- Home
- Basic embroidery stitches
- Stitch a French Knot
FRENCH KNOT TUTORIAL
Tired of Your French Knots Slipping Through The Fabric or Canvas?
A patient, step-by-step approach that finally makes those little knots behave, from someone who's been in the tangled-thread trenches.
We've All Been There
Sound familiar? You pull your needle through the fabric or canvas, expecting a neat, perky little dot, but instead you get... a tangle. A loose loop. A sad, droopy bump that looks more like tangled fishing line than an elegant stitch. Or you can't see anything because the knot has pulled through to the back of your work.
Believe me, I've been there. I used to stare at my hoop in defeat, wondering how everyone else made it look so easy while my work was a field of wonky knots.
If you're feeling that frustration, let me tell you something: you don't lack talent. You just haven't been shown the right approach to french knot embroidery yet. If you are new to hand embroidery, our beginner's guide covers everything you need to get set up before tackling individual stitches.
It's not about having "magic hands." It's about slowing down and giving yourself permission to doodle with knots.
French Knot Frustrations? You're Not Alone
If your French knots are misbehaving, here are the four most common problems and what to do about them.
Knot Pulls Straight Through
What's happening: Your needle is going back into the same hole it came out of.
The fix: Always re-enter the fabric one or two threads away from where you came up. Even a tiny gap is enough to anchor the knot.
Knot is Loose or Floppy
What's happening: You let go of the tension too early.
The fix: Keep gentle, steady tension on the working thread all the way through the pull. Only release once the knot sits snug against the fabric.
Messy or Uneven Wraps
What's happening: Wrapping too quickly, or too far from the fabric surface.
The fix: Slow down. Wrap close to the fabric, not halfway up the needle. Neat wraps make neat knots.
Knot Too Small or Disappears
What's happening: Not enough wraps, or too few strands of thread.
The fix: Try two wraps instead of one, or add an extra strand to your needle. Both will give you a plumper knot.
Don't worry if you recognise more than one of these. Most of us have hit all four at some point.
From Rushing to Relaxing
My "aha!" moment didn't come from a fancy tool or a complicated tutorial. It came when I stopped trying to make a project and started to just play with french knot stitches.
For 15 minutes each evening, I would just sit and make knots. No pressure. No pattern. I called it my knot-doodling time. Slowly, patiently, something started to click.
The Simple 4-Step Rhythm for Perfect French Knots
Let's break down the motion that finally worked for me. Think of it as a gentle, four-step rhythm. I've used a chunky thread here so you can easily see what my hands are doing in the photos below the steps.
Come Up for Air
Bring your needle up through the fabric exactly where you want your knot to live. Easy.
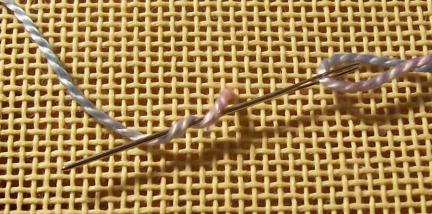
Wrap, Don't Strangle
With your other hand, hold the thread taught (but not tight!). Wrap it once around your needle for a small knot, or twice for a slightly chubbier one.
Find a New Home
Here's the most important part! Insert the tip of your needle back into the fabric right next to where you came up, but not in the very same hole. Give it a little space, just a fabric thread or two away.
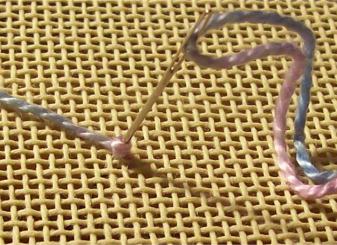
A Slow, Gentle Pull
Keep holding the wrapped thread taut with your other hand as you slowly and smoothly pull the needle all the way through to the back. A nice, even motion is all you need.
That's it. That's the whole dance.
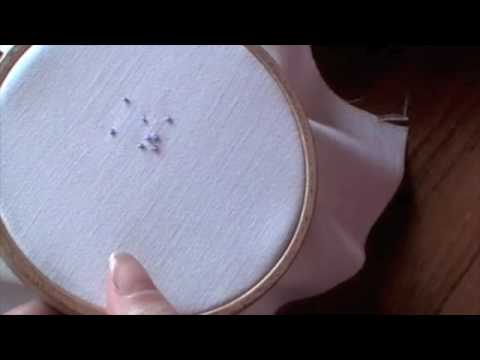
Now Watch the slow, steady rhythm in action. No rushing needed!
What Fellow Stitchers Are Saying
"This is the best video that I have found to teach French Knots. Worked first time and consistently :) Thank You so much"
"Thank you very much! This is the only tutorial that really worked for me :)"
"French knots have been very confusing to me for ages, but this video has made them a lot clearer. Thank you again!"
My Top 3 French Knot Secrets
During my nightly knot-doodling sessions, I ran into every problem imaginable. These three little secrets were the ones that made the biggest difference. French knots are one of the most versatile stitches in surface embroidery. Once you have them down, try them scattered across a crazy quilt block for texture.
Give Your Knot Some Space
When you put your needle back down, never go back into the exact same hole. Moving over by just one or two threads of the fabric gives the knot something to grip onto, so it sits proudly on top.
Shorter is Sweeter
Work with a shorter length of thread, about the length from your fingertips to your elbow (12–18 inches). It's far less likely to tangle and makes maintaining even tension a breeze.
Find a Little Mantra
Say a three-part mantra as you stitch: "Wrap… anchor… pull." This simple verbal cue keeps your hands and mind focused on a steady, consistent rhythm.
Controlling the Size of Your French Knots
Once you've got the basic stitch down, you can start playing with knot size. Two things control it: wraps and strands.
Wraps
1 wrap gives you a tiny, tight dot. Perfect for small details like eyes or seed-like textures.
2 wraps is the standard French knot. This is what most patterns mean when they say "French knot."
3 wraps can work, but the knot starts getting bulky and harder to keep tidy. If you want something bigger, try adding more strands instead of more wraps.
Strands
More strands in your needle means a fatter knot, even with the same number of wraps. Two strands with two wraps is a reliable combination for most surface embroidery. For cross stitch on Aida, one or two strands is usually enough as the weave holds the knot in place.
Where French Knots Work Best
French knots turn up everywhere once you start looking for them.
Flower Centres
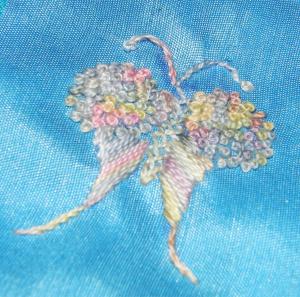
The classic use. A cluster of knots fills the middle of a lazy daisy or satin-stitched petal beautifully.
Scattered Texture and Fill
Groups of French knots create a bumpy, organic texture that's perfect for sheep's wool, lavender sprigs, or a field of tiny wildflowers.
Small Details
Eyes on animals or figures, berries, buttons on clothing, dots on fabric patterns.
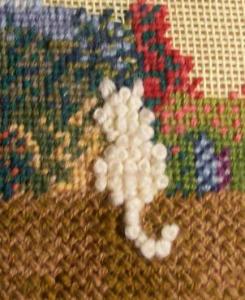
Cross Stitch Accents
A single French knot on a cross-stitch piece adds a tiny 3D pop, often used for eyes or small decorative dots.
If you find yourself wanting knots bigger than two or three wraps can give you, have a look at the colonial knot. It's a close cousin that handles bulk much better.
Your Tidy Knots are Waiting
Two years ago, I would have avoided any pattern that had French knots. Now, they're one of my favorite ways to add texture and detail.
Every wonky knot you make today is teaching your hands something. It's not a sign of failure; it's the foundation of your future skill.
It doesn't come from a flash of talent, but from the quiet, happy rhythm of patient practice.
Ready for more stitches? The bullion stitch is another wrapped stitch that builds on the same hand rhythm you have just learned. Or explore the full basic embroidery stitches collection.
You might like these
Couching Stitch Embroidery: Types, Techniques & Designs
Explore couching stitch embroidery with easy step-by-step photos. Discover different types, creative designs, and add stunning texture to your projects.
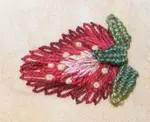
Lazy Daisy Stitch Embroidery: How to Stitch a Sweet Strawberry
With our how-to guide, you'll learn that lazy daisy stitch is not just for flowers! Get creative and stitch a sweet strawberry project
Learn stem stitch and variations of this basic embroidery stitch
This stem stitch tutorial covers the basic stitch, raised stem and portuguese knotted stem. Videos explain how to work the stitches.
Stay connected between projects
If you’d like occasional updates from my embroidery room, including new patterns, gentle tips, and little things I think you might enjoy, you’re warmly invited to join the Stitchin’ Times newsletter.
About Me - Contact Carol - Privacy Policy - Site Map - Testimonials
Please do not copy the content of this site. It is protected by Copyscape.
Copyright © 2006- www.needlework-tips-and-techniques.com All rights reserved