- Home
- Designing
CROSS STITCH DESIGN
Designing Cross Stitch on a Computer: Why It Changed Everything
From graph paper frustration to creative freedom — discover the practical benefits of designing your needlework on screen.
How I Got Started
If you haven't tried designing cross stitch or blackwork on a computer yet, you're in for a treat.
I started designing the old-fashioned way — with graph paper, coloured pencils, and more eraser crumbs than I care to admit. Every motif drawn by hand. Every border counted and recounted. I remember the frustration of drawing little trees down one side of a sampler and then finding they didn't match up at the top — I should have left four squares between each one, not three.
And don't get me started on gluing slips of paper together to position text, or holding a mirror in one hand while trying to draw a mirror image of a motif with the other. It worked, but it was slow — and there were moments when the kitchen table looked like a craft shop had exploded.


Then I discovered charting software. And honestly? I haven't touched a piece of graph paper or a glue stick since.
I'm not an advocate of letting the computer do all the work — scanning in a photo and asking the software to convert it rarely gives you something you'd actually want to stitch. The results tend to be enormous, use far too many colours, and you'd need a whole room just to store your threads.
But as a design tool? It's wonderful. Here's why.
Why a Computer Makes Designing Easier
Whether you're planning a cross stitch sampler, a blackwork panel, or anything in between — these five features alone make computer designing worth trying.
The Magic Undo Button
Wouldn't it be nice if real life had an undo button? On paper, a mistake means erasing — or gluing a new piece of paper on top and redrawing the whole section. On screen, one click and you're back where you were — free to try that leaf in a different colour or position, time and time again.
Borders & Mirror Images
Remember those little trees I mentioned? Draw one motif, copy and paste it to form an entire border in seconds — perfectly spaced every time. And mirror images that used to need an actual mirror and a steady hand? One click.
Adding Text to Designs
I used to draw text on a separate slip of paper, count to find the middle of both sheets, and glue it in place. On a computer? Just pick it up and move it. The software can even centre everything automatically. All that counting and gluing — gone.
Blackwork Fill Patterns
Drawing a blackwork fill pattern by hand can take as long as stitching it! Save a fill as a reusable pattern and apply it to any shape with one click. This feature alone has saved me many hours.
Preview Your Finished Piece
See how your design will look before stitching a single thread. Don't like it on cream? Try blue. The software will estimate how much thread you'll need, pick suitable symbols for your chart, and — best of all — print it as large as your eyesight requires. No more squinting.

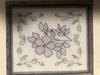
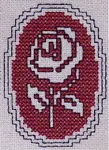
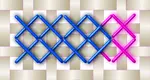
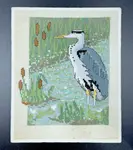
A colourful blackwork design — created entirely on screen
Ready to Try Computer Designing?
Perhaps you want to start your own needlework business, or maybe you'd simply like to adapt some of the patterns you've bought. Either way, if you already have a computer, you have everything you need to begin.
There are several cross stitch and embroidery design programs available — some free, some paid. Popular options include MacStitch (for Mac) and WinStitch (for Windows), but there are others too. What matters most is finding one that suits the way you like to work.
My honest advice? Start simple. You don't need the most expensive software to create lovely designs. Many stitchers begin with graph paper to learn the basics of charting, then move to software when they're ready for more flexibility. There's no rush — and no wrong starting point.
Caught the designing bug? My ebook Stitch Your Own Business walks you through every step from your first chart to building a pattern business — with all the hard-won lessons I picked up along the way.
Your Design Questions — Answered
Over the years, visitors to this page have shared their design stories, questions, and tips. Click through to read the full discussions — you might find the answer to something you've been wondering about too.
Old Charts to New — Breathing new life into older designs
Basic 101: How to Use MacStitch — Getting started with the software
How Do I Become a Better Cross Stitch Designer? — Tips for improving your design skills
Problem with Where to Start — Overcoming that blank-page feeling
Charting a Digitized Image — Working from photos and scanned artwork
Design Libraries in MacStitch and WinStitch — Organising your motif collections
Converting a Wedding Invitation to Cross Stitch — A beautiful personalised project
Backstitch and Outlining in WinStitch — Adding detail to your designs
Bitten by the Designing Bug — When the creative spark catches fire
Budding Cross Stitch Designer Needs Advice — First steps and encouragement
Tips for Exporting MacStitch Charts — Getting print-ready results
Want to Turn Your Designs into a Business?
My ebook Stitch Your Own Business covers every step — from your first chart to pricing, marketing, and building a website that brings customers to you.
It's 121 pages of practical, no-fluff guidance from someone who's been through it all — the wins and the wobbles.
£19.95 · Instant PDF download · 8-week guarantee
Ready to Design Something Beautiful?
Whether you start with a pencil and graph paper or dive straight into software, the important thing is to begin. Your first design doesn't need to be perfect — mine certainly wasn't.
Every beautiful pattern began as a blank grid and an idea.
You don't need to be an artist. You need an idea, a grid, and a stitcher's eye for what will look beautiful when it's finished.


You might like these
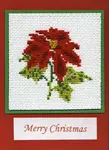
Cross Stitch Card Making Ideas: A Fun Finishing Technique
See inspiring card making ideas from fellow stitchers! This guide shows you how to mount your cross stitch on a card for a beautiful, finished look.
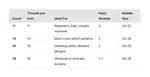
Aida Cloth Guide: Compare 11, 14, 16 & 18 Count (With Chart)
Which Aida count is right for you? Compare 11, 14, 16 and 18 count with a video guide, stitch chart, and needle and floss recommendations for each.
Embroidery and cross stitch videos
Links to my embroidery and cross stitch videos


Stay connected between projects
If you’d like occasional updates from my embroidery room, including new patterns, gentle tips, and little things I think you might enjoy, you’re warmly invited to join the Stitchin’ Times newsletter.
About Me - Contact Carol - Privacy Policy - Site Map - Testimonials
Please do not copy the content of this site. It is protected by Copyscape.
Copyright © 2006- www.needlework-tips-and-techniques.com All rights reserved