- Home
- Basic embroidery stitches
- Raised Buttonhole Stitch
STUMPWORK TECHNIQUE
Raised Buttonhole Stitch Flower: Your Step-by-Step Guide to Beautiful 3D Blooms
One simple stitch, worked in a spiral, creates flowers that literally rise off the fabric.
You Already Know Buttonhole Stitch. This Just Adds a Little Magic.
If you can work a blanket stitch, you can do this. The raised buttonhole stitch flower uses exactly the same looping motion, but instead of stitching into the fabric, you wrap around a simple cross stitch base. The result is a plump, textured flower that sits proudly above your work.
It looks impressive. It feels satisfying. And the technique is far simpler than the finished result suggests.
You will need your fabric held in an embroidery hoop or frame to keep both hands free. Then it is just a case of following the spiral, one stitch at a time.
STEP BY STEP
Working the Raised Buttonhole Stitch Flower
Follow along with the photos below. I have marked the stitch points with a disappearing ink pen to make the steps easier to follow. There is no need to write letters on your own project.
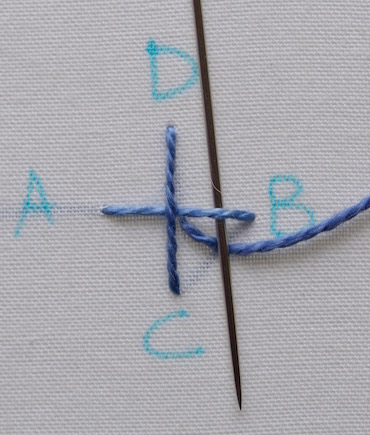
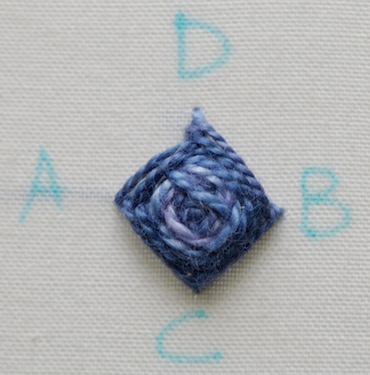
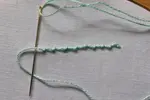
Step 1: Create Your Cross Stitch Base
Start by making an upright cross stitch: work a vertical stitch (a to b) then a horizontal stitch (c to d).
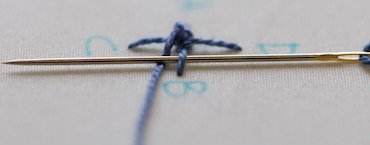
Bring your needle back up in the centre. Take it under the strand of thread labelled B, keeping the working thread under the point of the needle, and work a buttonhole stitch.
The needle does not go through the fabric here. It slides under the horizontal part of the cross stitch only.
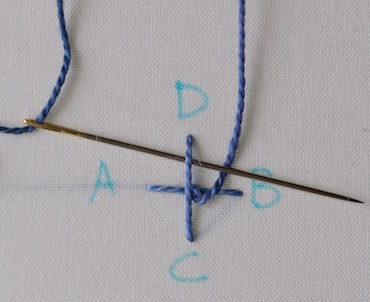
Step 2: Begin the Spiral
Now work in an anti-clockwise direction. Take your needle under the thread leading to point D in the photo. Keep the working thread under the needle and work another buttonhole stitch.
Gently pull each stitch towards the centre of your flower as you go, until it sits snugly against the base.
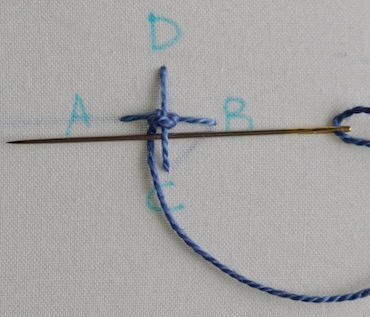
Step 3: Continue Around the Spokes
Keep going in the same manner, working around the "spokes" of your flower, creating a buttonhole stitch over each one.
You may find it easier to turn your fabric as you go. I kept the camera angle consistent so the photos would be easier to follow.
Remember to pull each stitch gently to snug it up around the centre. I am using a hand-dyed perle 8 thread for this flower.
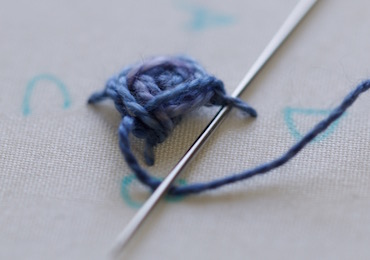
Step 4: Complete the First Circuit
You can see the circular flower shape appearing in the centre now.
After you complete the first circuit of the cross stitch threads, continue around and around, packing in your buttonhole stitches carefully.
Watch your tension here. You want the stitches to sit comfortably in a spiral, not bunching up or looking straggly. It can take a little practice to find the sweet spot.
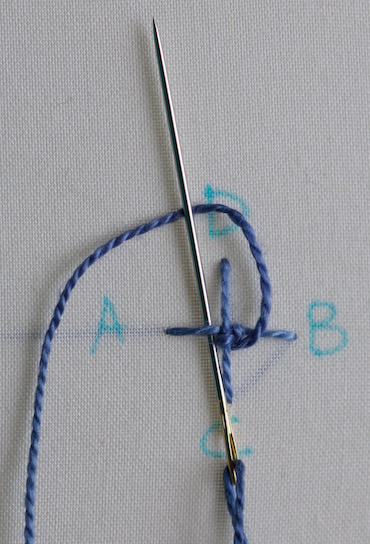
Step 5: See How the Needle Moves
I took this photo from a lower angle so you can see exactly how the needle slides under the "spoke" and over the working thread.
This is the same motion every time. Once you have it, you just repeat it around and around.
Step 6: Build Up the Flower
You can see from this photo how the stitches wrap around the previous ones, increasing the diameter of the flower with each circuit.
Relax your tension a little as you get closer to the outside edge. There is still plenty of room for more stitches here.
Step 7: The Finished Flower
Here is the completed raised buttonhole stitch flower. Quite by chance, the lighter tones of the hand-dyed thread settled in the centre, surrounded by the darker shades. I think it looks quite effective.
To finish, take your needle down through the fabric just beyond the last round of stitches and secure your thread on the back.
THREAD VARIATIONS
Try Different Threads for Different Effects
The raised buttonhole stitch flower works beautifully in a range of threads. Each one gives a slightly different texture and feel. Here are three to try.
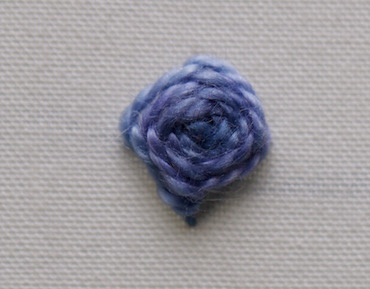
Hand-Dyed Perle Cotton
The same blue thread as the tutorial, photographed without the guide markings. The colour variations in hand-dyed thread create lovely shading.
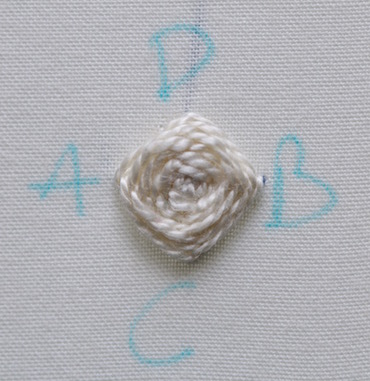
Plain Perle 8 Cotton
A single colour gives a cleaner, more structured look. Perfect for whitework or when you want the texture to do all the talking.
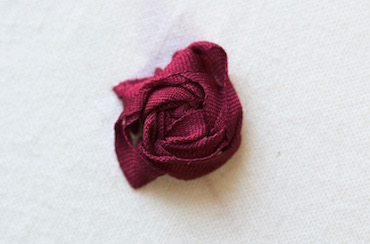
4mm Silk Ribbon
Silk ribbon creates a softer, more romantic flower with a lovely drape. A beautiful option for ribbon embroidery projects.
HELPFUL TIPS
Getting the Best Results
Quick Tips for Success
- ✓ Use a hoop or frame. You need both hands free for this stitch, so secure your fabric first.
- ✓ Turn your fabric as you go. It is much easier to work each spoke from a comfortable angle than to twist your wrist.
- ✓ Watch your tension. Snug in the centre, slightly relaxed toward the edges. Too tight and the flower buckles. Too loose and it looks untidy.
- ✓ Try different threads. Perle cotton, stranded cotton, silk ribbon, even fine wool. Each gives a different texture and scale.
- ✓ Practice on a spare piece of fabric. Your second flower will be noticeably better than your first. Give yourself permission to experiment.
KEEP EXPLORING
Ready to Try More Stitches?
The raised buttonhole stitch flower is just one of many textured techniques you can add to your work. Here are a couple of places to go next.
Looking for flower stitches? Try 3 easy flower stitches for beginners, lazy daisy stitch, or satin stitch. For stem and outline stitches, see hand embroidery stitches for stems.
You might like these
A Beginner’s Guide to the Coral Knot Stitch for Textured Embroidery
Learn how to embroider the coral knot stitch with this easy, step-by-step guide. Perfect for beginners who want to add beautiful, bumpy texture to their work!
Which hand embroidery stitches are best for stems and twigs
A selection of hand embroidery stitches that are ideal for outlining shapes or stitching stems, branches, twigs, vines and even seaweed.
How to Do Herringbone Stitch: Embroidery Step-by-Step
Step-by-step herringbone stitch tutorial for hand embroidery. Clear photos show how to keep stitches neat and avoid tangles. Includes variations.

Stay connected between projects
If you’d like occasional updates from my embroidery room, including new patterns, gentle tips, and little things I think you might enjoy, you’re warmly invited to join the Stitchin’ Times newsletter.
About Me - Contact Carol - Privacy Policy - Site Map - Testimonials
Please do not copy the content of this site. It is protected by Copyscape.
Copyright © 2006- www.needlework-tips-and-techniques.com All rights reserved