- Home
- Basic embroidery stitches
- Chain Stitch
EMBROIDERY STITCH TUTORIAL
Chain Stitch Tutorial — Little Fishy (Beginner-Friendly)
Learn six chain stitch variations while stitching an adorable little fish — with clear steps and simple defaults
If you've ever saved a dozen embroidery tutorials… then sat down with your hoop and thought, wait—where do I even start? you're in the right place.
In this tutorial you'll stitch an adorable little fish while learning six beginner-friendly variations of chain stitch—with clear steps, simple defaults, and a finished result you can actually feel proud of (even if your stitches aren't perfect yet).
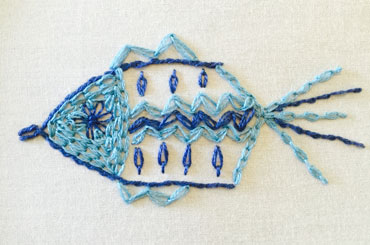
What you'll make: a small fish motif you can add to a patch, tote, shirt pocket, or sampler.
What you'll practice: basic chain, twisted chain, zig-zag chain, cable chain, and detached chain (lazy daisy) + a detached chain tail.
What you'll need (minimum): fabric in a hoop, an embroidery needle, and two shades of stranded embroidery floss (I used 2 strands throughout).
Quick Permission (because beginners need it)
If your first stitches look a little uneven, that's normal. Chain stitch gets prettier as you settle into a rhythm — you're not "bad," you're just warming up.
So grab your hoop, pick your two colours, and let's stitch this little fishy step by step.
What Do You Need
You can make this fish with a very small setup:
- Embroidery hoop (any size that fits the fish comfortably)
- A piece of firmly woven cotton or linen for hand embroidery.
- Embroidery needle — with a sharp point
- Two shades of stranded embroidery floss
Nice to have (but optional)
A water-soluble pen or pencil to mark the pattern (and optional dots for even stitch spacing)
Small, sharp scissors
Pattern
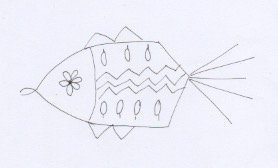
Printable pattern
Printable pattern: Print this page, then transfer the design onto your fabric.
Iron-on transfer: quick and clean if you have a transfer pencil to draw with.
Other transfer methods: tracing, lightbox/window, or water-soluble pen all work too. (If you're not sure which method to use, start with the simplest option you already have — you don't need "perfect" tools to get a good result.)
Learn more about iron-on transfers and other methods of getting your pattern on the fabric.
Before You Start
- If your floss keeps twisting or knotting, let your needle dangle for a second every so often to untwist.
- If your first stitches look uneven, keep going for a few minutes — chain stitch usually evens out once you find your rhythm.
Stitch Help
This tutorial focuses on chain stitch variations.
Lazy daisy stitch — (used for the eye and decorations) is also explained on the page above.
- basic chain stitch (opens a new page)
- twisted chain stitch
- zig-zag chain
- cable chain
- detached chain (opens a new page)
- detached chain stitch with tail
You're Ready — Let's Begin
You've got your fabric hooped, your pattern transferred, and your floss sorted. Everything from here is hands-on — one stitch at a time.
Wobbly stitches at the start are completely normal.
What matters is you keep going long enough for your hands to find the rhythm — that's how embroidery gets easier.
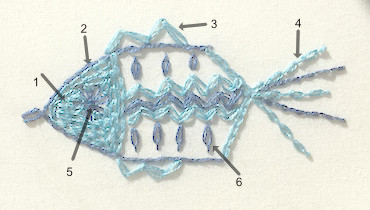
Twisted Chain Stitch Outline
We will use twisted chain stitch for:
- the dark blue outline of the fish (body and head), and
- the two dark lines in the tail.
Set up
Thread your needle with 2 strands of embroidery floss.
2 strands = separate the floss into six single strands, then stitch using two together.
Hoop tip: If you're working in a hoop, don't stretch the fabric drum-tight. A little "give" helps the stitch sit neatly.
Stitch the outline
Start at the back of the body and work around the outline toward the mouth.
Fig 1 — Twisted chain stitch
- Bring your needle up at the start of the outline.
- Insert it back down right next to where you came up, then bring the needle tip back up about 5mm further along the outline.
Important: don't pull the needle all the way through yet — leave a loop on the surface. - Take your working thread (the thread attached to your needle — not the tail end) and pass it across the needle and under the tip to create the twist.
- Now pull the needle through gently. You'll see the twisted loop form.
What "good" looks like: aim for stitches that are roughly the same length. They don't need to be identical — consistent is the goal.
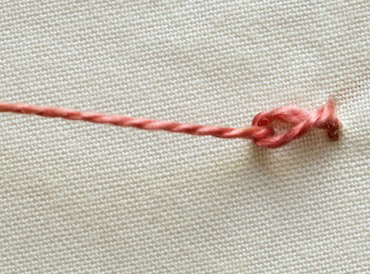
Fig 2 — Twisted chain stitch
This next photo shows how your work will look at this point. It almost resembles a little fish itself, doesn't it?
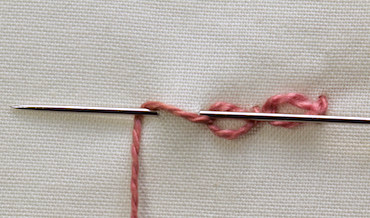
Fig 3 — Twisted chain stitch
Continue around the fish. Repeat the same steps as you follow the outline around the body and head.
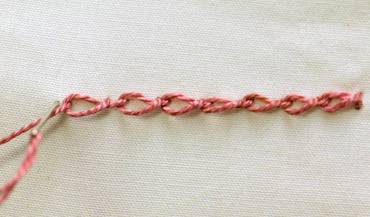
Fig 4 — Twisted chain stitch
Here is my finished row of twisted chain stitch in the sample thread.
When you have outlined the body and head, also stitch the two lines of twisted chain in the tail.
Don't be afraid to practice on spare fabric before working on your fish.
Mouth (so it looks open)
When you reach the mouth, you'll get a cleaner "open mouth" if you stitch the top and bottom separately:
- Finish the top lip, then fasten off (secure the thread on the back with 2–3 tiny stitches and trim).
- Start again for the bottom lip so there's a small gap between the lines.
Tail lines
When the outline is done, stitch the two tail lines in twisted chain stitch as well.
Zig Zag Chain Stitch Decoration
We'll use zig-zag chain stitch for:
- the decoration inside the fish's body, and
- the fins.
This stitch looks fancy, but it's basically a chain stitch that "locks" into the previous stitch to keep the angles crisp.
Prep (this makes it 10× easier)
If you want your zig-zags to look even, mark two rows of small dots first:
- a top row (for the "peaks")
- a bottom row (for the "valleys")
Try to space them evenly — perfection isn't required, but consistency helps.
Zig-zag chain — step by step
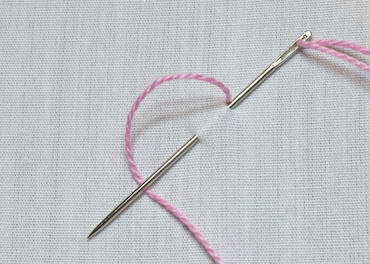
Fig 1 — Zigzag chain
- Anchor the thread: take two tiny stitches in place to secure your floss.
- Bring your needle up at your first top dot.
- Insert the needle down right beside the thread, and bring the tip up at the next bottom dot.
- Pass the working thread under the needle, then pull through to form your first loop.
The "secret" that makes it zig-zag
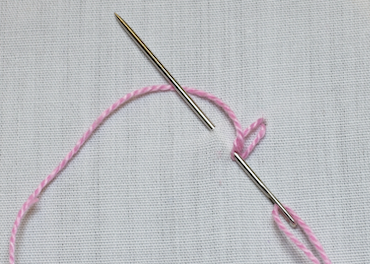
Fig 2 — Zigzag chain
To keep the angles neat, you'll pierce the thread of the previous stitch each time you start the next one.
- For the next stitch, take your needle down through the thread/loop of the previous stitch (this is what holds the shape), then bring it up at the next top dot.
- Pass the working thread under the needle and pull through.

Fig 3 — Zigzag chain
Now repeat:
- down through the previous stitch,
- up at the next dot on the opposite row,
- thread under needle,
- pull through.
Finishing the row
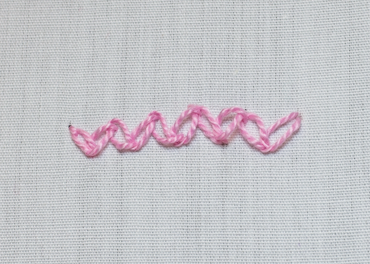
Fig 4 — Zigzag chain
When you reach the end, take the needle down just outside the last loop to secure it neatly on the front.
Here is my finished row of zigzag chain stitch.
Where to stitch it on the fish. Work three rows of zig-zag chain inside the fish's body, alternating colours if you like (it adds a lot of charm with very little effort).
Optional note: A stitch that creates a similar look is herringbone stitch — but zig-zag chain is usually easier for beginners to control.
Cable Chain Stitch Tail
The turquoise lines in the tail use cable chain stitch. From a distance it looks like a neat row of chain links — one of those stitches that looks complicated, but becomes straightforward once you do the first few.
Prep (worth it)
Mark a line of evenly spaced dots (pencil or water-soluble pen). Keeping the spacing consistent makes the "links" look tidy.
Start with one normal chain stitch
Begin your row with a regular chain stitch on your line.
Cable chain = alternate "chain" + "link"
After that first chain stitch, you'll repeat a two-step pattern:
- make a regular chain stitch
- make a tiny "link" stitch that holds it in place
Step 1 — Make the first "link"
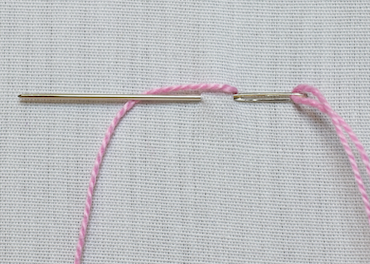
Fig 1 — Cable Chain
The part that makes it cable:
- Take your needle to the back just outside the loop of the chain stitch you just made.
- Wrap your working thread around the needle once.
- Pause: don't pull the needle all the way through yet.
What you're aiming for: this wrap forms a small knot-like link that sits between the chain stitches.
Step 2 — Bring the needle up at the next dot

Fig 2 — Cable Chain
- Bring the needle tip back up at the next dot along your line.
- Pass the working thread under the needle tip, then pull through gently.
You've just made:
- the little "link" (knot) that locks the previous chain, and
- the next chain stitch beginning.
Repeat along the tail line
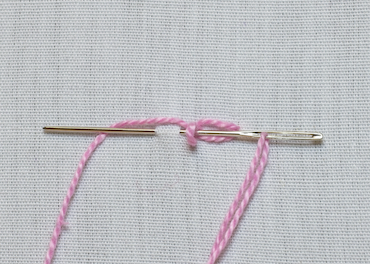
Fig 3 — Cable Chain
Continue down the line repeating the same rhythm:
- regular chain stitch
- link/knot stitch
- regular chain stitch
- link/knot stitch
Quick checkpoint (so you know it's working)
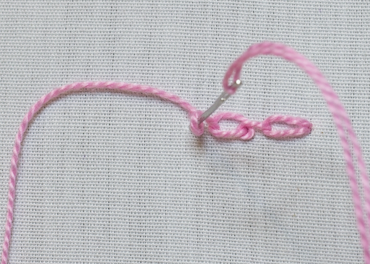
Fig 4 — Cable Chain
Repeat the normal chain and knotted chain in between along your row.
When you look from above, you should see:
- chain loops in a row, with
- small "links" (tiny knots) sitting between them like connectors.
If it looks messy at first (common beginner hiccup)
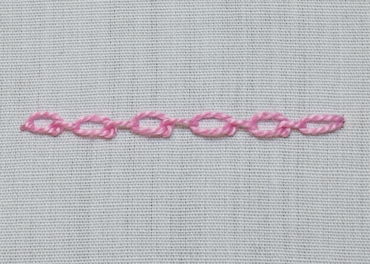
Fig 5 — Cable Chain
- Links too big? Pull the wrap snugger before you bring the needle up at the next dot.
- Fabric puckering? Ease up on tension and make sure the fabric isn't drum-tight in the hoop.
- Spacing uneven? That's exactly what the dots are for — re-marking is allowed.
Detached Chain With a Tail
We'll use detached chain with a tail to make the little tree-like shapes inside the fish's body.
If you already know detached chain (lazy daisy), this is the same stitch — you'll just make a slightly longer tie-down stitch to create the "tail."
Step by step
Bring your needle up where you want the loop to start.
Insert the needle back down right next to where you came up, and bring the tip back up a short distance away (where you want the loop to end).
- Don't pull tight — leave a loop on the surface.
Pass your working thread under the needle, then pull through gently to form the loop.
To hold the loop in place, make a small straight stitch over the end of the loop (this is the tie-down stitch).
For the "tail," simply make that tie-down stitch a little longer so it extends past the loop like a tiny stem.
What good looks like
- The loop should sit flat (not twisted), like a petal/leaf.
- The tail stitch should be straight and light — it's a detail, not a tug.
The Fish's Eye and Head
The eye (lazy daisy "flower")
For the eye, use detached chain stitch (lazy daisy) to make a small flower of petals.
Thread choice (so it actually shows up)
- Use 2 strands if you want the eye to be bold and clearly visible (especially on textured fabric).
- Use 1 strand only if you want a subtle, delicate look.
How to place it neatly
If you tend to stitch off-centre, mark a tiny dot for the eye's centre first — it makes the petals much easier to space evenly.
Fill the Head
Once the eye is done, fill the rest of the head with rows of basic chain stitch.
Two tips that make it look tidy:
- Keep your chain stitches roughly the same length (consistent beats perfect).
- Place each row snugly next to the previous one, but don't pull so tight that the fabric puckers.
If your rows look a bit gappy at first:
That's normal — you can close gaps by slightly adjusting stitch length on the next row. No one will notice once it's filled.
You Did It!
You've just stitched a whole set of chain stitch variations into one finished little fish — that's a lot of skill in one small project.
Take It One Step Further
Now that you've learned these chain variations, you can use them in all sorts of ways:
- change the colours and stitch another fish (a whole school looks brilliant),
- turn this motif into a patch or pocket detail,
- or swap the fish shape for any outline you like and fill it with these same textures.
Browse my other free embroidery designs →
And if you make a little fishy, share it — I'd love to see your colour choices and stitch variations.
You might like these
Which hand embroidery stitches are best for stems and twigs
A selection of hand embroidery stitches that are ideal for outlining shapes or stitching stems, branches, twigs, vines and even seaweed.
Basic Embroidery Stitches for Beginners - Simple Guides and Tips
Learn basic embroidery stitches with easy-to-follow tutorials and practical tips. Perfect for beginners looking to add a creative touch to their projects
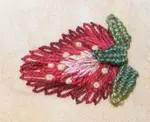
Lazy Daisy Stitch Embroidery: How to Stitch a Sweet Strawberry
With our how-to guide, you'll learn that lazy daisy stitch is not just for flowers! Get creative and stitch a sweet strawberry project

Stay connected between projects
If you’d like occasional updates from my embroidery room, including new patterns, gentle tips, and little things I think you might enjoy, you’re warmly invited to join the Stitchin’ Times newsletter.
About Me - Contact Carol - Privacy Policy - Site Map - Testimonials
Please do not copy the content of this site. It is protected by Copyscape.
Copyright © 2006- www.needlework-tips-and-techniques.com All rights reserved