- Home
- Needle Felting
Needle Felting 101: A Beginner's Guide to Sculpting with Wool
 A selection of my needle felted animals
Discover the fun and addictive world of needle felt, a craft that transforms wool fibers into shapes and sculptures using special needles. Let's explore the basics and helpful tips to start your needle felting journey.
What is Needle Felting?
Needle felting is a beginner-friendly way to “sculpt” with wool—no water or soap needed.
It’s a dry felting technique where you repeatedly push a barbed (notched) needle into loose fibers. Those little barbs catch the wool as the needle enters and shift fibers through the mass. With each poke the wool tangles tighter, compresses more, and even shrinks slightly.
Because the wool firms up in the areas you needle most, changing your angle and focus helps you build clean edges, curves, and small details.
Basic Equipment Needed
To get started with needle felting, you will need three essential pieces of equipment: notched needles, unspun wool fleece, and a needle felting surface.
Notched needle felt needles
Notched needles vary in length, strength, shape, and the number and position of the notches.
Each type of needle has a specific function in transforming raw wool into needle felt. Triangle, star, twisted or spiral, and reverse needles each contribute differently to the process.
To start, use longer, thicker needles that can penetrate deeper into the wool and capture more fibers.
As the wool compacts, switch to finer needles to smooth the surface and eliminate "fuzzies." For a fuzzy effect, use a reverse needle, which pulls fibers out of the work.
Needle felting is relaxing, but it does involve poking these sharp needles over and over, so it’s normal to worry about your fingers at first.
Working slowly and keeping your hands out of the needle’s path helps, and many felters also wear finger protection (like rubber or leather finger guards/thimbles) because accidental punctures can happen.
 A close up of the notches in the tips of felting needles
Needle holders
Because felting needles were first designed for industrial machines, holding a single bare needle can feel fiddly or uncomfortable—especially during longer sessions.
That’s where a needle holder really helps: the grip is more comfortable, and a multi-needle tool can speed things up by working a wider patch of wool at once.
One useful thing to know, though, is that multi-needle holders don’t all feel the same—how many needles you load, and how close together they sit, changes your coverage, your speed, and how quickly the surface firms up.
 3 types of wool, needles and tools for needle felting
Needle felting surfaces
A good felting surface is one of the easiest ways to make needle felting feel safer and smoother.
A felting mat or base, often made from dense foam, gives you a poke-safe surface that cushions the needle and helps prevent it from striking the hard table below.
For beginners, two common options are high-density upholstery foam and a needle felting brush: foam is simple and soft under the needle, while the brush’s bristles let you work on top with a bit more airflow and comfort.
Types of Wool for needle felt
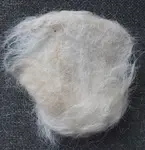
Unspun fleece
Unspun wool fleece comes in two main types: short fiber wool and long fiber wool.
Short fiber wool, such as core wool, is ideal for beginners due to its ease of felting and lower cost.
It is used for the center of your sculptures, with fibers laying in various directions to aid felt formation.
Long fiber wool, also known as tops, is combed so fibers run in the same direction, making them smooth.
They take more time to compact and are best used for surface work or wet felting.
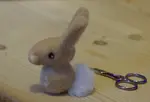
 Amy, my first needle felted doll who looks like she has rabbit teeth!
Wool from different sources
Sheep's wool varies! Some breeds produce softer fleece than others.
On one end of the scale are the Herdwick sheep, which have a coarse fleece, at the other is the Merino, which has extra soft wool. Each has its own purpose when creating felt.
Other breeds, such as the Wensleydale, have wavy fleeces. This is ideal for creating doll hair or animals with curly locks.
Other fibers for needle felt
You can felt fibers from other creatures, such as alpaca, camels, angora goats, and rabbits. Even dog fur will work if you blend it with wool.
I do suggest starting with wool though, for its ease of use.
Getting Started with Needle Felting
To begin a needle felting project, scrunch up the wool, place it on the surface, and start poking it with the needle.
If your needle ever snaps, it’s often from side-to-side pressure (bending the needle), or from hitting something hard underneath when your mat is too thin or worn. Using a proper felting mat and poking straight in and straight out, without pushing the needle sideways, helps reduce the risk of breakage.
With repeated pokes, the fibers tangle and tighten into a firm shape that you can build up and sculpt. If you want blended or realistic colors, you can mix wool first using hand carders or blending paddles.
This page will explain how to create basic shapes.
Mixing colors
When creating realistic sculptures, you may find it necessary to mix colors. To do this, you need two paddles or hand carders. These have wire "teeth" which grip hold of the fibers, helping them to align with each other and blend together.
Using a former
To shape the wool, wrap it around common household items like wooden spoon handles or skewers, which will serve as molds.
For smoother removal, consider sanding wooden items to prevent the wool from snagging.
Common Challenges and how to overcome them
Beginners may face several challenges, including uneven felting, accidental holes, difficulty shaping complex forms, and frustration with slow progress.
Solutions to these issues include using finer needles for smoothing, adding more wool to fix mistakes, breaking complex shapes into simpler parts, and being patient throughout the learning process.
Uneven felting
If your project has bumps or uneven areas, use a finer needle to smooth the surface. Be gentle and work evenly, focusing on the areas that need more attention. You can also roll the piece between your palms to help even it out.
Accidental holes or over-felting
If you make a mistake and create a hole or over-felt an area, you can add more wool to the spot and gently poke it with the needle to fix it. Use a small amount of wool at first, and add more if needed.
Difficulty shaping complex forms:
When working on more complex shapes, it can be helpful to break them down into simpler parts and gradually add smaller pieces to build it up using the felting needle.
Frustration with slow progress
Needle felting requires patience and practice to master.
If your initial projects aren't perfect, don't be discouraged. Enjoy the learning process, take breaks, and tackle smaller projects to build confidence and avoid burnout.
Remember, your skills will improve over time, allowing you to craft more intricate and detailed pieces.
Your first needle felt project!
Understanding potential challenges and applying these tips will equip you for successful needle felting.
With the right materials and equipment at hand, jump into this captivating hobby, starting with our needle-felted rabbit tutorial—beware, it's addictive!
Dedication and practice will enable you to craft intricate designs. Remember to share your creations and encourage others to explore needle felting. Enjoy your felting journey!
Learned something new?
Learned something new and exciting? Share this article with your friends and family who might be interested in needle felting. Let them join you in this creative journey!
You might like these
Needle Felted Bunny Tutorial — Step-by-Step for Beginners
Create a cute needle-felted bunny with this step-by-step beginner tutorial. Includes materials list, clear photos, ear & muzzle techniques, and finishing tips.
How to Needle Felt: Step-by-Step Tutorial for Beginners
How to needle felt from scratch: a beginner tutorial covering safety, equipment, technique, and your first flat felted shape with step-by-step photos.
Stay connected between projects
If you’d like occasional updates from my embroidery room, including new patterns, gentle tips, and little things I think you might enjoy, you’re warmly invited to join the Stitchin’ Times newsletter.
About Me - Contact Carol - Privacy Policy - Site Map - Testimonials
Please do not copy the content of this site. It is protected by Copyscape.
Copyright © 2006- www.needlework-tips-and-techniques.com All rights reserved