- Home
- Basic embroidery stitches
- Chevron Stitch
Chevron Stitch embroidery tutorial
Chevron stitch was the ideal solution when I wanted to represent a fishing net on my under-the-sea crazy quilt block.
It is, however, more common to use this hand embroidery stitch in a single row, where it can then be embellished with other stitches to form an attractive border or seam treatment.
Marking guidelines or dots
You may find that marking your fabric with a disappearing ink pen (or hard pencil) will help while learning this basic embroidery stitch..
You can do this in two different ways. I will be using the dots to demonstrate on this page.
- Mark two parallel lines, to form the top and bottom of your row of stitches
- Mark three equidistant dots on the bottom "line" and then three similar dots above and to the right of these, as shown in fig 2.
The distance between the top row and bottom row will affect the angle of your stitches, as will the spacing of your dots.
How to work Chevron Stitch in the hand
I photographed both the sewing method and stab stitch method of working this stitch for you.
Let's start with the sewing method for which you don't need a hoop.
Step 1
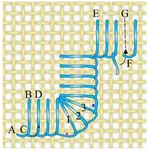
Bring your needle up at the first dot on the left of the bottom row.
Take it down again at the third dot and push the tip back up at dot 2, then pull the needle through.
Step 2
Move to the upper row of dots. Insert the needle point on the second dot of this group of three, and bring it up again at the first. Pull needle through.
Step 3
This time put your needle into the third dot of the first group of three, bring the point back up at point 2, and pull the needle through.
Step 4
Move down to the 2nd lower group of dots and scoop up the fabric from the second to the first dot onto the needle. Pull through. Continue in the same way across the row.
Working chevron stitch in an embroidery hoop
If you prefer to work in an embroidery hoop, then it is more practical to use the stab stitch method of hand embroidery. The fabric is kept taut in the hoop making it difficult to scoop up a "bite" of the fabric. The following photos show how each insertion of the needle is done separately.
Fig 11 shows the finished chevron stitch row that I demonstrated above. I used a hand-dyed twisted silk thread for this. I tend to find it works best with a twisted thread, as stranded floss can look a little untidy. Pearl cottons are a great choice, especially numbers 5 and 8.
I photographed this before the dots had disappeared. It can take up to 24 hours for this to happen, depending on your brand of pen.
Embellishing the basic stitch
There are many different ways you can embellish the basic stitch. I stitched a few examples in fig 12. First I used three detached chain stitches, next I worked three straight stitches and topped the middle one with a bunch of French knots.. The third uses just a single french knot. You could use a different color for the embellishment if desired.
You might like these
Basic Embroidery Stitches for Beginners - Simple Guides and Tips
Learn basic embroidery stitches with easy-to-follow tutorials and practical tips. Perfect for beginners looking to add a creative touch to their projects
Needlepoint Stitches: Choose the Right One for Stunning Designs
Struggling to choose the right needlepoint stitch? Get expert tips on selecting stitches for texture, direction, and style. Learn effortlessly
How to Turn a Corner with Blanket Stitch: A Step-by-Step Guide
Our guide on how to turn a corner with blanket stitch gives you the confidence to create polished, professional-looking edges you’ll be proud of every time.

Stay connected between projects
If you’d like occasional updates from my embroidery room, including new patterns, gentle tips, and little things I think you might enjoy, you’re warmly invited to join the Stitchin’ Times newsletter.
About Me - Contact Carol - Privacy Policy - Site Map - Testimonials
Please do not copy the content of this site. It is protected by Copyscape.
Copyright © 2006- www.needlework-tips-and-techniques.com All rights reserved