- Home
- Bullion Stitch
Bullion Stitch 101:
Learn the Basics and Beyond
How to work bullion knots - Bullion stitch roses - Bullion strawberries
Bullion stitch can add unique texture to your embroidery project.
When done correctly, bullion knots can create perfect little shapes, like roses or caterpillars, and give a 3D effect that makes your embroidery stand out. They can also add a sense of accomplishment when mastered.
The Trials and Tribulations of Bullion Stitch

However, bullion stitches or knots can be tricky to work.
They require patience and a steady hand, but even then, they can be uncooperative. It's easy to end up with a knotted mess instead of the desired stitch.
The tension of the thread is also critical, as it can affect the appearance of the knot. If it's too loose, the knot will be floppy, and if it's too tight, it will be stiff and unyielding. Achieving the right balance can be challenging.
Some threads are unsuitable for bullion knots and may split, fray, or break. Metallic, rayon, or silk threads can be particularly challenging to work with when first learning the stitch.
However, the satisfaction of getting them right is worth the effort. They challenge us to improve our embroidery skills and can add beauty to our work.
I Learned a Trick From an Expert
Years ago, I stood hypnotized by the rhythmic movements of an old woman's needle. She was creating bullion stitches with astonishing ease. Seeing my interest, she beckoned me over.
"My dear," she began, her eyes twinkling with the wisdom of years, "it's all about how you hold your fabric and a milliner's needle." Her fingers, gnarled with age yet delicate as a pianist's, showed me the slimmest needle I had ever seen.
That was when the puzzle pieces clicked into place, my own hands echoing her movements, finding the rhythm.
It might take a tad more effort than your regular stitch, but trust me, it will open up a world of possibilities. It's a stitch worth every ounce of your patience.
How to Work a Bullion Stitch

Use a single strand of embroidery floss.
Poke the needle up through the fabric at one end of the stitch.
Take a small bit of fabric onto the needle and come back up through the first hole.
The length of the stitch depends on the thread and desired knot size.

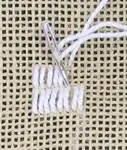
This picture shows how I learned to hold the needle and cloth to make nice, tidy bullion knots.
Push the needle almost all the way through the fabric, but not completely.
To keep it in place, press your thumb against the fabric near the needle and use your index finger to steady the thread wraps behind the needle.

Holding the thread with your other hand twist the thread around the needle at least six times.
Gently nudge the loops down towards the fabric and keep them in place with your index finger. Continue wrapping until you've got enough loops for the desired stitch length.
Check the wraps will make a long enough bullion by placing the needle along the stitch path.

If you are satisfied, use your thumb and index finger to ease the needle through the thread wraps and gently pull the needle free until the knot sits on top of the fabric.
Lay the fabric flat. nudge the knot into place, then poke the needle down through the fabric next to where the thread comes out.
Making a Bullion Loop
To make a bullion loop, wrap more thread around the needle than the space where it goes into and comes out of the fabric.
When you pull the needle through, the thread forms a twisty loop. This stitch is also called the coil stitch or caterpillar stitch.
I used bullion loops for the calyx on my strawberries further down this page.
How to Make a Bullion Rose

To create a bullion rose from three toning coloured threads:
Start with the darkest colour and make two bullion knots side by side

Use the medium-coloured thread to make longer stitches, focusing them around the centre two bullions.
Make each stitch overlap the previous one, creating a staggered pattern.

Continue making bullion knots around the centre, increasing the number of wraps for each stitch.
As you work, the stitches will start to take on a natural, curved shape.

When you're ready, switch to the lightest colored thread and make more bullion knots, using two strands of floss for added texture. Nestle these outside the previous stitches

Once finished, add a stem to the rose using a pencil and straight stitches. Make sure it's thick enough to look as though it could hold the rose, but not too chunky.
You might also want to add a leaf. There is a whole page on stitching leaves here.
Bullion Stitch Strawberries

I added bullion stitch strawberries to my quilt block using one strand of red thread.
Start with two bullion stitches, then add more rows, working down to the tip of the berry. Overlap each stitch in the centre to make the berries look plump. Aim for 6-8 bullion knots per berry.
This simple technique adds a charming touch to the quilt.
Adding the Strawberry Tops and Seeds
To finish the strawberry, I used a single strand of green floss to make a calyx on top. I made 3-4 bullion loops.
To make it look more lifelike, let some of the knots overlap the berry.
Wrap the thread enough to make a loop that's not too tight. If it's too loose, the berry looks squished.
For seeds, I used light yellow thread and French knots or colonial knots. You can also use black thread or other stitches. Dot them on top of the bullion coils.
Finally, I used a stem stitch in green to connect the strawberries.
This creates a simple and effective embroidery design.
Bullion Stitch Flowers

I love crazy quilt embroidery. This photo shows white bullion knots made into petals and surrounded by detached lazy daisy stitches with pearl seed beads. The bullion flowers are between mother-of-pearl buttons, which are attached with green thread and have a bead on top to look like another flower.
You could use bullion stitches to attach the buttons, making the whole piece a celebration of bullions and creativity.
If you want more ideas for stitching tiny flowers, there's a whole garden of ideas waiting for you here.
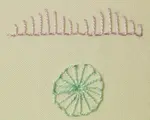
Bullion Starfish

I had an idea for an under-the-sea themed quilt block.
I used five bullion knots in a circle to create a starfish motif using crochet thread.
The bullion knot starfish turned out to be my favourite part. They show that sometimes, simple touches can make a piece special.
What Went Wrong?

The bullion stitch requires the needle to be inserted in a specific direction. If you do it wrong, the stitch will be uneven.
I made a mistake and inserted the needle from the outside instead of the centre, resulting in loose threads laying aside each bullion stitch. This is a common error and can be frustrating, but when it happens it's an opportunity to learn and improve.
Ready to Give Bullion Stitch a Try?
When learning the bullion stitch, you may face frustrations like tangled threads and uneven knots.
But with practice and persistence, you can master the technique and create beautiful designs.
The bullion stitch requires patience and skill, but the results are worth the effort.
With time and practice, you can create intricate designs like flowers, strawberries, or starfish.
Remember that mistakes are part of the process, and with time, you'll create stunning pieces.
Been There, Stitched That? Share Your Work!
Now it's your turn! Did you give the stitch a go? Did you discover a brilliant colour combination or have a little "aha!" moment of your own?
I would be so thrilled to see your creations and maybe even feature them here to inspire other stitchers. Seeing your work is the best part of my day!
Drop a photo and your story in the form below. Your experiments and questions are what make this little corner of the internet so special.
You might like these
3 Fun and Easy Blanket Stitch Variations to Learn
Ready to add some creative flair to your embroidery? Learn 3 fun blanket stitch variations! This simple guide shows you how to create the whipped stitch & more
Gobelin Stitch: A Comprehensive Guide for Needlepoint Enthusiasts
Master the Gobelin stitch! Learn step-by-step techniques, explore variations, and transform your needlework with expert tips.
Couching Stitch Demystified: Tips and Tricks for Perfect Results
Learn how to master couching stitch embroidery and add a new level of texture to your projects. Our guide has all the tips and tricks you need.
Stay connected between projects
If you’d like occasional updates from my embroidery room, including new patterns, gentle tips, and little things I think you might enjoy, you’re warmly invited to join the Stitchin’ Times newsletter.
No pressure. Just a friendly note now and then to keep you inspired.
About Me - Contact Carol - Privacy Policy - Site Map - Testimonials
Please do not copy the content of this site. It is protected by Copyscape.
Copyright © 2006- www.needlework-tips-and-techniques.com All rights reserved