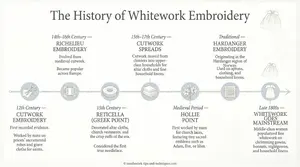
COUNTED THREAD TECHNIQUE
Pulled Thread Embroidery: Create Lace Without Cutting a Single Thread
A gentle introduction to pulled thread embroidery, with simple guidance for your first steps..
Pulled thread is one of the most beginner-friendly whitework techniques because you create lace-like openings with tension, without cutting the fabric.
Maybe you love the look of whitework samplers and heirloom embroidery, but the thought of cutting threads makes you nervous. What if you snip the wrong one?
Pulled thread gives you that same delicate, lacy effect in a much less intimidating way, which makes it a lovely place to start.
On this page I’ll show you what pulled thread embroidery is, what you need to begin, and the easiest tutorial to start with.
Here's the wonderful secret: pulled thread embroidery doesn't involve cutting anything. Not a single fabric thread gets snipped. Instead, you use tension, pulling your stitches firmly, to draw the fabric threads apart and create those gorgeous open, lacy patterns.
It's sometimes called drawn fabric or pulled work (but not drawn thread work, which is a different technique where you do cut threads).
If you can count threads and pull a needle, you already have the core skills. Everything else is just practice.
How Does Pulled Thread Work?
The magic is in the tension. When you work pulled thread stitches, you pull each stitch firmly, much more firmly than you would for regular embroidery. This draws the fabric threads together, creating small holes and open areas that let the light through.
The design isn't created by the thread colour (in fact, you usually match your thread to the fabric so the stitches virtually disappear). The beauty comes from the pattern of holes, the gaps where the fabric threads have been pulled apart.
Think of it like this: you're reshaping the fabric itself, using your stitches as the tool. The fabric becomes the design.
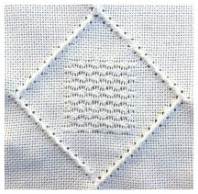
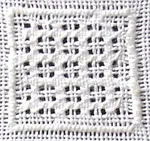
A beginner's pulled thread sample showing simple stitches with beautiful effect
Supplies for Pulled Thread Embroidery
Good news: you don't need much to get started. Four essentials, and you may already have some of them.
Thread
A single colour that matches your fabric as closely as possible. Use something strong: crochet thread, lacemaking thread, or pearl cotton all work well. Regular embroidery floss isn't ideal here, as it may not withstand the tension.
Clever trick: unravel threads from the edge of spare fabric and stitch with those. Perfect colour match, guaranteed.
Needle
A blunt-pointed tapestry needle. The blunt tip slides between the fabric threads without splitting them. This is essential for counted work where you need to move threads, not pierce them.
Fabric
A loose, evenly woven fabric so the threads can move easily under tension. Historical pieces used 50-count linen, but 28–36 count is much more practical (and far kinder to your eyes). The looser the weave, the easier the threads will pull apart.
Hoop or Frame
An embroidery hoop or frame to hold your work. You need your fabric taut enough to count threads clearly, but not drum-tight. You'll need some give to position your needle easily.
Getting Ready to Stitch
A few things to know before your needle touches the fabric. None of this is difficult, but it'll save you from the kind of frustration that makes people put their hoop down and not pick it up again.
Set Up Your Fabric
Place your fabric in the hoop with the threads lined up at right angles so you can see them clearly for counting. Here's the important bit: don't stretch it too tight. You need enough give to position your needle between threads easily. If the fabric feels like a drum, loosen it a notch.
Start Your Thread Carefully
Stray threads showing behind openwork is the classic pulled thread problem. One clever fix: trap the tail of your starting thread under the top ring of the hoop so it can't accidentally pull through while you begin stitching. It sounds simple, but it works beautifully.
Fasten Off Invisibly
When you've finished stitching, release the trapped tail and carefully pass it through the solid areas on the back, where threads have been pulled together. This hides the tail completely. Take your time here; rushed finishing is how loose ends appear in all the wrong places.
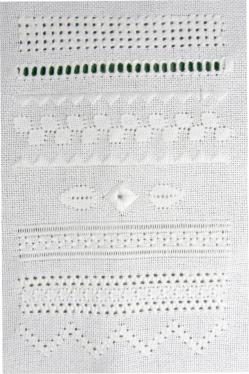
Pulled Thread Stitches to Explore
Here's where it gets exciting. A whole family of stitches works with pulled thread technique, and many of them will look familiar if you've done other counted thread work. But when you add tension, they transform into something completely different.
Don't feel you need to learn them all at once. Start with one or two (the free projects below use just a handful) and add to your repertoire as you gain confidence.
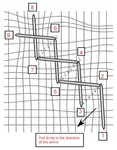
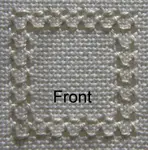
- Four-sided stitch creates a dense line of alternating holes. Often used in Hardanger too, so if you know it already, you're one step ahead.
- Cable stitch is another crossover from Hardanger embroidery. Quick to learn and produces a neat, structured line.
- Pulled satin stitch can be worked over different numbers of fabric threads, giving you flexibility in the pattern size and density.
- Honeycomb stitch creates a raised triangular pattern. Confusingly, the chart looks like brickwork, not honeycomb, so don't let that throw you.
- Diamond eyelet is a standalone motif that creates a beautiful open diamond shape. Lovely as a single accent or repeated in a grid.
- Cobbler stitch produces a pattern that resembles window panes. Striking when worked in a block.
- Ringed back stitch creates a row of delicate circles. One of the prettiest pulled thread effects.
- Diagonal raised band forms a diagonal ridge across the fabric. Adds wonderful texture and visual movement.
- Pulled double back stitch creates solid alternating squares. A good contrast stitch for combining with more open patterns.
- Three-sided stitch produces a dense line of alternating holes that makes an excellent border or divider between other stitch patterns.
You can also combine stitches to create composite patterns, and surface embroidery stitches (worked without tension) can be mixed in too, giving you the best of both worlds on a single piece.
Two Free Projects to Get You Started
You don't need to master all ten stitches before you start. These free projects will have you creating pulled thread embroidery with just a few stitches, and the results are genuinely beautiful.
Simple Pulled Thread Project
Uses just two stitches, making it perfect for your very first attempt. Mount it in an aperture card or make it into a coaster. Small, manageable, and satisfying.
Start this project →Pulled Thread Band Sampler
Seven lessons that walk you through the stitches listed above, one band at a time. Originally a stitch-a-long from my newsletter and now available as a complete tutorial. One band even uses drawn thread work, so you can see the difference for yourself.
Start this sampler →Related Techniques You Might Enjoy
If pulled thread embroidery appeals to you, these related techniques share similar skills and materials.
Whitework Embroidery
The family of techniques that pulled thread belongs to. Discover the full range of white-on-white needlework.
Explore whitework →Hardanger Embroidery
Shares several stitches with pulled thread (four-sided, cable) but adds the drama of cut threads and woven bars.
Discover Hardanger →Drawn Thread Work
The technique that does involve cutting fabric threads. Beautiful results, and a natural next step once you're comfortable with pulled work.
Learn drawn thread →You might like these
Pulled Work Embroidery Beginner's Guide: A Simple Free Project
Pulled thread embroidery guide for beginners. Learn two different stitches to create a lacy pattern. Step-by-step preparation, stitching and finishing.
Learn the Four-Sided Stitch: An Easy Pulled Thread Stitch
Learn the 4-sided stitch! This easy step-by-step guide with diagrams shows you how to create a neat, lacy border. Perfect for hems!
Four-Sided Stitch Instructions for Horizontal and Vertical Stitching
Discover four sided stitch, commonly used in Hardanger, pulled thread work, and counted embroidery. Easy steps for stunning openwork effects.


Stay connected between projects
If you’d like occasional updates from my embroidery room, including new patterns, gentle tips, and little things I think you might enjoy, you’re warmly invited to join the Stitchin’ Times newsletter.