- Home
- Basic embroidery stitches
- Lazy Daisy Stitch
STITCH TUTORIAL
Lazy Daisy Stitch: Not Just for Flowers
This versatile little stitch can create strawberries, leaves, feathers — anything with a petal shape. Here’s a fun project to prove it
Most people learn lazy daisy stitch to make little embroidered flowers — and it’s lovely for that. But here’s the thing: once you see it as a single petal-shaped stitch you can place anywhere, at any angle, in any colour, it opens up all sorts of possibilities.
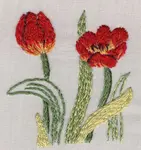
This plump little strawberry is a perfect example. It’s nothing more than layers of lazy daisy stitches, built up from dark to light to create a three-dimensional berry. I made it for my Strawberries and Cream crazy quilt block, and it turned out to be one of my favourite pieces on the whole project.
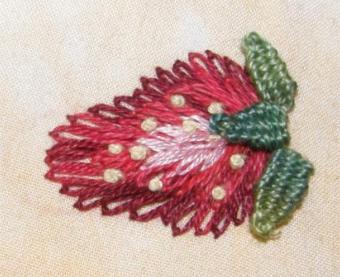
Finished strawberry — lazy daisy stitch with French knot seeds and woven picot sepals
By the end of this tutorial you’ll have your own embroidered strawberry — a satisfying little piece you can add to a crazy quilt, stitch onto a pouch, or simply frame in a small hoop. I’ll walk you through it layer by layer, with a photo at each stage so you always know where you are.
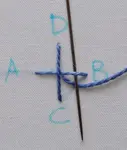
If you haven’t tried lazy daisy stitch before, have a quick look at my chain stitch page to see how it’s worked — it’s a detached chain stitch, and once you’ve done a couple you’ll have the rhythm of it.
How to Stitch Your Lazy Daisy Strawberry
What You’ll Need
Nothing specialist — you probably have most of this already.
- Embroidery floss — dark red, medium red and pink for the berry
- Yellow thread for the seeds
- Green perle or floss for the sepals
- Embroidery needle
- Tightly woven embroidery fabric
- Embroidery hoop to keep your fabric taut
- Disappearing ink pen to sketch your outline
For my sample, I used an overdyed floss from Needle Necessities in dark reds for the first layer, followed by a medium red I found in a mixed bag from a charity shop. I finished the base with a variegated pink/white floss from DMC. The exact shades don’t matter — that’s one of the lovely things about surface embroidery. Just pick colours you feel go together and your strawberry will look right.
Drawing Your Strawberry
Take a disappearing ink pen and sketch a simple strawberry shape onto your fabric — mine was about 3 inches from tip to greenery. Don’t worry about getting it symmetrical — real strawberries rarely are, and a slightly wonky shape actually looks more believable.
If you don’t have a disappearing ink pen, a hard graphite pencil works fine. There’s no need for a printed pattern here — strawberries are one of those shapes that are wonderfully simple to draw freehand.
The Base Layer
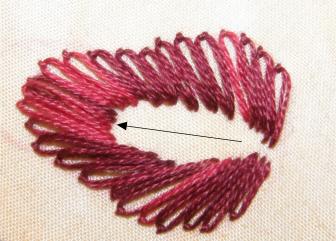
Start near the bottom of the strawberry (the arrow in the photo shows where I began) using 2 strands of your darkest thread.
Take long lazy daisy stitches right out to the outline you drew, keeping the thread under the needle. Anchor each stitch with a tiny stitch just outside the outline.
Begin with the stitches close together and at the same angle. As you work around the shape, space them a little further apart and follow the curve, moving up the other side until you reach the top.
Building Up the Layers
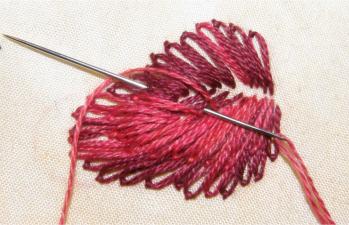
To create a raised effect in the centre, take a few straight stitches across the empty central area in the same dark thread.
Switch to a lighter coloured thread and begin the second layer. Each new stitch should overlap the previous layer by about halfway. Start each stitch from the central line of the strawberry, without leaving a gap.
Take some stitches across the centre line to blend the two sides together and soften that line down the middle.
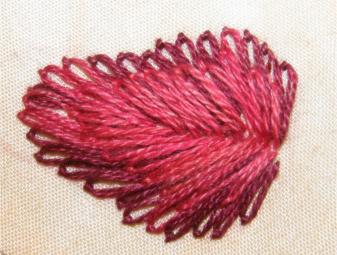
The Red Stitching Completed
Here’s how it looks with the second layer finished. You can already see the berry taking shape — the overlap between the dark and medium tones gives it a rounded, three-dimensional quality.
If yours doesn’t look exactly like mine, that’s perfectly fine. Every handmade strawberry has its own character, and that’s part of the charm.
Adding a Highlight
The third layer uses a lighter floss — I used a variegated pink/white. This creates the highlight area where light catches the berry, and it’s what makes it look truly three-dimensional.
Work these stitches over the top of the previous layers, then take the last stitch down the central line of the strawberry.

Seeds and Sepals
Scatter a few French knots across the surface for the seeds — yellow looks natural, though black works well too.
For the sepals at the top, I used needlewoven picots in an overdyed green perle. You could also use simple straight stitches or fly stitches if you prefer something quicker.
Add a stem and perhaps a tendril or two, and your strawberry is complete.
That’s your strawberry done — and with it, a new way of thinking about lazy daisy stitch. Once you see it as a building block rather than just a flower petal, all sorts of ideas start to open up. If you wanted even more dimension, you could pad the area with felt first, as I did for my stumpwork bunny tutorial, or stitch over a needle-felted wool shape for a truly sculptural effect.
One Stitch Learned, Dozens More to Try
Lazy daisy is part of the chain stitch family — and now that you know how versatile a single detached chain can be, you might enjoy exploring the rest of the family or discovering what other simple stitches can do.
Chain Stitch Family
Lazy daisy is just one member. Learn the full chain stitch and its variations — open chain, twisted chain, and more — all from the same simple loop.
Explore Chain StitchStitch Index
Browse the full collection of embroidery stitches with clear diagrams and step-by-step instructions for each one. Find your next favourite.
Browse All StitchesYou might like these
Raised Buttonhole Stitch Flower: A Step-by-Step Guide
Learn how to make a 3D raised buttonhole stitch flower! This easy step-by-step tutorial shows you how to create beautiful, textured flowers.
A Beginner's Guide to Split Stitch for Lines and Fillings
Learn how to embroider with split stitch! This step-by-step guide shows you how to create smooth outlines and filled shapes for your embroidery projects
Needlepoint Stitches: Choose the Right One for Stunning Designs
Struggling to choose the right needlepoint stitch? Get expert tips on selecting stitches for texture, direction, and style. Learn effortlessly

Stay connected between projects
If you’d like occasional updates from my embroidery room, including new patterns, gentle tips, and little things I think you might enjoy, you’re warmly invited to join the Stitchin’ Times newsletter.
About Me - Contact Carol - Privacy Policy - Site Map - Testimonials
Please do not copy the content of this site. It is protected by Copyscape.
Copyright © 2006- www.needlework-tips-and-techniques.com All rights reserved