- Home
- Intro to blackwork
- Attaching Beads
BEADING TUTORIAL
Attaching Beads to Fabric Securely
A simple cross stitch method that keeps beads firmly in place, plus a quick-reference chart for choosing the right needle, thread and bead size
Why Add Beads?
If you've ever looked at a finished piece of embroidery and thought "that could do with just a little something extra". Beads might be exactly what you're looking for.
Seed beads make a lovely alternative to French knots in a design. They catch the light in a way that thread alone can't quite manage, and they add a tactile quality that makes people want to reach out and touch your work.
I use them in my 1920s-inspired designs, Pearl and Coral, to create tiny pearl earrings and necklaces. Just a handful of beads, but they bring those ladies to life in a way that stitching alone wouldn't.

The method for attaching them is surprisingly simple and once you've done a few, it becomes second nature.
Materials Checklist
You won't need anything exotic, most of these items are probably already in your stitching basket. Here's what to gather before you begin:
Needles: Beading needles or short sharps - the sizes depend on your bead size (the decision chart below will help you choose)
Thread: Nymo/KO, FireLine/WildFire, or silk thread, again, the chart matches thread to fabric type
Beads: Seed beads (15/0 or 11/0), Delicas, or larger glass beads depending on your project
Small sharp scissors for trimming thread close to the fabric
A hoop or frame keeps your fabric taut while you work
A beading mat this is genuinely a lifesaver. A piece of corrugated cardboard with the ribs exposed works in a pinch, or use a piece of felt or velvet. Anything that stops those tiny beads from rolling away mid-stitch!
Choosing your Needle, Thread and Beads
Not sure which needle, thread and bead size to use? It depends on your fabric. Find the one that best matches your project below, and you'll have a reliable combination to work with.
Lightweight Silk, Organza or Chiffon
Needle: Beading needle size 12–13 (very fine)
Thread: Fine silk or bonded nylon (KO) - keep your tension gentle
Beads: Size 15/0 or 11/0 - test on a scrap first. Avoid heavy beads and use minimal pull to protect the delicate fabric.
Medium-Weight Linen or Cotton
Needle: Beading needle size 10-12
Thread: Nymo / KO or FireLine for extra strength
Beads: 11/0 or Delica - these give lovely uniform coverage. Keep your fabric hooped for neat, even rows.
Knit or Stretch Fabrics
Needle: Big-eye needle or size 10 beading needle
Thread: Strong flexible thread (FireLine / WildFire)
Beads: 11/0–8/0; consider pre-stringing. Pre-stabilise the fabric and use stretch-friendly stitches so the beads don't distort the weave.
Heavy Wool, Denim or Upholstery
Needle: Sharps size 8–10 or a heavy beading needle
Thread: Heavy nylon / quilting thread or FireLine
Beads: Larger beads (8/0–6/0) - anchor them well with reinforcement passes and backstitching so they stay put on these heavier fabrics.
Sheer or Delicate Embroidery Fabrics
Needle: Extra-fine beading needle (size 13–14)
Thread: Fine silk or very fine nylon
Beads: 15/0 tiny seed beads. Test your tension carefully and use small anchoring stitches, these fabrics show everything, so a light touch is key.
How to Attach Beads Securely
This method uses a cross stitch to lock each bead firmly in place, it won't shift, wobble or fall off. The whole process takes four simple steps.
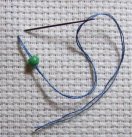
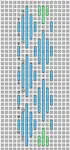
Step 1: Thread Through the Bead
Bring your threaded needle up through the bottom left hole of the cross stitch position. Slide the bead onto the needle, then take the needle down through the top right hole.
At this point the bead is sitting on a single diagonal stitch. It's attached, but not yet secure. That's what the next steps are for.
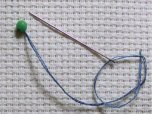
Step 2: Come Up in the Bottom Right
Now bring the needle up again, this time through the bottom right hole of the stitch, as shown in the diagram.
You're getting ready to pass through the bead a second time, which is what makes this attachment so reliable.
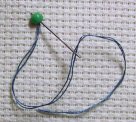
Step 3: Pass Through the Bead Again
Give the bead a gentle twist so the hole is accessible, then push your needle through the centre of the bead again. Take the needle back down through the top right hole of the fabric.
This second pass is the clever bit. It forms the second arm of a cross stitch, locking the bead firmly in position.
Step 4: Done!
And that's it! The bead is now held by two passes of thread through its centre, anchored at all four corners of the cross stitch. It's not going anywhere.
If you give it a gentle tug, you'll feel how secure it is. This is the same method I use on all my beaded pieces, and I've never had a bead come loose.

Creative Ways to Use Beads in Your Designs
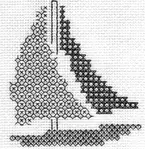
Here's something I find really exciting about beading. You don't need a pattern that specifically calls for beads. You can add them to almost any cross stitch or blackwork design to bring a little extra sparkle and dimension.
Seed beads work beautifully as flower centres and blossom details. But they're also wonderful for adding things like eyes on animals, tiny noses, berries on a branch, or baubles on a Christmas tree.
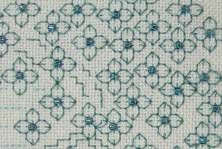
The photo above shows beads used as cherry blossom centres in one of my Japanese blackwork patterns. Each bead catches the light differently, giving the flowers a sense of depth that flat stitching alone can't achieve.
Once you start seeing opportunities to add beads, you'll spot them everywhere and that's half the fun.
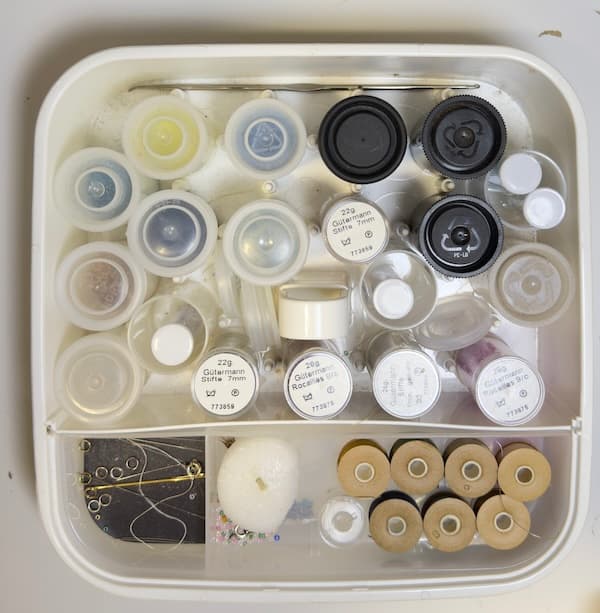
Storing Your Seed Beads
A quick word on storage, because there's nothing more frustrating than tipping over an open container of size 15/0 beads and watching them scatter across the carpet. Ask me how I know.
Mine live in a mixture of their original packaging, small zip-lock bags, and old film canisters. It is not the tidiest system, but it works! Dedicated bead storage containers with clear compartments are lovely if you want to see everything at a glance. Small zip-lock bags are a great budget option too: they are transparent, easy to label, and stack flat in a tin or box.
One handy trick: if you're using opaque containers, tape a sample bead to the lid so you can identify the colour without opening it. Saves a lot of rummaging.
Practical Tips for Common Beading Issues
Beading does have its quirks, tiny things that can trip you up if you're not expecting them. Here are the issues I see most often, along with the fixes that have worked for me over the years.
Thread Breakages
This usually happens when your thread is under too much tension or when beads have sharp edges inside their hole. It's more common than you'd think, especially with cheaper beads.
Use a strong thread like FireLine, Nymo, or silk with good tensile strength. Run it through beeswax or a thread conditioner before you start, this reduces friction and makes a real difference. And get into the habit of checking beads for sharp edges. If you find one, either discard it or smooth the hole with a bead reamer.
Uneven Bead Placement
If your beads aren't sitting in nice uniform rows, it's almost always a tension issue. The good news is that consistent tension is something that develops naturally with practice, so if yours is a bit wobbly right now, you're in excellent company.
Keep your fabric in a hoop or frame, maintain steady (not tight) tension, and for symmetrical designs, you can lightly mark bead positions with a washable pencil or chalk.
Small Bead Holes
Some seed beads have holes that seem barely big enough for a single thread, let alone a needle. If your standard needle won't fit, switch to thin beading needles (sizes 10–15) designed for exactly this purpose.
Still struggling? Try flattening the thread end gently with pliers, trimming it at an angle, or switching to a finer thread. A thread conditioner can also smooth the thread just enough to help it slide through.
Beads Rolling Away
Tiny beads have a talent for escaping. I've found more than a few between sofa cushions over the years. A beading mat or piece of felt on your work surface will stop them in their tracks. If you don't have one, a shallow dish or even a piece of corrugated cardboard with the ribs exposed works a treat.
Running Out of Thread
Nothing disrupts your flow quite like running out of thread mid-row. My rule of thumb: always cut more than you think you need. If you do run short, end off neatly by weaving through a few stitches on the back, then start a fresh length. The join won't show from the front.
Tangles and Knots
Long threads love to tangle. It's practically their hobby. Keep your working length to around 18 inches (roughly elbow to fingertip) and you'll avoid most of the frustration. If a knot does form, resist the urge to pull, instead, ease it open gently with a fine needle or pin. Running your thread through conditioner before stitching also helps enormously.
KEEP GOING
Your Beads Will Thank You for Practising
Like most things in needlework, beading gets easier and more enjoyable with every bead you attach. Your tension will settle, your fingers will find their rhythm, and before long you'll be adding beads to designs just because you can.
Don't be afraid to experiment with different bead sizes, colours and placements on scrap fabric before committing to a project. That kind of playful exploration is where the best ideas come from.
Happy beading!
You might like these
Make a bookmark with a Celtic embroidery pattern
A treat for lovers of Celtic embroidery. This little free blackwork bookmark is quick and easy to make as a gift, or for yourself
Blackwork Tutorial: Why You Stitch Outlines First (Not Fills)
Learn the blackwork outline-first method that makes stitching easier. Step-by-step guide with thread tips. Perfect for cross stitchers trying blackwork!
Pattern darning is simple - this free tutorial will teach you how
Pattern darning is much more exciting than darning socks! This free tutorial shows how to use it as a border around a blackwork design.

Stay connected between projects
If you’d like occasional updates from my embroidery room, including new patterns, gentle tips, and little things I think you might enjoy, you’re warmly invited to join the Stitchin’ Times newsletter.
About Me - Contact Carol - Privacy Policy - Site Map - Testimonials
Please do not copy the content of this site. It is protected by Copyscape.
Copyright © 2006- www.needlework-tips-and-techniques.com All rights reserved