- Home
- Basic embroidery stitches
- Blanket Stitch
BEGINNER STITCH TUTORIAL
Blanket Stitch Embroidery: Step-by-step tutorial/h1>
One simple stitch that edges, decorates, and fills. Here is everything you need to start.
By Carol Leather | Last updated March 2026
WHY LEARN THIS STITCH?
What You'll Use Blanket Stitch For
Blanket stitch is one of those stitches that keeps turning up because it does so many different jobs. Here are the most common ways you will see it used.
Edging and Finishing
The classic use. Work it along a raw edge to create a neat, decorative border on blankets, applique shapes, or felt projects.
Perfect for beginners and a great first project.
Applique
Secure fabric shapes to a background with blanket stitch for a folk-art look that is both decorative and functional.
Beginner-friendly once you have the basic stitch down.
Surface Embroidery
Use it to fill shapes, create texture, or build flowers and leaves. Vary the stitch height and spacing for completely different effects.
Intermediate, try this once you are comfortable with even rows.
Cutwork and Hardanger
Blanket stitch forms the strong, neat bars and edges needed in cutwork embroidery and similar openwork techniques.
Try later, this needs confident, even tension throughout.
Blanket Stitch vs Buttonhole Stitch: What's the Difference?
This is one of the most common questions in embroidery, and the answer is simpler than you might think. The two stitches use exactly the same motion. The only difference is spacing.
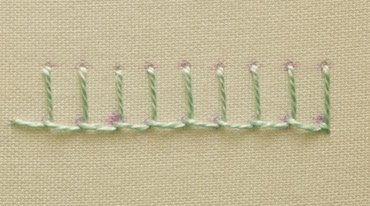
Blanket stitch is worked with gaps between each stitch, creating that open, looped edge you see on wool blankets and decorative borders.
Buttonhole stitch is worked with the stitches packed tightly together, side by side, so the loops form a solid ridge. That dense edge is what makes it strong enough to reinforce a buttonhole or outline cutwork shapes.
ONE STITCH, SO MANY POSSIBILITIES
See What Blanket Stitch Can Do
I used this one simple stitch to outline and shade flowers, build a freehand hermit crab shell, and form the delicate bridges in a cutwork design. It is more versatile than you might expect.
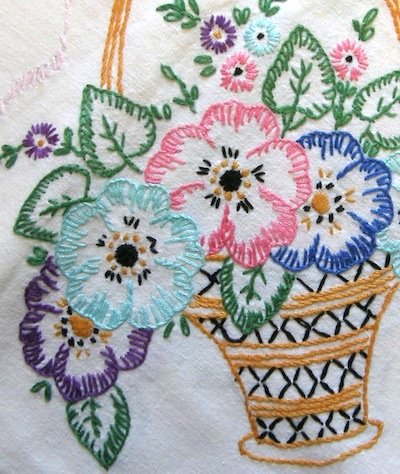
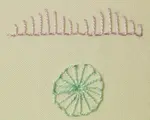
Decorative Flowers
Radial blanket stitch creates petals that look far more complex than they are.

Cutwork Embroidery
Pack the stitches tightly together and blanket stitch becomes buttonhole stitch, forming the strong, neat edges needed in cutwork designs.

Freehand Shading
Blanket stitch fills create beautiful texture for shapes like this hermit crab shell.
BEFORE YOU START
A Couple of Quick Tips
While you can work this stitch "in the hand," using an embroidery hoop is the best way to go when you are learning. A hoop keeps your fabric taut, which makes it much easier to keep your tension even and avoid puckering.
Thread Choice
A non-stranded thread like Perle cotton is a great choice for learning because the stitches sit smoothly without needing to manage separate strands.
I used Perle cotton number 8 for the step-by-step samples on this page. The flowers and hermit crab were stitched with embroidery floss, which gives a softer, finer finish.
Keeping Stitches Even
A great trick while you are learning is to mark evenly spaced dots on your fabric with a disappearing ink pen. These guide dots give you consistent spacing and stitch height, so your finished row looks beautifully uniform.
That said, even stitches are not always the goal. Once you are comfortable with the rhythm, try deliberately varying the height or spacing for a more playful, organic look.
Your First Practice Setup
Grab these supplies and you are ready to follow along with the tutorial below.
- An embroidery hoop with a scrap of plain-weave fabric
- Perle cotton number 8 (any colour you like)
- A disappearing ink pen to mark your guide dots
- A tapestry or crewel needle
SEE IT IN ACTION
Watch the Video Tutorial
The easiest way to learn is to see the stitch in action. This short video shows you exactly how to work blanket stitch using the "stab stitch" method in a hoop.
You can follow along by clicking the transcript button below.
FOLLOW ALONG
Step-by-Step Instructions
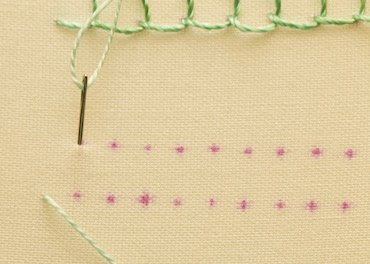
When your fabric is stretched in a hoop, you will work with one hand above and one below the fabric. Start from the left and work towards the right.
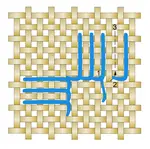
Step 1: Come Up From the Back
Bring your needle up from the back at your starting position on the bottom line. This is where your first stitch will begin.
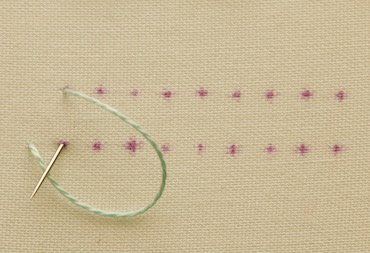
Step 2: Go Down at the Top, Leave a Loop
Take the needle down through the fabric at the top of your stitch, but do not pull the thread all the way through. Leave a loose loop of thread on the surface of your work.
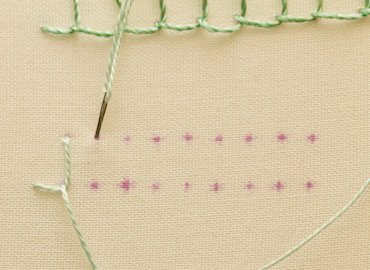
Step 3: Come Up Inside the Loop
Bring your needle back up to the front at the next dot along the bottom row, making sure your needle comes up inside the loop of thread you just made.
Gently pull the thread through until the loop tightens and sits neatly along the bottom line. Do not pull it too tight.
Step 4: Continue and Finish
Continue this motion until you reach the end of your row. To finish, make a tiny "tie down" stitch just outside the last loop to secure it in place.
If your thread starts to run short before you finish the row, here is a neat method for changing thread in blanket stitch without leaving a visible join.
DON'T WORRY, EVERYONE DOES THIS
Common Mistakes and Easy Fixes
Uneven Spacing
If your stitches look a bit random, go back to marking guide dots with a disappearing ink pen. Once the muscle memory builds, you can ditch the dots.
Pulling Too Tight
If the fabric puckers or the bottom loops dig in, ease up as you pull each stitch through. The loop should sit gently on the surface, not strain against it.
Losing the Loop
Accidentally pulled the thread all the way through before catching the loop? Just slide the needle back under the stitch you just made, hook the working thread, and pull through to remake the loop.
Need Help With...
How to work neat corners without gaps or bunching.
Join a new thread mid-row without a visible break.
Whipped, knotted, scalloped, and more creative options.
YOUR TURN
Time to Practise
Now that you have the basic rhythm down, grab a scrap piece of fabric and experiment with spacing.
Try stitching one row with the stitches spread out to create an open, airy edge. Right below it, try another row with the stitches packed tightly together for a dense, solid line. The distance between each stitch dramatically changes the look, so have fun seeing what you prefer.
READY FOR MORE?
Keep Building Your Skills
Now that you have blanket stitch in your toolkit, these pages are the natural next steps.
Blanket Stitch Variations
Learn whipped lines, leafy effects, and playful scallops to take your blanket stitch further.
Explore VariationsTurning Corners
Straight edges feeling comfortable? The next skill to master is turning neat corners with blanket stitch.
Learn CornersRaised Buttonhole Stitch
Ready for something dimensional? Try this beautiful raised flower tutorial using a close cousin of blanket stitch.
Try the TutorialYou might like these
3 Fun and Easy Blanket Stitch Variations to Learn
Ready to add some creative flair to your embroidery? Learn 3 fun blanket stitch variations! This simple guide shows you how to create the whipped stitch & more
How to Change Thread in Blanket Stitch: A Simple Guide
Running out of thread in your blanket stitch project? Learn a simple, neat method for joining a new thread seamlessly with this quick step-by-step tutorial.
Stay connected between projects
If you’d like occasional updates from my embroidery room, including new patterns, gentle tips, and little things I think you might enjoy, you’re warmly invited to join the Stitchin’ Times newsletter.
About Me - Contact Carol - Privacy Policy - Site Map - Testimonials
Please do not copy the content of this site. It is protected by Copyscape.
Copyright © 2006- www.needlework-tips-and-techniques.com All rights reserved