- Home
- Basic embroidery stitches
- Learn hand embroidery stitches
Beginner-Friendly Hand Embroidery Fills with Step-by-Step Photos
Want fills that show real texture and pattern — not just flat coverage? This page teaches unusual filling stitches you’ll actually use, with step-by-step photos and simple practice samplers so you can stitch patterned fills with confidence tonight.
Below are my practice samplers — I take them into classes so students can look, feel and try each stitch. Use different threads to vary the effect and make these stitches your own.
Scroll down for ideas, photographed step sequences and full step-by-step instructions.
Creating Shapes and Filling with Texture

For this photo I sketched a jumble of overlapping circles and ovals on the fabric — no plan, just a starting point. Using Fine Cotton and Pearl Cotton no. 8, I stitched an impromptu sampler.
Each stitch gave a shape its own texture — some smooth and flowing, others bold and bumpy, and a few happy surprises along the way.
In this first sampler I used nine stitches, each adding its own flair.
| Stitch | What it does / how it feels |
|---|---|
| Closed herringbone stitch | Adds a subtle, almost quilted texture. |
| Satin stitch + split-stitch outline | Creates a smooth, defined shape when paired with a split stitch outline. |
| Chain stitch filling | Simple to work yet wonderfully effective for flowing fills. |
| Seeding stitch framed by stem stitch | Gives a delicate, airy feel when framed by a neat stem stitch. |
| French knot centre | Surrounded by detached chain stitch, it forms a dainty little flower. |
| Trellis couching | Teamed with stem stitch, it looks like a charming net pattern. |
| Spider's web centre | Edged with blanket stitch, it becomes an unexpected firework burst. |
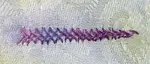
| Open fishbone stitch | Adds a lovely leafy element to the mix. |
Exploring Hand Embroidery Stitches
One stitch can do many jobs. Chain stitch and stem stitch aren’t just for outlines — they can add texture, depth and personality to a shape. The more you experiment, the more flexible they become, and that’s the fun part.
Here are a few practical techniques I use to fill shapes with texture and character:
- Side-by-Side Rows: Place multiple rows of the same stitch next to each other to create a solid, filled area.
- Spiral Patterns: Start at the edge and spiral inward — perfect for round shapes (see shape 3 on the sampler).
- Full-Width Stitches: Stretch a stitch across the full width of a shape for a bold, clean finish (used in shapes 1 and 8).
- Detached Stitches as Fill: Group small detached stitches tightly (or scatter them loosely) to add delicate texture and depth — handy for centres and edges (shape 5 shows both approaches).
In the next section I’ll show photographed step sequences and exactly how to apply these techniques to your own projects. Once you start looking at shapes this way, you’ll spot texture possibilities everywhere.
Solid or Open: Creating Contrast in Your Stitching
When I first started filling enclosed shapes I thought “more is more” — pack every inch with dense stitches.
Over time I learned the opposite: mixing solid, stitched areas with lighter, open techniques creates far more interest and makes each texture read clearly.
Look at the four diaper-pattern hearts in the photo below. Repeating motifs in horizontal, diagonal, or random arrangements gives variety without overwhelming the design — the patterns feel deliberate, not cluttered.
For this piece I used size 12 pearl cotton and two strands of DMC Light Effects for a little shimmer. To keep each heart crisp I outlined the shapes with a simple stem stitch — the outline defines the edge while the contrasting fills do the visual work.

| Stitch | Effect / brief notes |
|---|---|
| Sheaf stitch | A structured yet airy design — ideal for lighter fills that still show clear direction and rhythm. |
| Ermine stitch | Straightforward, repeatable pattern with elegant diagonal details that add subtle rhythm to a fill. |
| Tête de bœuf | A dramatic stitch that suggests a bull’s head and horns — adds personality and a focal detail in a fill. |
| Four‑legged knot | A compact knotted stitch that provides tactile texture — great for small textured areas or accents. |
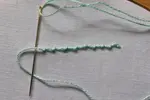
Sheaf stitch
The Sheaf Stitch is an understated yet beautiful filling stitch, perfect for creating light, open textures.
Start with Straight Stitches: Make three evenly spaced vertical stitches, grouped closely together.

Anchor the Group: Bring your needle up through the centre of the group, threading it under the left stitch.

Secure the Center: Wrap the thread around the middle stitches, tucking it under the right stitch.

Finish the Stitch: Pull the thread firmly to draw the long stitches together at the centre, securing them in place.

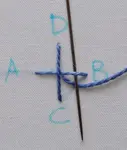
Ermine Filling
The Ermine Stitch combines simplicity and elegance, with diagonal accents for added interest.
Create the Base Stitch: Begin with a single vertical stitch.
 Step 1
Add the Diagonal Arms: Bring the needle up to the left of the vertical stitch and cross over it at a slight angle, taking the needle down on the right side.
 Step 2
Position for Visual Balance: Keep the diagonal arms slightly longer at the top and closer together near the base for a balanced appearance.
Balance the Design: Repeat the diagonal stitch, starting on the right and crossing over to the left.
 Step 3
Tete de Boeuf
This stitch, named for its resemblance to a bull’s head and horns, adds a whimsical touch to your embroidery.
- Start with a Fly Stitch: Make a small “V” shape then catch it down with a detached chain stitch.
- Adjust for Tension: Avoid pulling the thread too tightly to maintain the soft, rounded shape of the "horns."
 Step 1
 Step 2
 Step 3
 Complete tete de boeuf
Four-legged knot
This stitch resembles an upright cross stitch with a diagonal tie down stitch. I found it took practice to achieve the hand movement necessary for the knotted part, but it was well worth persevering.
Begin by making a vertical stitch. Then, bring the thread up on the right, about halfway down the first stitch.
Insert the needle close to the vertical stitch, on the same horizontal level as your previous entry point. Be careful not to pull the needle all the way through. This is the starting point for the knot.
Pick Up a "Bite" of Fabric Using a sewing motion, pick up a small amount of fabric on the needle, tucking the thread under the needle. The exit point should be on a horizontal line with where the thread came to the surface on the right.
 Step 1
Gently pull the thread through to create a small knot at the centre of the cross. This secures the cross in place.
 Step 2
Finally, insert the needle back into the fabric slightly below the knot to lock it in place. This ensures the knot remains in place and doesn't come undone.
 Complete 4 legged knot stitch
Thank you for stopping by
Thank you for visiting and exploring the world of hand embroidery stitches with me.
Whether you're new to embroidery or refining your skills, I hope these techniques inspire you to create stunning embroidery patterns and designs.
For more ideas, check out the stitch index, where you’ll find step-by-step tutorials for a variety of embroidery stitches.
You might like these
How to Do Herringbone Stitch: Embroidery Step-by-Step
Step-by-step herringbone stitch tutorial for hand embroidery. Clear photos show how to keep stitches neat and avoid tangles. Includes variations.
Raised Buttonhole Stitch Flower: A Step-by-Step Guide
Learn how to make a 3D raised buttonhole stitch flower! This easy step-by-step tutorial shows you how to create beautiful, textured flowers.
A Beginner’s Guide to the Coral Knot Stitch for Textured Embroidery
Learn how to embroider the coral knot stitch with this easy, step-by-step guide. Perfect for beginners who want to add beautiful, bumpy texture to their work!
Stay connected between projects
If you’d like occasional updates from my embroidery room, including new patterns, gentle tips, and little things I think you might enjoy, you’re warmly invited to join the Stitchin’ Times newsletter.
About Me - Contact Carol - Privacy Policy - Site Map - Testimonials
Please do not copy the content of this site. It is protected by Copyscape.
Copyright © 2006- www.needlework-tips-and-techniques.com All rights reserved