- Home
- Whitework
Whitework Embroidery: Discover 8 Beautiful Techniques
Whitework embroidery is a style of needlework stitched with white thread on white fabric, creating delicate patterns through texture, light, and shadow rather than colour.

Because normal embroidery floss is often too soft for this work, stitchers traditionally use stronger, more durable threads.
In the late 1800s, middle-class women helped popularise fine whitework on christening gowns, bonnets, nightgowns, and household linens.
One of my favourite examples is a piece of whitework embroidery my mother owns - its tiny, airy stitches show just how much detail is possible with nothing but white thread.

Whether it’s worked on a ground fabric or built up as “stitches in the air” (needlelace, or punto in aria), all of these forms fall under the umbrella of whitework.
In this introduction, we’ll look at what counts as whitework and how these techniques create such beautiful results.

Free whitework sampler
New to whitework and not sure where to start?
This free, beginner-friendly sampler walks you through seven simple bands so you can try the stitches without the pressure of a “big” project.
You’ll begin with basic filling and drawn-thread work, then build up to pulled satin and double back stitch, diamond eyelets, double backtitch leaves, honeycomb, three-sided, ringed back, and diagonal four-sided stitch.
By the time you finish the sampler, you’ll have a neat little banded piece and the confidence to tackle your first full whitework project.
Start whitework in the UK (what to buy + what to stitch first)
If you’re new to whitework, you don’t need a huge stash — just the basics and a small first project you can finish.
A simple beginner starter list
Fabric: a firm, even-weave fabric is easiest (even-weave linen is ideal for counted styles)
Thread:
- smooth cotton for crisp detail (e.g., stranded cotton or fine cotton)
- a slightly heavier thread (e.g., perlé/coton à broder) if you want more “lift” and definition
Needles:
- a tapestry needle (blunt tip) for counted work on evenweave
- a sharp embroidery needle for surface stitches and eyelets (handy to have both)
Hoop or frame: a small hoop is fine to start; a frame is a bonus later for larger pieces
Small sharp scissors (tiny tips help for cutwork later)
Good light (honestly one of the best “tools” for whitework!)
Best first whitework projects (quick wins for beginners)
Pick something small that teaches the “feel” of tension without being fiddly:
- A pulled-thread band sampler (pretty, structured, forgiving)
- A drawn-thread border on a small rectangle (great practice for neat edges)
- A simple Hardanger motif (very satisfying once you understand the steps)
Types of whitework embroidery
The links below will take you to the relevant sections on this page.
Which whitework technique should I start with?
Use this quick guide to choose your first technique.
Pulled thread
Looks like: delicate lacy patterns made by tightening stitches so the fabric threads draw together.
Difficulty: ★★☆☆☆ (beginner-friendly once you get tension right)
You’ll need: evenweave linen, strong white thread, tapestry needle, hoop/frame
Good first project: a small sampler band or bookmark panel
Drawn thread
Looks like: open “ladder” areas where threads are removed, then the remaining threads are wrapped/stitched.
Difficulty: ★★★☆☆ (a bit more fiddly because you’re altering the fabric)
You’ll need: evenweave linen, sharp scissors, strong thread, hoop/frame
Good first project: a simple border (e.g., a narrow hem/edge strip)
Cutwork
Looks like: bold cut openings with stitched edges (often floral/scroll shapes).
Difficulty: ★★★☆☆ to ★★★★☆ (cutting + neat edges = higher stakes)
You’ll need: firm fabric, sharp embroidery needle, very sharp small scissors
Good first project: a small motif on a handkerchief corner (minimal cutting)
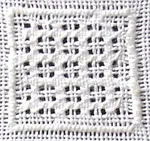
Hardanger
Looks like: geometric satin-stitch blocks + cut-and-woven areas (very structured)
Difficulty: ★★★☆☆ (methodical; easier if you like counting)
You’ll need: evenweave fabric, perlé cotton, tapestry needle, sharp scissors
Good first project: a small coaster or ornament panel (simple repeat motif)
Needlelace (stumpwork-style lace / detached lace)
Looks like: lace made with stitches rather than fabric (often very fine and airy)
Difficulty: ★★★★☆ to ★★★★★ (slow, precise, best after basics)
You’ll need: very fine thread, sharp needle, support fabric or padding method (depends on style)
Good first project: a tiny practice motif (single flower/petal) before larger pieces
Whitework methods in more detail
Drawn thread work

Drawn thread work is a kind of white-on-white embroidery where you literally remove threads from the fabric, then group the remaining ones into tiny clusters to create lacy windows of solid and open pattern.
Start simple with decorative hemstitching: take out threads in one direction, bundle what’s left, and you’ve got a delicate edge or insertion.
Or go further and remove threads both ways, binding the survivors into a grid and embellishing them with needleweaving or darning.
That open, lacy area is called a withdrawn ground - the same kind of detail you see on old baby caps, bonnets, and christening gowns.
Band two of the free sampler above goes into more detail about drawn thread work.
Pulled thread embroidery

If drawn thread work removes threads, pulled thread work simply shifts them. Also called drawn fabric, it relies on tight stitches that tug the threads into tiny bunches so the holes between them form the pattern.
Because the beauty lies in the distortion of the fabric itself, not in the stitches, pulled thread work doesn’t really work in colour - the stitching should disappear.
My gentle pulled work introduction page gives you a chance to try it out and see the difference for yourself. No scary cutting involved here.
Hardanger Embroidery

Hardanger embroidery takes its name from the region in Norway where it began, but its real magic lies in how it layers techniques you already know.
It combines pulled and drawn thread work with satin stitch motifs and blocks, first removing fabric threads, then wrapping or needleweaving the ones that remain so lacy stitches can fill the gaps.
Traditionally used on aprons, clothing, and household linens, Hardanger patterns now often appear in colour too - and they still work beautifully.
Cutwork embroidery

Cutwork embroidery, first recorded in the 12th century, is the quiet ancestor of later needle-made laces. For a time it was a guarded craft, worked in secret by nuns on priests’ sacramental robes and even grave cloths for saints.
By the 15th to 17th centuries, it had moved from the cloister to the parlour, as upper-class women used it for altar cloths and fine household linens.
Those early cutwork techniques didn’t disappear - they evolved, expanded, and eventually formed the foundation of the needle-made laces we know today.
Needlelace (or Needlepoint lace)

Needlelace (or needlepoint lace) is the point where earlier whitework, cutwork, and needle-made laces step off the fabric and become a lace all their own.
Growing out of those withdrawn and cut grounds, it replaces the fabric background entirely, building new shapes stitch by stitch with nothing more than thread and a needle.
Traditionally worked in fine white thread, needlelace has the same roots as early whitework and cutwork, but over time it evolved into a free-standing lace that could be as airy as cobwebs or as solid and sculptural as carved ivory, all based on the humble buttonhole or blanket stitch.
Today you’ll see it used in stumpwork embroidery, decorating crazy quilts, or forming full motifs, like my coloured mermaid in the photograph.
My friend, Liz Bartlett, kindly wrote a page that traces how needlelace developed from its whitework and cutwork ancestors into a distinct lace technique in its own right.
Richelieu embroidery
Richelieu embroidery sits between early cutwork and later needlelace, borrowing from both.
Inspired by medieval cutwork, it became popular from the 14th to 16th centuries, using buttonhole-stitched outlines around shapes with the fabric cut away inside.
The empty spaces were then bridged with buttonholed bars, often dressed up with tiny picot loops in the middle - a clear step toward the decorative fillings of needlelace.
You’ll often see Richelieu on tablecloths and mantelpiece edgings, sometimes backed with coloured fabric to show off the openwork.
Built with dense buttonhole stitches and sturdy bars, it stands up well to washing, which is why so many antique examples have survived to tell the story of how cutwork techniques gradually evolved toward true needlelace.
Reticella

Reticella, sometimes called Greek Point, is the first needlelace to treat fabric as nothing more than scaffolding. Building on techniques like Richelieu, it uses the fabric only as a temporary support while the real lace is constructed in thread.
Threads are laid across a pattern, couched in place, then enriched with overcast stitches and picots. Once the design is complete, the ground fabric is carefully cut away, leaving a free-standing web of geometric lace that many consider the most beautiful - and one of the most time-consuming - forms of needlelace.
Historically, Reticella decorated altar cloths, church vestments, and the crisp ruffs of the 15th–17th centuries. The modern piece shown here, stitched by Jenny Bargh of Sydney from a pattern in the Italian magazine Rakam, shows how this “true” needlelace is still being interpreted today.
Hollie Point
Hollie Point is a medieval embroidery technique first worked by nuns for church laces, often filled with tiny sacred emblems such as Adam, Eve, or lilies.
Instead of drawing the motif with thread, the design in Hollie stitch appears in the spaces between the stitches, creating a mesh that looks very much like filet crochet.
This type of whitework appears to be rarely practised today.
Whitework embroidery FAQ
Pulled vs drawn thread — what’s the difference?
Pulled thread makes patterns by pulling stitches tight so the fabric threads bunch together and create open areas.
Drawn thread creates open areas by removing threads first, then stitching/wrapping the remaining threads into patterns.
If you’re nervous about cutting fabric, start with pulled thread.
What fabric is best for beginners?
Choose a firm, even-weave fabric so your stitches sit neatly and counting is easier.
For many beginners, an evenweave linen/cotton in a “middle” count (not too fine) feels manageable.
Avoid very soft/loose fabrics at first — they distort more easily.
What fabric count should I start with?
A mid-range evenweave is usually easiest (fine enough to look pretty, but not so tiny it’s frustrating).
What needle size do I need for whitework?
For counted whitework on evenweave: a tapestry needle (blunt tip) is often easiest because it slides between threads.
For surface stitches, eyelets, and any areas where you need to pierce the fabric: a sharp embroidery (crewel) needle helps.
If in doubt, use the needle that lets your thread pass smoothly without forcing (forcing leads to fuzzing and puckering).
Do I need a hoop or a frame?
You can absolutely start with a hoop — it’s simple and affordable.
A frame becomes helpful for larger pieces, for techniques needing very even tension, or if you find you “over-pull” stitches.
Whichever you use, aim for even tension (tight like a drum is great for some work, but over-tight can also cause distortion).
How do I stop puckering or distortion?
Don’t over-tighten as you stitch — especially with pulled work (tight, but controlled).
Keep your fabric supported (hoop/frame) and reposition rather than stretching.
Try shorter thread lengths (thread behaves better and twists less).
When finished, gently block: dampen slightly, pin to shape, let dry — it makes a big difference in how whitework sits.
What threads give crisp results vs raised effects?
For crisp, fine detail: smooth cottons (e.g., stranded cotton used with fewer strands, or fine whitework threads).
For more definition / gentle relief: slightly heavier threads (e.g., perlé cotton) give a clearer “line”.
For raised work: look for techniques that use padding/cording (common in some cutwork styles).
What’s the easiest first whitework technique?
Many beginners find pulled thread the quickest win (no cutting, and results appear fast).
If you enjoy neat geometry and counting, Hardanger can be very satisfying early on.
Needlelace is beautiful, but usually feels easier after you’ve built confidence with tension and thread control.
Ready to try whitework embroidery?
After seeing all these examples, it’s easy to think whitework embroidery is only for experts with perfect eyesight and endless patience. But if you can thread a needle and work a few basic stitches, you already have enough to begin.
White thread, a simple piece of fabric, and a small starter motif or hemstitched edge are all you need to create something light, lacy, and very much your own. So yes - you really can try whitework embroidery, starting small and letting your confidence grow one tiny white stitch at a time.
You might like these
Whitework Embroidery Stitches: Step-by-Step Cobbler Stitch Guide
Discover the beauty of whitework embroidery stitches with a step-by-step guide to Cobbler Stitch, featuring a detailed diagram and photo of the finished sample
Pulled Work Embroidery Beginner's Guide: A Simple Free Project
Pulled thread embroidery guide for beginners. Learn two different stitches to create a lacy pattern. Step-by-step preparation, stitching and finishing.
How to Hemstitch by Hand: Step-by-Step Embroidery Tutorial
Learn hemstitch embroidery with this easy tutorial. Master fabric scoring, hem folding, and Danish hemstitch technique with clear diagrams.


Stay connected between projects
If you’d like occasional updates from my embroidery room, including new patterns, gentle tips, and little things I think you might enjoy, you’re warmly invited to join the Stitchin’ Times newsletter.
About Me - Contact Carol - Privacy Policy - Site Map - Testimonials
Please do not copy the content of this site. It is protected by Copyscape.
Copyright © 2006- www.needlework-tips-and-techniques.com All rights reserved