- Home
- Finish It!
Needlework Finishing Techniques:
Make Your Embroidery Stand Out
If you’ve ever finished an embroidery piece and then stalled out, unsure what to do next, this guide to needlework finishing techniques will walk you through your options.
Instead of letting your stitching stay folded in a drawer, you’ll see exactly how to wash, prepare, and protect it so it’s ready to shine.
We’ll explore simple ways to frame and hang your work, as well as turn it into cushions, ornaments, bookmarks, and other practical pieces.
When you’re ready to take action, you can follow the step-by-step tutorials linked throughout for specific methods and projects. By the end, you’ll know which finishing path fits your project, your skill level, and how you plan to use the piece.
Most importantly, you’ll feel confident taking that last step so your embroidery can be seen, used, and enjoyed - not hidden away.
Washing and Preparing Your Embroidery
A well-finished piece begins with a clean foundation. Embroidery projects often accumulate dirt, oil, and hoop marks during the stitching process. Here’s how to refresh your piece:
Washing Tips: Lightly wash your fabric with mild soap and cold water, taking care not to scrub. If your piece is delicate or includes specialty threads, check the label or test a small area first. For more detailed tips click to go to my washing needlework page.
Stain Removal: For stubborn spots, gentle stain removers like distilled white vinegar or baking soda can work wonders. Avoid harsh chemicals that might damage the fibers. More stain removal tips here.
Carefully cleaning your work brings out its original colors and textures, giving your piece a renewed vibrance before finishing.
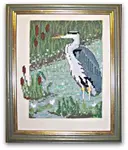
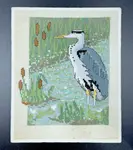
Frame It Like a Pro

Framing is one of the best ways to protect and display your embroidery.
Framing not only preserves your work but also highlights its detail, turning it into a display piece. You don’t need to be a professional framer; just follow some simple steps explained in full on my framing your needlework page. It covers:
- Choosing acid-free materials: Select materials that are specifically designed for framing to ensure your piece remains preserved for years to come.
- Stretching and securing the fabric: Learn how to properly stretch and secure your embroidery fabric to prevent wrinkles and creases.
- How to choose a frame: Select a frame that complements the colours and style of your piece. For vintage embroidery, consider an ornate frame; for modern designs, a sleek, minimalist frame works well.
Finished Project Ideas for Your Needlework

Embroidery doesn’t have to stay in frames!
Beyond display, there are countless creative ways to turn your finished needlework into beautiful and functional items.
Here are some project ideas, with links pointing to relevant examples, techniques, patterns, or specific tutorials where available:
- Wall Hangings: As a nod to traditional tapestries, consider using a finished quilt as a wall decoration
- Cushions and Pillows: Transform your pieces into cushions or pillows, adding style and coziness (see examples using blackwork samplers)
- Table Linen: Add a special touch to mealtimes with embroidered doilies, mats, and runners (explore my Hardanger patterns suitable for these)
- Holiday Décor: Create unique ornaments or decorations for festive occasions, like coasters (explore Christmas coaster patterns), destined to become cherished heirlooms.
- Bookmarks: Craft special bookmarks using free patterns with instructions, such as this Celtic style blackwork bookmark or this beginner hardanger version.
- Sewing Accessories: Make functional items like pincushions or a needlecase (view Assisi embroidery needlecase examples)
- Jewellery: Turn your stitching into delightful wearable art! Follow our tutorial to make a needlelace daffodil brooch.
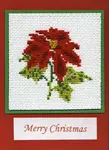
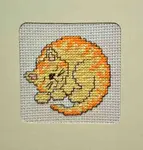
- Greeting Cards: Incorporate your embroidery into handmade cards with cut-out windows for a personal touch.

Advanced Finishing Techniques
If you’re ready to go beyond the basics, try these advanced techniques to give your needlework a professional finish:
- Hemstitching: Add a hemstitched edge to create a refined, polished look for your embroidery.
- Edging and Binding: Create intricate borders around your work using crochet, lace, or decorative stitches. These edges add elegance and can enhance the style of your needlework. Try 3-sided stitch or four sided stitch.
Experimenting with different finishes lets you customise each project and achieve a unique look that reflects your style.
Frequently Asked Questions
How do I prevent my needlework from fraying?
How do I prevent my needlework from fraying?
Use a hemstitch or apply a fabric adhesive to seal the edges before framing or displaying.
Can I frame my embroidery without glass?
Can I frame my embroidery without glass?
Yes! Framing without glass allows the texture to stand out. However, be sure to keep it in a low-dust area to prevent buildup.
What’s the best way to clean old embroidery pieces?
What’s the best way to clean old embroidery pieces?
For vintage embroidery, avoid water-based cleaning and use a dry, gentle brush instead. If necessary, consult a textile conservator for professional advice.
Transforming Your Project from Start to Finish
Whether you’re framing, gifting, or decorating, these needlework finishing techniques offer countless ways to make your embroidery shine. With a little care and creativity, your project can become a stunning piece of art that’s admired and enjoyed for years to come.
You might like these
Cross Stitch Card Making Ideas: A Fun Finishing Technique
See inspiring card making ideas from fellow stitchers! This guide shows you how to mount your cross stitch on a card for a beautiful, finished look.
Framing Cross Stitch at Home: Step-by-Step with Photos
How to frame cross stitch yourself: step-by-step photos for stretching, mounting and framing. Plus when to use glass and when to wash first.
Handmade Greeting Card Ideas: A Guide for Stitchers
Learn the easy way to mount your cross stitch or embroidery in an aperture card. Turn your small projects into beautiful handmade gifts.
Stay connected between projects
If you’d like occasional updates from my embroidery room, including new patterns, gentle tips, and little things I think you might enjoy, you’re warmly invited to join the Stitchin’ Times newsletter.
About Me - Contact Carol - Privacy Policy - Site Map - Testimonials
Please do not copy the content of this site. It is protected by Copyscape.
Copyright © 2006- www.needlework-tips-and-techniques.com All rights reserved