- Home
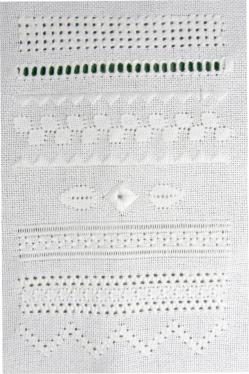
- Whitework Sampler
Whitework Sampler for Beginners: Part One
New to whitework? This sampler is the perfect starting point to explore various techniques within this style.
Whitework embroidery might look intimidating at first glance, but you'll soon find your rhythm. Stitch by stitch, you'll create an exquisitely detailed piece that's surprisingly satisfying to make.
Originally, this sampler was exclusive to my newsletter crew – now I'm sharing it with everyone. Time to pick up your needle!
You Will Need:
- 12x12 inch piece of white 28 count evenweave* or linen fabric
- White Perle No.8 thread (1 ball)
- Size 24 tapestry needle
- 8 inch Embroidery hoop
- Sharp pointed embroidery scissors
*The original model was stitched on Brittney fabric
Finding The Starting Point
First, prep your fabric:
- Fold one edge over to meet the opposite edge along the fabric’s length. You will have a skinny vertical rectangle.
- Identify the top edge of the folded fabric.
- Measure down 4 inches along the fold line.
- Mark this spot with a pin – this is the centre of your first row.
- Count 36 fabric threads to the left to reach the green dot (number 1) in the fourth square of the grid’s top row.
- Mark this starting point with a disappearing ink pen or HB (#2) pencil.
- Secure the fabric in a hoop to keep it taut while you stitch.

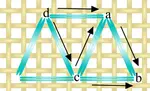
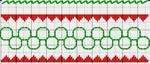
The Stitch Diagram
Remember that green dot?
It marks the start of stitch one in the diagram below (now blue). Each stitch spans 3 fabric threads, either horizontally or vertically, with the thread running diagonally across the back.
I’ve coloured the stitches in the first four rows to help you track your progress. Don’t worry—these colours aren’t part of the design (the thread stays white); they’re just a guide.
As you stitch, give the thread a good tug to ‘scrunch’ the fabric threads. This tightens the stitches and creates small holes at each end.

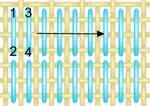
Pulled Thread Work - Rows 1-3
- Bring the needle up on the left of the first stitch, cross three threads right, and push it through to the back.
- Next, move three threads down from the start point to the left for stitch two. Use the same hole to finish.
- As you stitch, the trailing thread will create diagonal lines (like we talked about!).
- For stitch three, bring the needle up following the arrow directions, pull tight, and tuck it back into the same hole from stitch two.
Repeat until stitch eight, pulling each stitch firmly.
For the second row, carry the thread diagonally from eight to nine (shown in pink on the diagram). Continue stitching up the row with vertical and horizontal stitches on the front and diagonal stitches on the back.
For row three, follow the numbered stitches on the diagram and start as before.
Row 4 Adjustment
As you start row four of your whitework sampler, note a slight change.
After stitch 25, flip your work and slide the needle through the back of stitch 24. This stops loose threads from peeking through the hole at the end of stitch 25, keeping your work looking crisp.
Bring the needle back up for stitch 26 and continue stitching as normal. Paying attention to these details makes all the difference—you’ll achieve a professional finish without fuss.
Take your time here. Trust me, your effort will pay off!
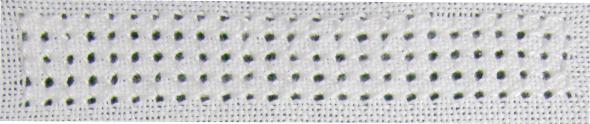
The Final Steps For This Band
To finish your sampler’s first band, turn your work upside down and rejoin your thread behind existing stitches where you first started row 1. This will allow you to fill in that missing corner.
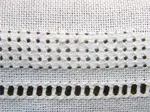
Take a moment to admire your stitching—it should match the photo below, though maybe without the mistakes! Can you spot where my tension’s off and where I missed two squares?
Well done on finishing this section!
Ready For The Next Step in Your Whitework Sampler?
Next up: mastering drawn thread work and basic hemstitching.
New to these techniques? They’re often mixed up with pulled thread work, but a simple practice band will show you exactly how they differ.
Grab your needle and join us – you’ll add this gorgeous, delicate skill to your stitching toolkit in no time!
For those who may be unfamiliar with these techniques, it's important to note that they are often confused with pulled thread work. However, by completing a straightforward band using drawn thread work, you'll gain a better understanding of the differences between these methods.
So join us for our next lesson and expand your embroidery skills with this beautiful and intricate technique.
Go to band 2 - drawn thread work
Go to band 3 - satin stitch border and pulled double back stitch
Go to band 4 - diamond eyelet stitch
Go to band 5 - honeycomb stitch
Go to band 6 - three sided stitch
Move on to band 7 - diagonal 4 sided stitch
Learn more about whitework embroidery
You might like these
Use pulled three sided stitch in your whitework sampler
In our penultimate band on the whitework sampler we are using three sided stitch and ringed back stitch
Diamond eyelet stitch and double backstitch leaves
Time for diamond eyelet stitch and double backstitch leaves in our free whitework embroidery sampler. Learn pulled thread and drawn thread work!
Pulled thread work - sampler band 3
Combining stitches is common in pulled thread work. For this third band in our free whitework sampler we will use satin stitch with pulled double back stitch
You might like these
Use pulled three sided stitch in your whitework sampler
In our penultimate band on the whitework sampler we are using three sided stitch and ringed back stitch
Pulled thread work - sampler band 3
Combining stitches is common in pulled thread work. For this third band in our free whitework sampler we will use satin stitch with pulled double back stitch
Diamond eyelet stitch and double backstitch leaves
Time for diamond eyelet stitch and double backstitch leaves in our free whitework embroidery sampler. Learn pulled thread and drawn thread work!
Stay connected between projects
If you’d like occasional updates from my embroidery room, including new patterns, gentle tips, and little things I think you might enjoy, you’re warmly invited to join the Stitchin’ Times newsletter.
About Me - Contact Carol - Privacy Policy - Site Map - Testimonials
Please do not copy the content of this site. It is protected by Copyscape.
Copyright © 2006- www.needlework-tips-and-techniques.com All rights reserved