- Home
- Needlepoint
NEEDLEPOINT GUIDE
Needlepoint Stitches: Choose the Right One for Stunning Designs
Learn how stitch direction, size, shape and texture work together to bring your designs to life
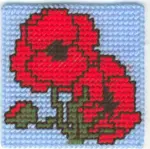
Painting With Thread
Choosing the right needlepoint stitch can feel overwhelming at first — there are so many options! But don’t worry, you don’t need to learn them all at once.
Whether you’re just starting or looking to improve, the key is knowing a few essential stitches and understanding how they affect your design.
Think of needlepoint like painting with thread. Some stitches create smooth backgrounds, while others add texture and depth. Some are quick and easy, while others take more time but give stunning effects.
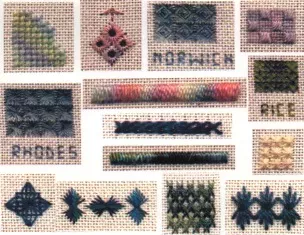
Build Your Needlepoint Stitch Library
Having a go-to collection of stitches makes needlepoint more enjoyable and helps you quickly choose the right stitch for any project. Below, you’ll find essential stitches categorised by their purpose and effect.
Foundation Stitches (Great for Beginners!)
These stitches form the backbone of most needlepoint projects and provide smooth, even coverage.
Tent Stitch
The most versatile stitch, perfect for backgrounds and fine details.
Learn Tent Stitch →Basketweave Stitch
Prevents canvas distortion, ideal for filling large areas evenly.
Learn Basketweave →Decorative & Textured Stitches
Use these stitches to add depth, interest, and personality to your work.
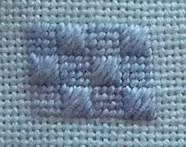
Scotch Stitch
Creates a structured, geometric pattern for backgrounds and borders.
Learn Scotch Stitch →Rhodes Stitch
A raised, spiral effect perfect for bold accents and focal points.
Learn Rhodes Stitch →Rice Stitch
Adds beautiful texture with layered cross-stitches and endless thread effects.
Learn Rice Stitch →Organic & Free-Flowing Stitches
Perfect for natural shapes, foliage, or soft textures in your design.
As you continue learning, you’ll discover more stitches that add dimension and personality to your work. Ready to stitch with confidence? Read on to learn how direction, size, shape and texture affect your choices!
The Importance of Stitch Direction
Each needlepoint stitch has a natural direction — some are always worked diagonally, while others follow straight horizontal or vertical lines. While you can’t change the way a stitch is worked, you can choose the best stitch for the effect you want.
Why Stitch Direction Matters
Stitch direction determines how your design looks and how your canvas behaves. Diagonal stitches distribute thread tension differently from straight stitches, sometimes causing the canvas to distort. The direction of the stitch can also create a visual effect — some stitches appear smooth and subtle, while others add strong lines or movement to the design.
Choosing the Right Stitch for the Right Effect
When selecting a stitch, think about the effect you want to achieve. Want to create a sense of movement? Choose a stitch that naturally flows in the direction you want, like Slanted Gobelin for sloping hills. Need stability and structure? Use a straight-aligned stitch like Brick Stitch for buildings and borders.
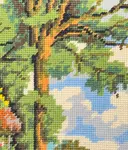
For example, if you’re stitching a tree, you might use an upright Gobelin for the trunk (to give it a strong, structured look) and a Diagonal Mosaic Stitch for the leaves (to create movement). If you’re stitching a brick wall, horizontal stitches will help create a more realistic effect.
Pro Tip: Preventing Canvas Warping
Diagonal stitches can sometimes pull fabric out of shape. Using a frame or stretcher bars will help keep the canvas even and prevent distortion.
Stitches Without a Visible Direction
Not all stitches create strong lines or obvious movement. Some blend smoothly into the design, making them ideal for backgrounds or areas where you want texture without a dominant direction.
Textured stitches (like Rice Stitch or Rhodes) add visual interest without guiding the eye in a particular direction. Even-coverage stitches (like Tent Stitch) create a balanced, uniform look, making them perfect for background areas where you don’t want the stitches to compete with the main design.
If your design needs a soft, blended effect, consider a stitch that adds depth without a strong directional pull. This keeps the focus on your main elements while adding richness and dimension to your work.
Stitch Size: Why It Matters
The size of your stitches affects how your design looks, how much detail you can include, and how your canvas behaves. Some stitches are tiny and delicate, while others are large and bold. Choosing the right size helps balance your design.
Choosing the Right Size
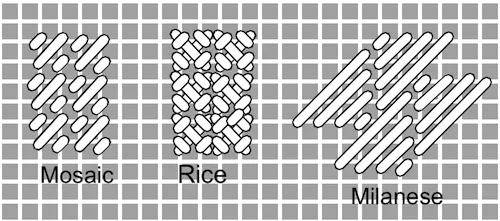
Size of the area — Larger stitches (like Milanese Stitch) cover more area quickly and create bold, textured effects. Great for backgrounds, decorative borders, and filling large spaces.
Level of detail needed — Smaller stitches (like Mosaic Stitch) offer more precision and detail. They work well for fine details, small design elements, and intricate patterns.
Thread coverage and texture — Large stitches often create more raised, textured surfaces, while smaller stitches provide a smoother finish.
Combination stitches — Many needlepoint stitches are made up of multiple individual stitches grouped together. The total size of the group determines the overall impact on your design.
Pro Tip: Balancing Stitch Size
Mixing stitch sizes within a piece helps create depth and contrast. Use larger stitches for backgrounds or bold elements and smaller stitches for detailed areas to keep your design visually balanced.
Overall Shape of a Group of Stitches
While individual stitches have a set structure, many needlepoint stitches are grouped together to form larger patterns. The overall shape these groups create affects how your design looks and how smoothly it fits into the stitched area.
Square or Rectangular Stitches
Stitches like Scotch Stitch and Chequer Stitch create a structured, geometric look. They’re great for backgrounds, tiled patterns, and architectural elements. They can leave small gaps at the edges of irregular shapes, requiring compensating stitches.
Diagonal & Slanted Stitches
Stitches like Slanted Gobelin and Diagonal Mosaic add movement and a sense of flow to designs. They work well for natural elements like waves, grass, or fabric folds. They may pull the fabric more than straight stitches — using a frame helps prevent distortion.
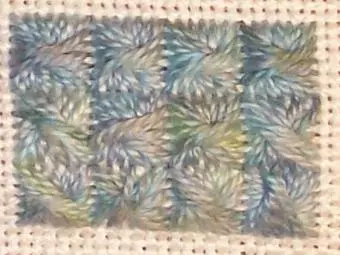
Irregular Stitches
Stitches like Leaf Stitch and Rhodes Stitch break away from straight lines to create softer, organic shapes. They’re perfect for floral designs, foliage, and rounded objects. They can be trickier to fit into grid-based designs but add beautiful texture and depth.
Working with Partial Shapes and Edges
Not every stitch will perfectly fit an area of your design. Sometimes, you’ll need compensating stitches to fill smaller spaces at the edges. These are portions of a larger stitch adjusted to fit into the available area — helping create a clean, polished finish.
Pro Tip: Using Stitch Shape to Enhance Your Design
If you want your piece to look structured and orderly, stick to stitches with square or rectangular formations. If you want a more natural, free-flowing effect, incorporate diagonal or curved stitch groupings. Mixing both can create contrast and visual interest!
The Texture a Stitch Creates
Texture plays a huge role in needlepoint — it adds dimension, contrast, and personality to your design. Some stitches create a smooth, even surface, while others stand out with raised or bumpy textures. Choosing the right texture helps bring your project to life!
Flat & Smooth
Tent Stitch, Continental Stitch — create an even, polished look. Ideal for backgrounds and fine details where you want colours to blend seamlessly.
Raised & Dimensional
Rhodes Stitch, Smyrna Cross — stand out from the fabric, adding depth. Perfect for bold accents, flower centres, and focal points.
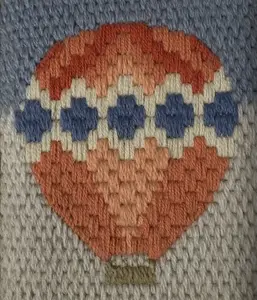
Textured & Patterned
Hungarian Stitch, Bargello — create subtle patterns or ridges that give movement. Excellent for landscapes, clothing details, and textured surfaces.
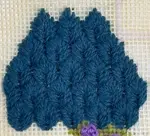
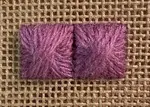
Pile & Loop
Velvet Stitch, Turkey Work — form a plush, fabric-like effect. Great for fur, hair, or soft tactile surfaces. Can be trimmed or left looped.
How to Use Texture Effectively
When planning your project, think about which areas should be smooth, which should stand out, and how texture can enhance the final look. Want to highlight an element? Use raised or looped stitches to make it pop. Need a soft, blended background? Stick to smooth, flat stitches. Looking for variety? Mix textures to create contrast and depth.
For example, if you’re stitching a landscape, you might use Gobelin for rolling hills, Tent Stitch for the sky, and Velvet Stitch for fluffy clouds or a furry animal.
Pro Tip: Balancing Texture
Too much texture can make a piece look busy or uneven. Try combining smooth areas with raised details to create a design that feels polished and visually appealing.
Time to Start Stitching
Now that you understand how stitch direction, size, shape, and texture affect your design, it’s time to put your knowledge into practice! Whether you’re working on your first project or refining your technique, experimenting with different stitches is the best way to build confidence and skill.
Every stitch you learn opens up new creative possibilities.
You might like these
Scotch Stitch Needlepoint Guide: Step-by-Step Tutorial
Learn how to work the Scotch Stitch with our step-by-step needlepoint tutorial, including variations like Alternating and Chequer Stitch
Needlepoint Patterns: Discover Beautiful Designs for Your Next Project
Needlepoint patterns that use textured needlepoint stitches and over-dyed threads make up the Textures to Dye for range
Free Christmas Bargello Design: A Needlepoint Pattern for Beginners
Create your own Bargello Christmas design with this free needlepoint pattern. Perfect for beginners, with step-by-step instructions and downloadable pattern.


Stay connected between projects
If you’d like occasional updates from my embroidery room, including new patterns, gentle tips, and little things I think you might enjoy, you’re warmly invited to join the Stitchin’ Times newsletter.
About Me - Contact Carol - Privacy Policy - Site Map - Testimonials
Please do not copy the content of this site. It is protected by Copyscape.
Copyright © 2006- www.needlework-tips-and-techniques.com All rights reserved