- Home
- Free Assisi Pattern
Your First Assisi Rose: A Free Pattern & Fun Step-by-Step Guide
Have you ever admired those intricate embroidery pieces where the design seems to appear magically because the background is completely filled in?
That’s the wonderful reverse magic of Assisi work. You can absolutely do it.
This lovely rose pattern is the perfect introduction. It’s a small project with a big impact, and I’ll walk you through each step.
Ready to create something you can be proud of? Let’s get started!
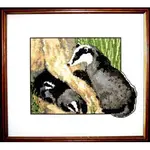
Say Hello to Your Assisi Rose
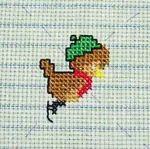
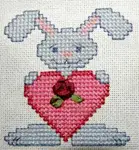
Isn’t it lovely? This simple, elegant design can be yours.
Below is the finished piece to inspire you.
Now it’s your turn to enjoy the timeless charm of this embroidery, whatever your stitching experience.

What You'll Need to Gather
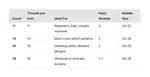
You don't need much to get going, just a few simple supplies:
- An 8-inch (20cm) square of 14-count Aida or 28-count evenweave fabric
- Embroidery floss (I used classic red, DMC 498, and black, DMC 310)
- A tapestry needle (size 24 or 26 will be perfect)
- An embroidery hoop to keep everything taut
Let's Get Stitching!

Here comes the fun part. We'll break it down into easy little steps so you can relax and enjoy the process.
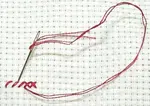
Finding Your Starting Point
To make sure your rose ends up right in the middle, it's always best to begin stitching from the center of the fabric.
(A little pro-tip: you can find the center by gently folding your fabric in half, and then in half again!).
Because the background shape is symmetrical, there is actually a stitch in the centre horizontally, not a fabric thread. Moving your centre slightly to one side or the other is not going to make a difference to the overall result, so don't let this throw you.
Step 1: Drawing the Lines with Backstitch
First things first, let's stitch the outline of our rose. Think of it like a colouring book. We're just creating the lines before we fill in the background! Using 1 or 2 strands of your black thread (DMC 310), depending on how obvious you want the lines to appear, outline the entire rose design using backstitch.
Step 2: Filling the Background with Long Armed Cross Stitch
Now for the magic we talked about! The solid covering of Long Armed Cross Stitch is what creates that beautiful reverse effect, making your un-stitched rose really stand out.
Don't let the name intimidate you; it's just a slightly stretched-out version of a regular cross stitch.

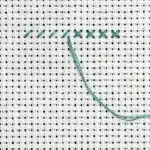
- Start with a basic cross stitch. Following the diagram above, bring your needle up at 1, down at 2, up at 3, and down at 4. That’s your first little anchor stitch.
- Now, for the "long" stitch. Bring your needle up at 5 and take it down at 6 to create the first long arm.
- Keep the rhythm going. You'll repeat the sequence of stitches from 7 to 8, and then 9 to 10.
- A quick tip for neatness: Try to make sure the shorter "arm" of your stitches always crosses over in the same direction. It's a small detail that makes the finished piece look wonderfully polished.
- Finish the row. When you get to the edge of the design, finish the row with a normal cross stitch (marked in a darker blue on the diagram).
Work this stitch in rows to fill the entire background, and watch your beautiful rose emerge.
Fancy a Bit of History for Your Tea Break?
While you're taking a breather, here’s a fun little story.
This style of embroidery is named after Assisi, the charming Italian village where it originated centuries ago!
It has a deep connection to St. Francis, and the craft was revived in the 19th century by local women. Traditionally it was done in red or blue, but later stitchers started playing with greens and golds, too.
The classic red floss you're using for this project is a perfect example of that timeless tradition! So, as you stitch, you're taking part in a long, lovely history of creativity!
 A bronze statue of St Francis in the main Basilica of Assisi. He is depicted as a soldier, realising his destiny lay in more peaceful ways. - Photo by Cath Andrews
Look What You Did! What's Next?
Congratulations on completing your first Assisi rose!
You've mastered the 'reverse magic' we talked about. You've created something to be truly proud of.
If you’ve caught the bug and are itching to try more, these books are fantastic resources for exploring the technique further.
For a classic guide: Assisi Embroideries by Therese de Dillmont. You can sometimes find vintage copies online.
For a rare gem: Assisi Work & Italian Hemstitching by Camela Testa.
For modern inspiration: Assisi Embroidery: Technique and 42 Charted Designs from the Dover Needlework Series. This one is often available secondhand.
Thank you for stitching along with me.
A special thank you to my friend Cath Andrews for allowing me to share her beautiful photographs of the village of Assisi, below.


You might like these
Waste Canvas — How to Use & Remove (Step-by-Step Guide)
Take your needlework to the next level with waste canvas: Transform your clothes into one-of-a-kind statement pieces
How to Wash Cross Stitch Before Framing – Safe & Easy Guide
Should you wash cross stitch before framing? Yes! Learn how to safely wash, dry and press your embroidery. Step-by-step instructions to remove oils and marks.
Cross Stitch vs Embroidery: Choosing the Right Needlework Technique
Choose from cross stitch or embroidery - let your creativity shine through & create beautiful items to last a lifetime! No matter which you choose, have fun


Stay connected between projects
If you’d like occasional updates from my embroidery room, including new patterns, gentle tips, and little things I think you might enjoy, you’re warmly invited to join the Stitchin’ Times newsletter.
About Me - Contact Carol - Privacy Policy - Site Map - Testimonials
Please do not copy the content of this site. It is protected by Copyscape.
Copyright © 2006- www.needlework-tips-and-techniques.com All rights reserved