- Home
- Basic embroidery stitches
- Feather Stitch
Learn how to do Feather Stitch embroidery
Feather stitch is a beautiful and versatile basic embroidery stitch that adds a touch of elegance to any project.
This looped stitch creates a neat and regular appearance when worked on evenweave fabric, making it perfect for borders or decorative seam treatments.
Alternatively, when stitched on a tightly woven fabric, it can mimic the delicate and organic look of branches, twigs, vines, or even seaweed and coral.
In the written tutorial and videos below, you will learn how to create feather stitch and explore different variations of this hand embroidery stitch.
Whether you're a beginner or an experienced embroiderer, this stitch is relatively easy to master and offers endless possibilities for creativity.
Quick Links
What is feather stitch used for?

I stitched this tree on a crazy quilt block. Feather stitch is often used on these quilts to decorate the seams between patches, but on this occasion I chose to decorate the patch itself.
Beginning with chain stitch for the heavier lines, to give structure to the tree shape, I then worked the meandering feather stitches between the branches, starting from the tips and working towards the trunk.

In the next photograph I worked the brown feather stitch first, and then overlapped this with the white stitching.
I didn't transfer a drawing on to the fabric. I just let the stitches wander wherever they wished to go, varying the size of my stitches as desired.
I used six-stranded embroidery floss for both these examples.
When you're learning this stitch, I highly recommend using evenweave or Aida fabric in an embroidery hoop.
Why, you ask?
Well, let me explain. By using a hoop, you can count the fabric threads and make sure your stitches are placed just right. It's like having a little guide to help you along the way. Plus, it's much easier to keep your tension even, which is super important for achieving that perfect finished look.
I chose to work over 4 fabric threads for my sample below the video, but you can adjust it to fit whatever size you need.
Video: Feather Stitch Tutorial
I don't know about you, but I often find it easier to watch a stitch being worked rather than trying to follow a written description. I worked the following video in a hoop, but this time on a plain weave cotton.
You can follow along by clicking the transcript button, below.
Step 1

Bring your needle to the surface where you wish to start your feather stitch. Count four fabric threads to the right and reinsert the needle.
Pull the needle through, but not all the way. Leave a loop of thread below your work. Push the needle back up inside the thread loop, two threads to the left and four down.
Now pull the thread right through, slowly, until the stitch sits comfortably on the surface.
Step 2

You will have a V-shaped curve with the thread emerging from the centre bottom.
Bring the needle back up four fabric threads to the right of the hole the thread is exiting from, and repeat.
Step 3

Now work a stitch in a similar manner, but position it four fabric threads to the LEFT of the previous stitch.
Step 4

Alternate the position of your stitches as you continue along the row, working one on the right and the next on the left.
The finished row of feather stitch

For the photograph of my completed row of feather stitch above, I have turned the work so it travels from left to right. You can actually work your stitches from top to bottom or left to right, whichever feels most comfortable to you.

The row above is worked in the same manner, but I worked on a 6 across and 3 down basis to create a wider, but shallower, effect.

The base seam that I stitched in the video, ended up with a green embroidery floss (2 strands) threaded twice through each "arm", green straight stitch twigs and pink french knot roses.
Video: Double Feather Stitch
You can follow along by clicking the transcript button, below.
To make it easier to understand, in the video above I used a checked fabric. However, there is no need to be this exact in lining up your stitches when working on your own projects.
Using Different Threads and Fibres

The photograph shows the stitch worked at different scales. The chunkier sample uses Splendor Frosty Rays, which is a sparkly ribbon. Whereas the thread used from the finer sample was Spendor Strandable 12-ply silk.
Feather Stitch Variations
Straight-Sided Feather Stitch

In this variation when you bring your needle up inside the loop of thread you move it across so that it is vertically below the previous stitch instead of centered underneath it.
This gives it the characteristic straight sides.
Then, as in the original stitch, you change to working on the other side, again vertically.

Straight sided feather is then the basis for the next variation.
For this example I used a Perle thread made by Rubi. which was lovely and soft but firm, on 28 count evenweave fabric once again.
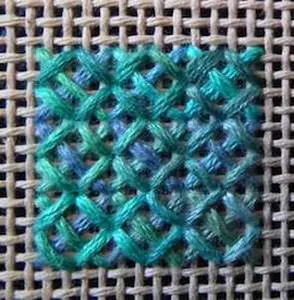
Crossed Feather Stitch
After completing your row of straight sided feather, you can then work a second layer over the top, filling in the gaps. This creates a plaited effect.
You can choose whether to use the same thread/colour or to use a contrasting one.
The stitch method is exactly the same as the straight sided variation.
Either of these make a decorative seam treatment for a crazy quilt block or a border in a counted design.


Combining Feather Stitch With Other Stitches
You can take things further by embellishing feather stitch with other stitches as shown on the green and pink project (from left to right)
- detached chain stitches tucked alongside the main "stem"
- detached chain stitch again but at the end of each "point"
- French knots, either singly or massed together
- three straight stitches grouped together to form tiny flowers
 Adding other stitches to decorate feather stitch
 Double feather stitch with french knot "buds"
Have fun, and experiment to see what effects you can get. You never know, soon feather stitch might become one of your favourites!
You might like these
Scotch Stitch Needlepoint Guide: Step-by-Step Tutorial
Learn how to work the Scotch Stitch with our step-by-step needlepoint tutorial, including variations like Alternating and Chequer Stitch
Chevron stitch embroidery tutorial with step by step photos
Learn the correct way to work chevron stitch embroidery and discover interesting new ways to use it in your next needlework project
Rice stitch - an easy needlepoint stitch to learn
Try Rice Stitch - one of the simple needlepoint stitches that you can use to give many different effects


Stay connected between projects
If you’d like occasional updates from my embroidery room, including new patterns, gentle tips, and little things I think you might enjoy, you’re warmly invited to join the Stitchin’ Times newsletter.
About Me - Contact Carol - Privacy Policy - Site Map - Testimonials
Please do not copy the content of this site. It is protected by Copyscape.
Copyright © 2006- www.needlework-tips-and-techniques.com All rights reserved