- Home
- Needlepoint
- Gobelin Stitch
NEEDLEPOINT TUTORIAL
Gobelin Stitch & 7 Variations
Simple techniques for stunning textures — from straight stitches to elegant shading effects
Your Guide to Beautiful Gobelin
If you've been looking at needlepoint stitches and feeling a bit overwhelmed by all the options, I completely understand. When I first started exploring beyond basic tent stitch, I wasn't sure which variations were worth learning and which would just leave me frustrated.
The good news? Gobelin stitch is one of those wonderful techniques where the results look far more impressive than the skill level required. It's built on simple straight stitches — and once you've got the basic movement, seven beautiful variations open up to you.
Whether you're fairly new to needlepoint or you've been stitching for a while and want to expand your repertoire, this guide walks you through each variation with step-by-step photos and honest tips — including what to do when things don't go quite to plan.
You'll discover how small changes — like switching thread types or adjusting your stitch angle — can completely transform the look of your work, from rustic textures to elegant shading effects.
Ready to get started? Let's begin with choosing the right threads.
Choosing the Right Threads
The thread you choose makes a real difference to your finished piece — and it's one of those decisions that can feel a bit daunting when you're starting out. So let me simplify things with three reliable options...
Wool Yarn
Lovely for adding rich texture and warmth. It covers the canvas beautifully, making it ideal for pieces that need durability — cushions, chair seats, and anything that gets handled.
Metallic Threads
Wonderful for accents and highlights — a little shimmer goes a long way. They can be trickier to work with (they like to twist!), but the effect is worth the patience.
Pearl Cotton
A twisted cotton thread with a lovely lustre. It comes in different thicknesses — size 5 works well on fine canvases and gives crisp, defined stitches.
Straight Gobelin Stitch
Let's start with the foundation — the Straight Gobelin Stitch. This is one of the simplest stitches in needlepoint, and it's the building block for everything else on this page. If you can make a straight stitch, you can do this.
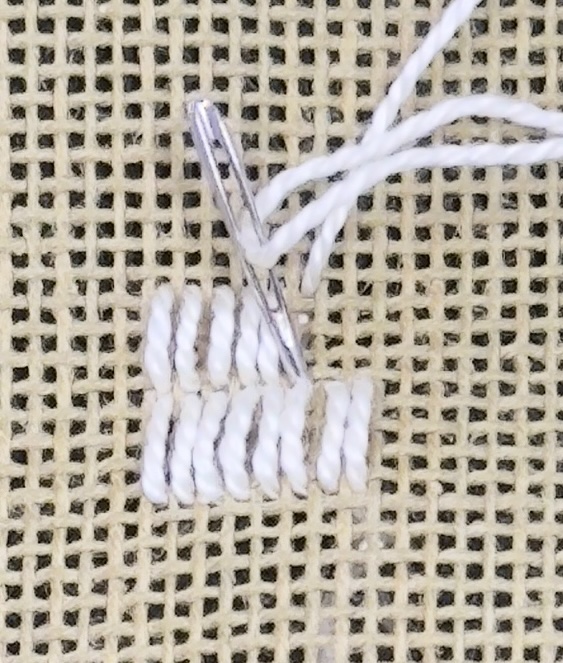
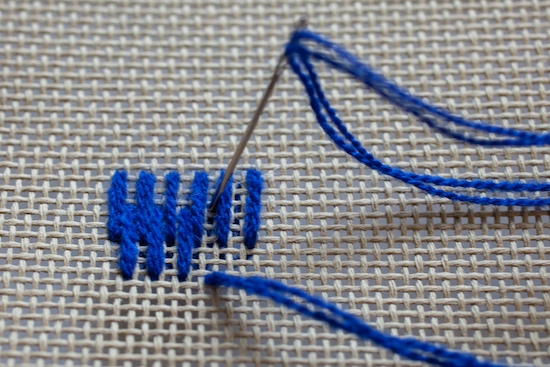
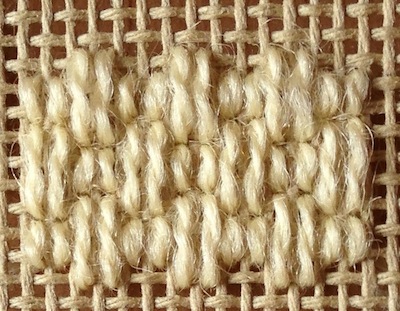
It's simply a straight stitch that covers the desired number of canvas threads — in this case, four. I used Pearl Cotton number 5 here so you can see each individual stitch clearly in the close-up. Wool tends to be a little fuzzy, which is beautiful in a finished piece but makes it harder to see the stitch formation when you're learning.
In the photo I'm in the process of stitching a second row, reusing the hole from the previous row.
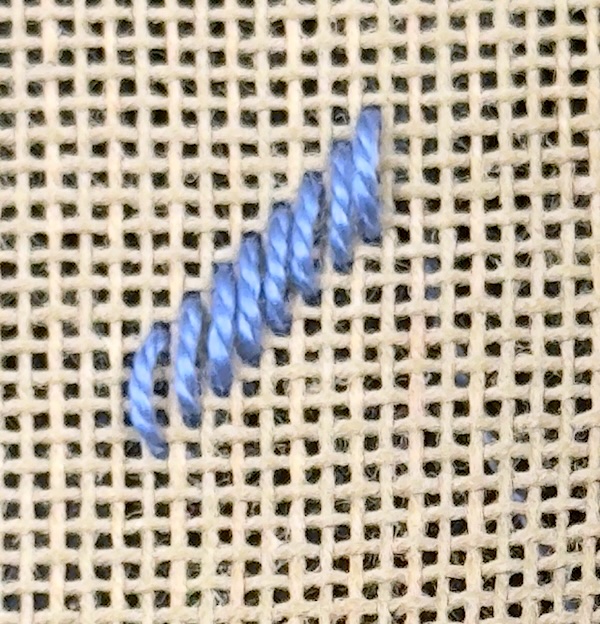
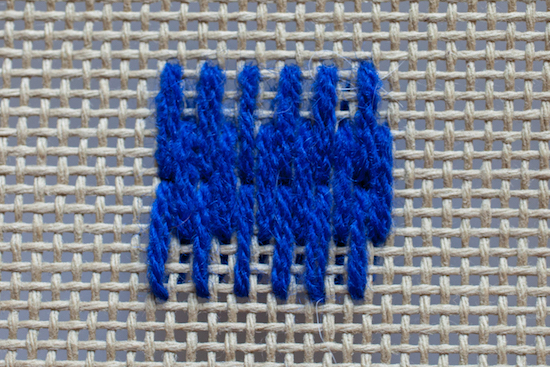
But here's the thing — it isn't always necessary to work into adjacent holes. In the second sample, I shifted each stitch slightly diagonally, creating a staggered effect rather than a rigid row-by-row approach. This adds movement and can resemble woven or tiled surfaces.
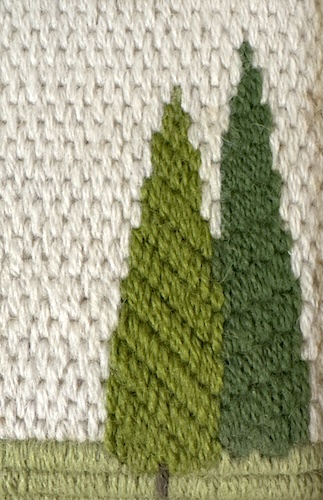
You can take this dropping technique further to create shapes and pictures, as in these two little trees.
Slanted Gobelin Stitch
Now let's angle things. By making the stitches themselves diagonal rather than straight, you get better canvas coverage — less of the background peeks through.

In this photo I worked over three canvas threads horizontally and vertically. I began stitching from left to right along the row, and when I reached the corner, I brought the needle back up below the previous stitch to travel down the canvas.
Although I used the same thread as before, you can see how the slant means less canvas shows under the stitches.
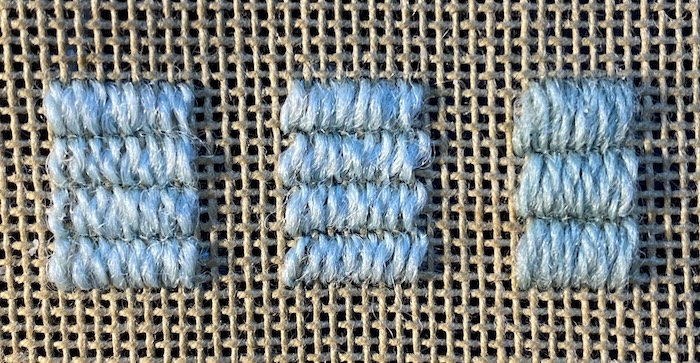
When I switch to wool you can see how the fuzzy yarn makes the stitches less defined and softer looking — which is often exactly what you want in a finished piece.
In this second photo, the left sample is straight gobelin over three canvas threads, using one strand of Persian wool. The middle sample uses the same wool but with slanted stitches crossing three threads vertically and one horizontally.
The right-hand sample is also slanted gobelin, but worked in a single strand of a thicker Danish wool called Cewec Zephyr. I was lucky enough to pick up a whole basket of different colours from a local charity shop here in the UK — keep your eyes open, because you never know what you'll find!
Encroaching or Interlocking Slanted Gobelin
Once you're comfortable with the slanted version, this variation takes it one step further — and it's where things get really exciting for creating natural-looking textures.
The difference is subtle but powerful: instead of keeping each row neatly separate, you slightly overlap the new stitches into the row above. This eliminates those hard lines between rows and creates soft, blended colour transitions.
Think of it like watercolour painting where colours gently merge into each other — that's the effect you're aiming for. It's perfect for representing fur, hair, sky gradients, or any time you want smooth shading.
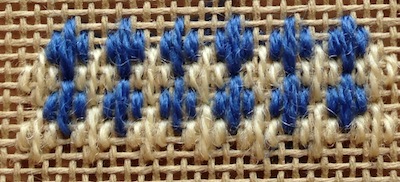
In this photo I used three shades of blue, working two rows in each colour.
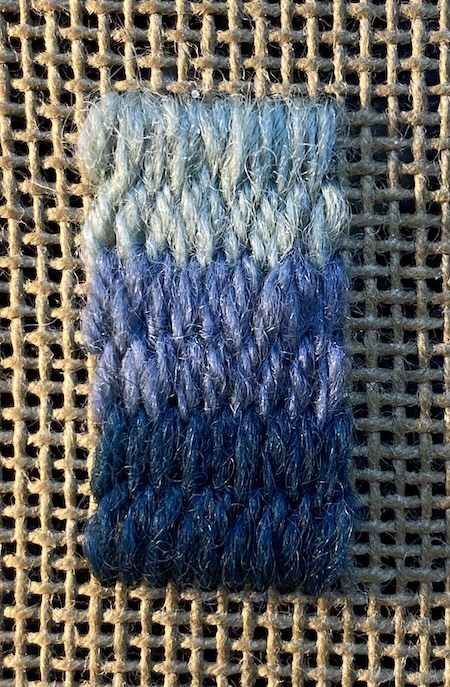
Start with a row of slanted gobelin stitches, just as before. For the next row, position each stitch so its top slightly overlaps the bottom of the stitches in the row above — in this sample I took the needle to the back one canvas thread above the hole used for the previous row. This helps disguise the transition between rows.
Alternating Straight Gobelin
This is a lovely variation that creates a brick wall effect — and it's easier than it looks.
The secret is to leave a gap between each stitch on your first row, then on the next row, work into the space you left. It's the same principle as laying bricks, and the pattern builds up quickly.
You can work this over any even number of canvas threads — I used six on interlock canvas for my samples.
For more about the different types of needlepoint canvas, have a look here.

If you scroll back up to the trees photo in the Straight Gobelin section, you'll notice the sky behind them was worked in this alternating method — it's a lovely way to fill a background area.
Parisian Stitch
This is one of my favourites for adding texture to a design. By simply alternating long and short stitches, you create a subtle ribbed effect that works beautifully for all sorts of textures.
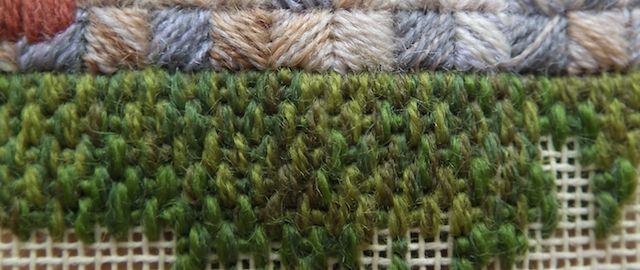
Look at the grass in the photo above — that's Parisian stitch, and the variation in colour comes from mixing strands of different coloured crewel wool in the needle. It's a small trick that makes a big difference.
I worked the longer stitches over 4 canvas threads and the shorter stitches over 2. Once you've got the rhythm of long-short-long-short, it's wonderfully meditative.
Double Parisian Stitch
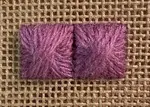
Fancy a woven effect? Work two long stitches followed by two short, then alternate the pattern on the following row. The result is a lovely textured surface that resembles basketweave.
Depending on which way you hold the canvas, this could represent a basket, a fence, or a hurdle — it's surprisingly versatile for such a simple pattern.
Hungarian Stitch
Work a group of three straight gobelin stitches (short, long, short), skip a hole, and repeat. On the following row, use the hole you skipped for the longer stitch. What emerges is a charming diaper pattern that looks like little diamonds.
Worked in two colours, as in the photo, the diamonds really pop. In a single colour the effect is more subtle — but still beautiful. It's one of those stitches where you can get very different results just by changing your colour choices.
I worked over 2 and 4 threads in my sample, using crewel wool.
Bargello Needlepoint
Did you know that the straight gobelin stitch is also the basis for Bargello needlepoint? In Bargello, the stitches are commonly worked over the same number of threads, but stepped up or down the canvas as you go. The magic happens when you gradually vary the colour for each row — building up those gorgeous wave and flame patterns.
Grab Your Yarn
Seven variations might feel like a lot to take in — but remember, they're all built on the same simple straight stitch. You don't need to learn them all at once. Pick whichever one caught your eye and give it a go on a scrap of canvas.
My suggestion? Start with the Slanted Gobelin Stitch — it covers the canvas beautifully and gives you a feel for how angle changes the whole character of the work.
If your first few stitches aren't perfectly even, that's genuinely fine — mine weren't either when I was learning these variations. Tension and consistency come with practice, and the beauty of working on canvas is that a little unevenness disappears into the overall texture.
You might like these
Learn Hand Embroidery Stitches for Textured Fills
Learn hand embroidery stitches to fill shapes with texture and confidence. Follow Carol's step-by-step photos to practise new stitches at your pace.
Rhodes Stitch: Heart, Square & Diamond Variations + Diagrams
Learn Rhodes stitch variations including heart, diamond, square and half stitch. Step-by-step diagrams for needlepoint and embroidery. Photos of each shape!
Chain Stitch: Unlocking the Art of Hand Embroidery
Simple chain stitch tutorial, showing different variations of this useful embroidery stitch with full instructions for a little fish design

Stay connected between projects
If you’d like occasional updates from my embroidery room, including new patterns, gentle tips, and little things I think you might enjoy, you’re warmly invited to join the Stitchin’ Times newsletter.
About Me - Contact Carol - Privacy Policy - Site Map - Testimonials
Please do not copy the content of this site. It is protected by Copyscape.
Copyright © 2006- www.needlework-tips-and-techniques.com All rights reserved