- Home
- Basic embroidery stitches
- Stem Stitch
Stem stitch and variations
As you unfold your latest embroidery pattern, a sense of excitement washes over you - until you stumble upon the words stem stitch and your heart skips a beat.
You've heard of it, but never tried it before. It sends your mind racing with questions. What if you're not doing it right? What if your stitches are uneven or too tight?
Let’s demystify this versatile stitch! I’ll walk you through a step-by-step guide on how to do stem stitch embroidery with confidence and ease.
Fabric and Thread Choices for Stem Stitch
When it comes to choosing your fabric, opt for tight weaves with a higher thread count, as they allow for more accurate stitch placement.
As this is a freestyle hand embroidery stitch, you don't need an evenweave fabric such as you would use for counted techniques like cross stitch.
If you're not sure of the difference, this page will help explain.
For your thread, you can select from a range of options, including silk thread, embroidery floss, or heavy pearl cottons, depending on the specific requirements of your project.
Variations on the Basic Stitch
The beauty of stem stitch lies in its versatility, with several variations that can add texture and dimension to your embroidery.
These include the Portuguese Knotted Stem Stitch, Raised Stem, and Trailing Stitch, which are all ideal for creating stunning Stumpwork embroidery patterns.

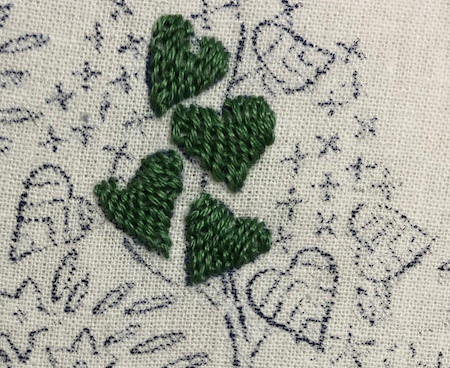
To inspire your creativity, take a look at the photograph above.
This features a beautiful floral embroidery pattern that showcases a combination of stitches, including detached chain (lazy daisy stitch), star stitch, straight stitch, and three types of stem stitches (shown further down this page).
If you're eager to try your hand at this project, you can download the pattern here.
Video: Stem Stitch
Get ready to learn all about stem stitch! In this video, I'll show you how it's done in an embroidery hoop. Check it out and get stitching!
You can follow along by clicking the transcript button, below.
Right-handed? Work from left to right, keeping the thread beneath each row. Lefties - reverse it!
Bring the needle up from the back on the line you are about to stitch. Take it down again one stitch length along.
If you are working without a hoop you can insert the needle and bring it back through the fabric in a single movement in what is known as the sewing method. Be extra careful with your tension to avoid puckering the work.
If you are working in a hoop, don't pull the thread all the way through, just hold it to the side while you insert the needle halfway between the entry and exit points. Draw the needle through and gently pull the thread so the stitch sits neatly on the surface.
Insert the needle again, further along the row, half a stitch length from the end of the previous stitch. Bring it back to the surface where the previous stitch ended and then repeat.
What thread should I use?
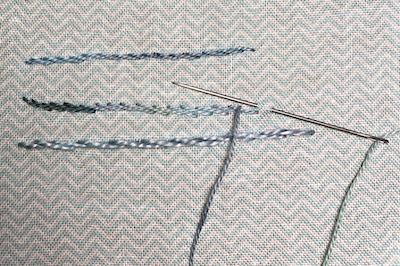
Add variety to your stem stitch with different threads! A single strand of embroidery floss or silk yields a delicate, fine line.
For more body, opt for pearl cotton – like the bottom two rows in the photo. Get creative and explore all the possibilities!
For a narrow row of Stem Stitch keep all your stitches on the same line. However, to make it wider you can bring the needle out above the line, making the stitch more diagonal. I illustrate this in the second row in the photo.
For a bolder stitch, opt for a thicker thread such as size 8 pearl cotton or combine multiple strands of floss. Voila! Your stitches will pop with extra texture.
How can I stitch a curve or fill a shape?
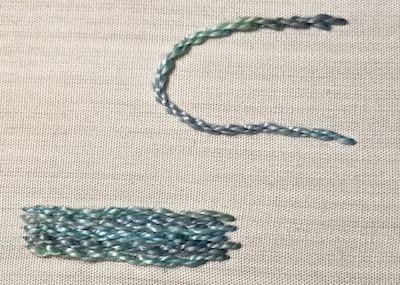
Shorten your stitches on curves and lengthen them slightly on straight sections to masterfully navigate the intricate twists and turns of your design.
These lines can be used for flower stems, animal whiskers, leaf veins, butterfly antenna, lettering and much more.
Also, don't rule it out for filling solid areas of a hand embroidery pattern. Placing rows of stem stitch side-by-side, perhaps changing colour as you progress, can create attractive leaves or flower petals.
Raised Stem Stitch
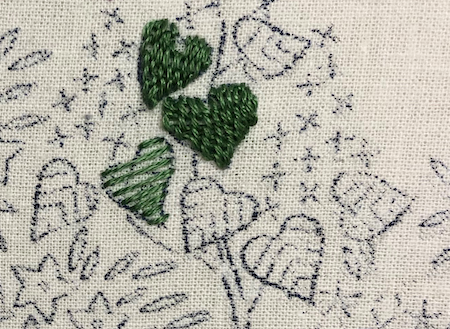
Embroidery takes on a whole new dimension when stem stitch is worked over straight stitches placed at right angles to the row.
Start by laying stitches across the shape to be filled equidistant from each other. Do not put tension on these, but let them lay comfortably on the surface. If, as in the example in these photographs, you are filling a leaf, start as near to the point as you can.
Bring the needle through to the front of the work at the tip of the leaf. We will work the stem stitches through the framework and not through the fabric.
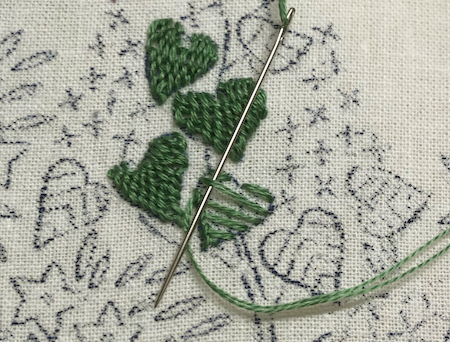
When working stem stitch over a framework of straight stitches placed at right angles to the row, this basic embroidery stitch becomes more dimensional.
Start by laying stitches across the shape to be filled equidistant from each other. Do not put tension on these, but let them lay comfortably on the surface. If, as in the example in these photographs, you are filling a leaf, start as near to the point as you can.
Bring the needle through to the front of the work at the tip of the leaf. We will work the stem stitches through the framework and not through the fabric.
Continue in the same manner, working your way across the width of the leaf. When your first straight stitch is full, and you need to travel further up the side of the leaf, just miss it out. As you progress, you will ignore more of the straight stitches, only working over those that are in your path.
The raised stem stitch creates a beautiful, cushioned effect. This variation of the basic stitch is often seen in crewel work designs.
Video: Portuguese Knotted Stem Stitch
You can follow along by clicking the transcript button, below.
Give your single line a raised look without using thicker thread - by trying the following variation.
Perhaps better called wrapped rather than a knotted stitch, Portuguese Knotted Stem involves a simple extra step. After working each stitch, you need to slip the needle under both the stitch you have just made and the previous one, twice.
Trust me, it is easier to do than it sounds. Check out the video.
Try out these creative variations of stem stitch! If you have any questions, don't hesitate to reach out.
Been There, Stitched That? Share Your Work!
Now it's your turn! Did you give the stitch a go? Did you discover a brilliant colour combination or have a little "aha!" moment of your own?
I would be so thrilled to see your creations and maybe even feature them here to inspire other stitchers. Seeing your work is the best part of my day!
Drop a photo and your story in the form below. Your experiments and questions are what make this little corner of the internet so special.
You might like these
Cross Stitch vs Embroidery: Choosing the Right Needlework Technique
Choose from cross stitch or embroidery - let your creativity shine through & create beautiful items to last a lifetime! No matter which you choose, have fun
How to Do Herringbone Stitch: Embroidery Step-by-Step
Step-by-step herringbone stitch tutorial for hand embroidery. Clear photos show how to keep stitches neat and avoid tangles. Includes variations.
How to Use Old or New Iron-On Embroidery Transfers & Test Them Safely
Feeling nervous about using an old iron-on transfer on expensive fabric? Learn how to test and apply any transfer for crisp, clear lines, frustration-free.

Stay connected between projects
If you’d like occasional updates from my embroidery room, including new patterns, gentle tips, and little things I think you might enjoy, you’re warmly invited to join the Stitchin’ Times newsletter.
About Me - Contact Carol - Privacy Policy - Site Map - Testimonials
Please do not copy the content of this site. It is protected by Copyscape.
Copyright © 2006- www.needlework-tips-and-techniques.com All rights reserved