- Home
- Basic embroidery stitches
- Split Stitch
What is Split Stitch and Why You'll Love It
Split stitch is often used to outline an area before filling it with satin stitch, to give a neat edge, but why stop there?
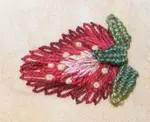
This gorgeous stitch is so much more than a simple outline. It can create beautifully smooth fillings and clever shading effects, like in this floral piece here.
 Tulips worked in split stitch, stem stitch and french knots
Would it surprise you to learn that I used split stitch for most of this design? The best part is, it's a wonderfully simple and relaxing stitch to learn.
I'm going to walk you through how to do it, and then we'll look at how you can use this one simple stitch to create beautiful, detailed embroidery.
How to work Split Stitch
Now, for split stitch, I find it’s much easier to get neat stitches if I keep my fabric taut in an embroidery hoop. This really helps to avoid any puckering. I work the stitch with one hand above the fabric and one below, with the hoop supported on my lowry stand or a table clamp.
Ready? Let's begin.
Step 1: Work from left to right, starting with a short, simple straight stitch along your design line.

Step 2: Bring your needle back up through the fabric, piercing the thread of your first stitch right in the middle. If you're using two or more strands of floss, you'll find it easiest to slip the needle right up between them.
Step 3: Take the needle back down into the fabric a half stitch length in front of your previous stitch.
Step 4: Repeat this motion along the row. As you add more stitches, you'll see a lovely, fine chain-like line begin to form.
And that's all there is to it! You're officially stitching the split stitch.
Filling a Simple Shape
Ready to put your new skill into practice? Let's use split stitch to fill in a shape. This is a great way to see how beautifully the rows nestle together.
I used 2 strands of embroidery floss for the acorn. When you work your rows next to each other, try to vary the length of your stitches slightly so the start and end points are staggered. This will help your rows blend together seamlessly.
The smooth split stitch nut is a lovely contrast to the textured coral stitch used for the cup and stalk.
Start on the outside edge where the cup and nut touch each other, then work around the semi-circle to the other side. I like to start again next to my first stitch, so that I don't need to turn my work.
Work your second and subsequent rows close to each other for a smooth effect (mine were a little too spaced out for my liking, looking back at them now).
If you want to try coral knot stitch as well, I wrote a page about that stitch too.
 Acorn worked in split stitch and coral knots
Unlocking Split Stitch's Potential
Fantastic! Now that you’ve successfully filled your first shape, you can see how this simple stitch works.
Let's take that new confidence and go back to those beautiful tulips... and see how that one simple stitch you just learned can create such a detailed and colourful design.
This is where you can get really creative with colour and shading. Here’s the breakdown of what I used:
- Lines in 2 strands mid-green embroidery floss were used for the open leaf.
- For a more variegated look, I used lines of 1 strand of mid-green mixed with 1 strand of light green in the needle at the same time.
- Close rows using 2 strands of light green were stitched to fill the other solid leaf.
- Again, two different shades of green were used together to fill leaf 4.
- To create a shaded effect on the tulips, I used short, staggered rows of yellow, then orange, then red floss.

A fun tip for blending colours: When I stitched the leaf with two different shades of green, I let the threads randomly change sides as I stitched to give a more variegated effect.
For another project, you could try keeping the lighter colour on the same side for every stitch for a more orderly look.
A Stitch for the Ages
Embroiderers from Medieval years used split stitch in their work, and it has stood the test of time.
It gives a smooth finish, which is emphasized when you use a shiny fiber. This makes it a useful alternative for areas that are too large to fill with satin stitch.
So whether you’re creating fine outlines or smooth, painterly fillings, you now have a wonderfully versatile stitch in your toolkit.
Happy stitching!
Been There, Stitched That? Share Your Work!
Now it's your turn! Did you give the stitch a go? Did you discover a brilliant colour combination or have a little "aha!" moment of your own?
I would be so thrilled to see your creations and maybe even feature them here to inspire other stitchers. Seeing your work is the best part of my day!
Drop a photo and your story in the form below. Your experiments and questions are what make this little corner of the internet so special.
You might like these
Chevron stitch embroidery tutorial with step by step photos
Learn the correct way to work chevron stitch embroidery and discover interesting new ways to use it in your next needlework project
Lazy Daisy Stitch Embroidery: How to Stitch a Sweet Strawberry
With our how-to guide, you'll learn that lazy daisy stitch is not just for flowers! Get creative and stitch a sweet strawberry project
Needlepoint Stitches: Choose the Right One for Stunning Designs
Struggling to choose the right needlepoint stitch? Get expert tips on selecting stitches for texture, direction, and style. Learn effortlessly


Stay connected between projects
If you’d like occasional updates from my embroidery room, including new patterns, gentle tips, and little things I think you might enjoy, you’re warmly invited to join the Stitchin’ Times newsletter.
About Me - Contact Carol - Privacy Policy - Site Map - Testimonials
Please do not copy the content of this site. It is protected by Copyscape.
Copyright © 2006- www.needlework-tips-and-techniques.com All rights reserved