- Home
- Basic embroidery stitches
- Different Types of Embroidery Stitches
Embroidery Reference
Embroidery Stitches: Find the Right One for Any Effect
Every stitch family explained, with a quick-reference cheat sheet, a learning path for all abilities, and a stitch-finder to help you choose the right one every time.
If you have ever stared at a list of embroidery stitches and wondered where to begin, here is the thing that makes it all simpler: every stitch belongs to one of four families. Once you know those four, the whole stitch library starts to make sense and choosing the right one for your design becomes much less guesswork.

Quick Reference
Essential Embroidery Stitches at a Glance
All embroidery stitches fall into four basic structures. Once you know what each group does best, choosing becomes much easier.
Flat Stitches
Best for: neat outlines, smooth fills, shading
Go-to stitches: Stem stitch, Split stitch, Satin stitch, Long & short stitch
Crossed Stitches
Best for: decorative borders, textured fills, leaf and vein effects
Go-to stitches: Herringbone stitch, Fishbone stitch, Leaf stitch
Looped Stitches
Best for: borders, flowing lines, decorative seams, quick coverage
Go-to stitches: Chain stitch, Blanket stitch, Feather stitch, Cretan stitch
Knotted Stitches
Best for: texture, dots, flower centres, raised detail
Go-to stitches: French knots, Colonial knots, Bullion knots, Coral knot
For a fuller explanation and more stitch ideas in each group, carry on below.
About the Different Types of Embroidery Stitches
Stitch names often describe how they are formed or what they resemble: herringbone, chain, feather. Sometimes the same stitch goes by different names in different countries, which does not help. And some stitches have similar names but are constructed in completely different ways.
If you are new to embroidery, coming across an unfamiliar name in a pattern can make you feel like you are missing something. You are not. Knowing the correct name just helps you look it up and find tutorials. It comes with time, not with talent.
The shortcut is to learn the four basic structures first: flat, crossed, looped and knotted. Once you know those, everything else slots in around them. Each type can be used to outline or fill an area, and beginners usually start with a combination of basic embroidery stitches suited to their fabric and design.
From there, you experiment. The more stitches you try, the easier it becomes to look at a design and know which one to reach for.
Where to Start
Your Stitch Learning Journey
Feeling spoiled for choice? Here is a simple path: a handful of useful stitches first, then the decorative ones, and the more advanced techniques when you are ready.
Level 1: The Foundations
Outlines and simple fills
- Stem stitch:smooth outlines and gentle curves
- Split stitch:crisp lines, and a handy "starter" outline for filled shapes
- Chain stitch:a quick, textured line for borders and outlines
- Blanket stitch:edging, borders, and tidy outlines
- Satin stitch:smooth blocks of colour for simple filling
- French knots:little dots of texture, perfect for flower centres
Want a broader beginner set? See the basic embroidery stitches page.
Level 2: Decorative Favourites
Borders and texture
- Feather stitch:light, lacy lines and pretty borders
- Herringbone stitch:decorative bands and textured filling
- Cretan stitch:bold, useful borders with great variations
- Fly stitch:little "V" shapes for leaves, sprigs, and airy texture
- Colonial knots:a tidy alternative to French knots
Level 3: Take It Further
Advanced and variation techniques
- Thread painting (long & short stitch):shading and soft, realistic fills
- Bullion stitch:raised texture for stitched roses and more
- Couching:laying thicker threads for bold lines and patterns
Once you have tried a few from Level 1, explore the four stitch families below: flat, crossed, looped and knotted. You will start to see how stitches are built.
Quick Stitch Finder
Which Stitch Should I Use?
If you know what effect you want, choosing a stitch becomes much easier. Use this as a shortcut, then click through for the how-to.
For a smooth outline
- Stem stitch:especially good on curves
- Split stitch:a crisp line, great when you will fill the shape afterwards
For a bold or textured outline
- Chain stitch:quick, slightly raised, and very flexible
- Blanket stitch:strong edging and decorative outlines
For a smooth filled area
- Satin stitch:solid blocks of colour, lovely for petals and lettering
- Long & short stitch (thread painting):soft shading and realistic colour changes
For a textured fill
- Herringbone stitch:great coverage with a woven look
- Fishbone stitch:beautiful for leaves and tapered shapes
For leaves or leaf veins
- Leaf stitch:built for leaf shapes
- Fishbone stitch:a slightly different leaf texture (try both and see which you prefer)
For little dots of texture
- French knots:classic and versatile
- Colonial knots:a tidy alternative that many stitchers find more consistent
For raised, showy texture
- Bullion knots:wonderful for roses and coil effects
- Coral knot:a knotted line with lots of character
For laying a thicker thread or ribbon
- Couching:perfect for bold outlines and patterns using heavier threads
And if you are still unsure, the four stitch families below will help you narrow things down quickly.
The Four Stitch Families
Each Type in Turn
Flat Stitches
These are your workhorses: clean, versatile, and the stitches most beginners learn first. Use them to outline a shape or fill an area with smooth colour. One thing worth knowing: when you fill an area with flat stitches, the thread sheen shifts with the direction of each stitch. You can use that as a design feature, or keep your stitches going the same way to avoid it.
This group includes simple and double running stitch, back stitch, stem, split, satin, chevron and long and short stitch.
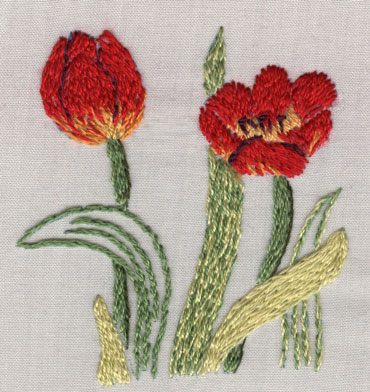
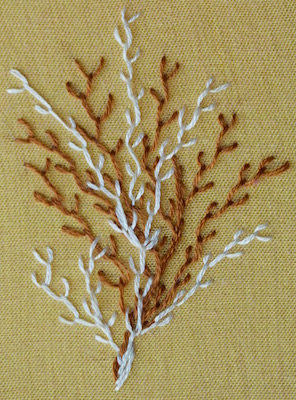
This tulip project shows stem stitch, split stitch and French knots.
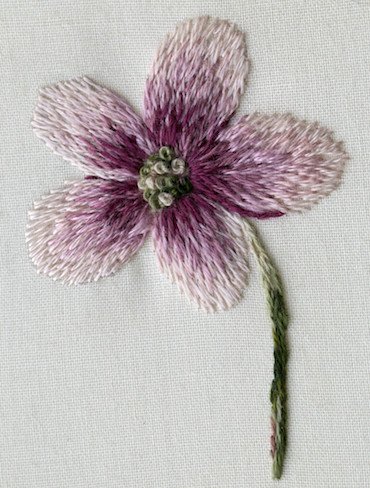
This simple flower was worked in long and short stitch (also known as needlepainting)
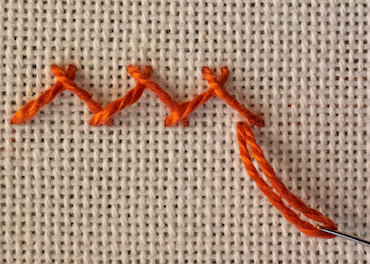
Herringbone stitch in progress, showing how the stitches cross each other
Crossed Stitches
Two stitches crossing over each other: that is the whole idea. You can work them on a counted grid, which gives the uniform precision of cross stitch from a chart, or freehand on any surface for more freedom. Crossed stitches are excellent for covering large areas and for creating that woven, textured look in leaves and borders.
Long-armed cross stitch is commonly used in Assisi work where the stitching frames a voided design. The group also includes herringbone stitch (sometimes called Russian cross stitch), fishbone, and leaf stitch.
Looped Stitches
A looped stitch anchors the thread with itself: you lay a loop on the fabric and hold it down with a stitch before moving on. Chain stitch is the classic example, and once you know it, you will find the variations come naturally. Some appear in the free little fishy project; the detached version, lazy daisy, features in the strawberry motif.
Feather stitch, blanket stitch, and buttonhole stitch all belong here too. So do Cretan stitch, fly stitch, wheat-ear, and vandyke. Each has its own feel for borders and decorative lines.
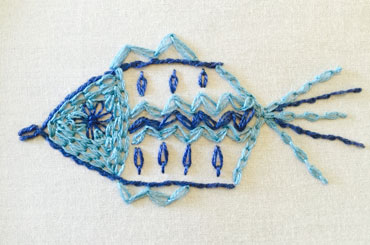
Chain stitch variations used to depict a fish
Feather stitch used to depict coral
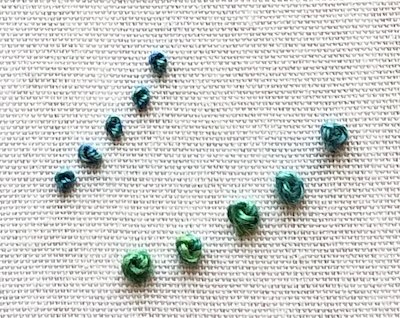
Colonial and French knots
Knotted Stitches
The ones that add real dimension to your work. Knotted stitches sit above the fabric surface rather than lying flat, giving your embroidery a texture you can actually feel. Scatter them for dotted effects, work them in rows for bold texture, or build up bullion knots into small sculptural forms like roses and buds. They look impressive, and they are more straightforward than they appear.
This group includes French and Colonial knots, Bullion knots, coral knot, scroll stitch, and double knot (palestrina). Many familiar stitches also have knotted versions: Portuguese knotted stem stitch, knotted chain, and knotted buttonhole, to name a few.

A rose made with bullion knots
Going Further
Developing Stitches Further
The four families are just the beginning. Stitches evolve, combine, and specialise. Here are the key techniques that grow out of the basics.
Composite Stitches
When one stitch is not quite enough, you combine two. Threading, whipping, or weaving a second thread through an existing stitch transforms something simple into something far more decorative. The base structure is already there: you are just adding on top.
Decorative seams on crazy quilt blocks are a great place to experiment with this: a herringbone or chevron foundation, then a contrasting thread woven through for extra interest.
Chevron stitch with additional stitches for decoration
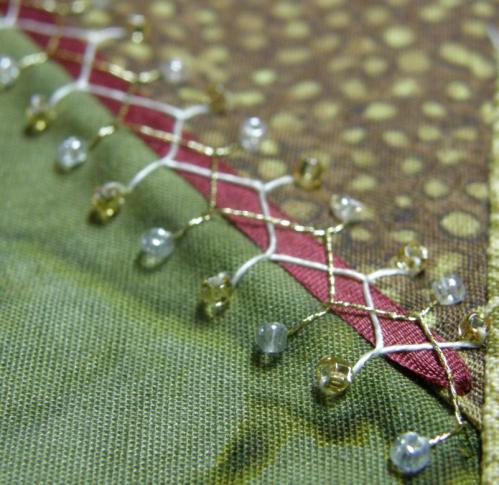
Cretan stitch couching down a ribbon
Couching
Sometimes you want to use a thread that is simply too thick to pass through the fabric: a ribbon, a cord, a chunky yarn. Couching is the answer: lay the thread on the surface and stitch it down with a finer one. It opens up a whole range of materials you would not otherwise be able to use, and it is particularly common in crewel work and goldwork.
Needlepoint Lace
This is where embroidery becomes truly three-dimensional. Needlepoint lace builds a delicate fabric from nothing but thread and looped stitches, worked in the air rather than on cloth. The foundation threads are couched to a temporary surface, then the lace is built up over them. It looks impossibly fine, and it is built from the same looped stitches in the family above.
Couching the foundation Cordonnet in place ready for needlepoint lace
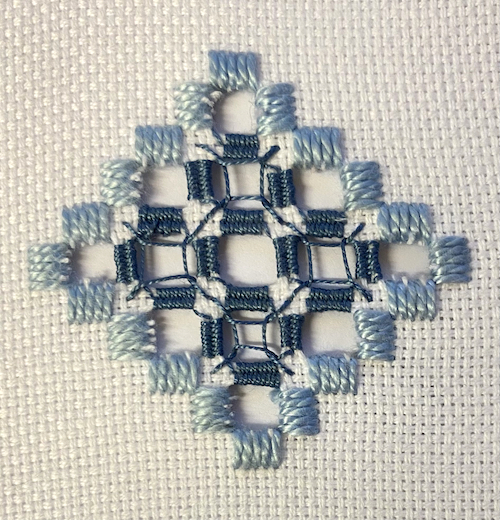
Hardanger motif worked in colour
Openwork
Instead of adding thread to the fabric, openwork rearranges or removes it. Pull the threads apart and the fabric becomes almost lace-like. Cut selected threads away and bundle the rest into neat clusters with stitching, as in Hardanger embroidery. Traditionally worked white on white, the results are deceptively geometric and very satisfying to stitch.
Smocking
Smocking works the other way round from most embroidery: you gather the fabric first, then stitch the pleats into a pattern. The gathering is simple running stitch. The decorative stitches on top are what give smocking its distinctive honeycomb look and keep the pleats perfectly in place.
Your Materials
Choosing Your Fabric
The fabric shapes everything: which stitches work well, how precisely you can place them, and the overall feel of the finished piece.
Evenly Woven Fabrics
Counted thread techniques are worked on evenly woven fabrics, resulting in stitches that are all the same size. Sometimes the stitching is pulled tight, which distorts the fabric and creates attractive open areas between the threads. The stitches themselves are less important than the effect they create.
Densely Woven Fabrics
Densely woven fabrics allow intricate designs to be embroidered on the surface as the embroiderer is not restricted as to where the needle can penetrate the cloth. Crewel work uses wool threads on tightly woven surfaces to produce a dimensional effect, creating strong and durable fabrics for heavy-use items.
Canvas
The strongest and most hardwearing form of needlework is worked on canvas. Through the ages this has been used for cushions, chair covers, and wall hangings, as well as a substitute for leather in belts, bags, and footwear. It is very sturdy yet flexible, making use of a variety of stitches.
✦ ✦ ✦
Keep Exploring
Ready for More?
Basic Embroidery Stitches
Start with the essentials: clear step-by-step tutorials for the most useful stitches, perfect for beginners and those returning to embroidery.
View Stitch TutorialsHand Embroidery for Beginners
Everything you need to get started: fabric, hoops, threads, and your first stitches, all in one place.
Start Here
Stay connected between projects
If you’d like occasional updates from my embroidery room, including new patterns, gentle tips, and little things I think you might enjoy, you’re warmly invited to join the Stitchin’ Times newsletter.
About Me - Contact Carol - Privacy Policy - Site Map - Testimonials
Please do not copy the content of this site. It is protected by Copyscape.
Copyright © 2006- www.needlework-tips-and-techniques.com All rights reserved