- Home
- Cross Stitch
- Learn How to Cross Stitch
Learn how to cross stitch
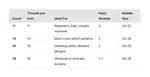
If you're looking to learn how to cross stitch, I recommend you use 14 count Aida cloth for your first attempt.
The chart will show you where to place each stitch. Each symbol inside the squares will relate to a thread colour, and will show you where to work each one. The cross stitch calculator will help you work out the finished size of your design.
As you learn how to cross stitch, you'll find that floss manufacturers use a numbering system to help you easily tell colours apart.
Where do I start?
Beginning cross stitch patterns in the centre ensures that the design will fit on the fabric. Most charts have the centre marked, either with arrows or a coloured line. Fold the fabric in half both ways, and crease it gently, to mark the centre. You may wish to pop a large headed pin in temporarily to make it easier to see. Then put the fabric into an embroidery hoop to keep it taut.

Cross stitch kits contain tapestry needles as they are blunt and will not pierce the fabric threads (or your finger).
If you are stitching on Aida 14, most charts will specify using 2 strands of embroidery floss.
Check this video for an easy way to separate the strands from the skein of 6 stranded cotton. Before you come back here, by clicking on the "BACK" button in your browser, check further down that page to find a simple method of starting your thread with the "loop method".
We were asked How do I follow a cross stitch chart?
Learn How to Cross Stitch: Techniques

The photo shows the continental method, this is a good way to learn to cross stitch for beginners.
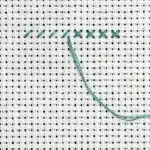
- Check the cross stitch pattern to see where to position your first stitch.
- Bring the needle up in the bottom left hole, reinsert it at the top right to create a diagonal stitch over one dense block of the fabric weave.
- Bring the needle back up directly below its current position, in the next hole down. Take it back through the fabric in the diagonal hole to the right. Continue in this way across the row.
- To complete the stitches on the journey back, bring the needle up in the bottom right and take it back down through the top left hole to make the cross.
Quick Tip: After working several stitches, you may find the thread is getting twisted. Just let the needle and thread dangle from your work for a moment or two, and it will untwist itself.
How to follow a cross stitch chart
Cross stitch beginners often ask if they should work a design line by line, however it is better to work blocks of colour to prevent too many stops and starts.

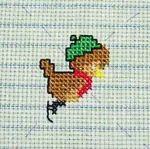
Look at your chart and find the symbol nearest to the centre. On this sample chart the centre would be the top left of the owl's beak.
This has the number 2 as its symbol. You will use yellow, as shown in the key below. The number 444 relates to the DMC colour number.

Start by working two cross stitches for the top row of his beak. Then work your way down the design using up the thread colour you have in our needle, cross stitching the row of three yellow stitches underneath. The next row needs 2 again, and then a single stitch finishes his beak.
Ah, well actually it doesn't! Did you spot the lone cross stitch with the same symbol the other side of the flower stem ?
I would stitch this at the same time I worked the row of three crosses. Just miss one hole and place the last yellow stitch where it needs to be. Carrying the thread across the back of one to four stitches is fine, but try to avoid trailing it long distances. It is often better to fasten off and start again if there is a sizeable gap.
Learn How to Cross Stitch: Changing colours
Once the beak is complete, you need to choose another symbol (colour) and work a block of that. On this design I would pick the empty circle symbol, which in this pattern is a light tan colour, and stitch the area underneath and to the left of your owl's beak. As there are many stitches to work in this colour on the other side of the flower stem, I would leave them for a separate piece of thread.
Outlining with backstitch
The finishing step in your learn how to cross stitch lesson is to outline your work with backstitch. Not all designs have backstitch, but many do. Normally if you have used 2 strands of floss for the cross stitch, you will use just 1 strand for the backstitch.
This is where I cheat a little, as I don't enjoy leaving all the backstitch until last. Instead, I do it little and often as I progress through a project. If I still have plenty of thread left in my needle I will "park" it out of the way for the time being while I complete more of the cross stitch, picking it up again when needed.
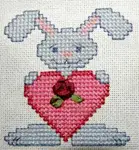
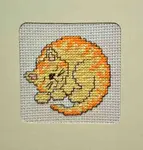
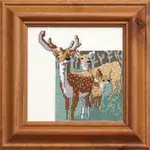
Cross stitch birds mini charts

Downloadable ebook containing 14 different birds. Simple and quick to create in cross stitch and backstitch.
£5.00
I hope you have enjoyed the first of my cross stitch lessons.
The little owl chart used as an example, along with other little birds, is available in the ebook above.
I also have a selection of free cross stitch patterns available on the site.
You might like these
Counted Cross Stitch - using linen and evenweave fabrics
Time to try counted cross stitch on linen or evenweave fabrics? Learn about the advantages over Aida and how to determine the finished project size.
Free Cross Stitch Calculator: Inches & cm, Any Fabric Count
Free interactive cross stitch calculator – enter your design dimensions and fabric count, get instant results in cm or inches. No maths needed. Try it now!
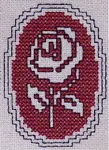
Free Assisi Rose Pattern: A Beginner's Embroidery Tutorial
Learn the beautiful reverse magic of Assisi embroidery! This free rose pattern is perfect for beginners. Get our step-by-step guide and stitch it today.


You might like these
Designing Cross Stitch on a Computer — Benefits & Tips
Discover the practical benefits of designing cross stitch on a computer — from instant undo to perfect borders. Plus tips for getting started and reader Q&A.
Celtic Cross Stitch - 4 designs depicting the Elements
Enjoy Celtic cross-stitch? Add a touch of magic to your project and bring the power of the earth, air, fire and water to life with these 4 designs.
Free Cross Stitch Calculator: Inches & cm, Any Fabric Count
Free interactive cross stitch calculator – enter your design dimensions and fabric count, get instant results in cm or inches. No maths needed. Try it now!
Stay connected between projects
If you’d like occasional updates from my embroidery room, including new patterns, gentle tips, and little things I think you might enjoy, you’re warmly invited to join the Stitchin’ Times newsletter.
About Me - Contact Carol - Privacy Policy - Site Map - Testimonials
Please do not copy the content of this site. It is protected by Copyscape.
Copyright © 2006- www.needlework-tips-and-techniques.com All rights reserved