- Home
- Cross Stitch
- Washing Cross Stitch
How to Wash Cross Stitch Before Framing (Step-by-Step)
Why Wash Your Finished Piece?
Washing your cross stitch projects when finished is essential.
Even the cleanest hands leave oils and dirt that dull your pristine stitchwork over time.
Plus, those stubborn hoop marks need to go before framing.
I've learned (sometimes the hard way) that proper washing does more than just clean - it helps your work last. Think of it as the final step in bringing your project to life, whether it's cross stitch or traditional embroidery.
Certain stains, especially from long-term handling or storage, can become permanent, so gentle washing may not remove them completely—but it will greatly reduce their visibility.
Let me walk you through the process I use to keep finished pieces looking their best. We'll cover everything from choosing the right cleaning method to preventing those heart-stopping color bleeds.
Case Study: Rescuing a Really Dirty Cross Stitch Piece
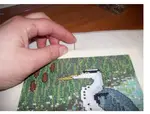
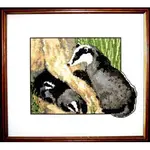
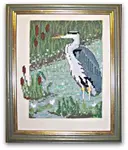
This heron design holds a special place in my heart, as it was one of my earliest cross stitch creations, framed many, many years ago.
Before cleaning
Back then, I chose to frame it without glass so visitors at cross stitch shows could see the stitching details clearly. Over the years, however, constant handling and repeated packing into cardboard boxes for transport left the fabric noticeably stained and discoloured.
 After taking the stitching out of the frame it was obvious how dirty it was
At first glance, the piece seemed almost beyond recovery, but considering its sentimental value, I felt it deserved my best effort to revive it.
 Heavily stained and discoloured cross stitch before washing
Step-by-Step Washing Process
Step 1: Initial Soak
After dampening in cold water, I placed the dirty cross stitch piece gently in lukewarm soapy water (Fairy Liquid), ensuring complete submersion without harsh agitation.
 Cross stitch soaking in lukewarm soapy water
Step 2: Gentle Agitation
I gently moved the fabric up and down—this "sluicing" helped loosen dirt without harming the stitches.
 Agitiating gently by hand increases the soap suds
Step 3: Repeated Soaking and Rinsing
I refreshed the water multiple times, each time noticing the water becoming clearer, signaling the gradual removal of embedded dirt and grime.
 Beginning the rinsing process
Step 4: Final Rinse and Inspection
After thorough rinsing, I gently inspected the stitching and fabric. By now, the water ran clear, and most of the grime was gone.
 Continue rinsing until all suds are gone
Drying: The Towel Method (Happy Dance!)
After gently squeezing excess water, I rolled the embroidery up in a clean, fluffy white towel. I then did my "happy dance"—stepping on the towel to remove excess moisture safely and efficiently.
 My cross stitch towel drying method
 Rolled up and ready for the happy dance
The Result: Revived and Beautiful Again?
Sometimes stains won’t vanish completely, no matter how carefully you wash your embroidery.
And that's okay!
These subtle imperfections tell the story of the history, use, and character of your handmade pieces. Ultimately, your cross stitch is more than just fabric and thread—it holds memories of the care, creativity, and adventures along the way.
 Cross stitch after gentle washing—improved but with subtle remaining stains
Now that you've seen how gentle washing can help revive even a heavily stained project, let's dive into some essential tips to ensure your own cross stitch pieces stay looking their best for years to come.
Essential Tips For Washing Cross Stitch Projects
Water: The temperature matters! Use cold to lukewarm water - never hot. This prevents shrinkage and colour bleeding on Aida, evenweave and linen. While quality brands like DMC and Zweigart are pre-shrunk, stick to gently washing around 30oC (86oF)
Soap: Fairy Liquid or Orvus Quilt Soap are gentle on delicate embroidery.
Skip the machine: Always hand wash your pieces. Even the delicate cycle can damage your work. Hand washing gives you control and protects your stitches.
Quick Prep: Take your fabric out of the hoop and brush off any loose dirt. Check care instructions for hand-dyed or printed fabrics - some aren't colorfast and might need spot cleaning instead.
Handle with Care: Support wet pieces fully - the weight of water can stretch fabric. Skip wringing or twisting to preserve your stitching. Think of your piece as the artwork it is.
Take note that although Aida is firm when you start stitching on it, the starch will wash out and it can become quite limp.
One Piece at a Time: Wash each piece separately to prevent any potential color transfer between projects.
How to Wash Different Cross Stitch Thread Types
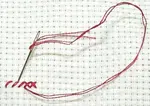
Before I start the cleaning process, I like to give my work a look over.
I want to make sure that all my thread ends are anchored under the stitches on the reverse of the stitching. I avoid knots, as they can come undone over time, especially during washing.
Let's look at the different thread types you might have used:
Cotton embroidery floss: DMC and Anchor embroidery floss are colorfast and handle gentle washing well. Use cool water and avoid aggressive handling. For stubborn spots, a soft baby toothbrush works well with light pressure.
Speciality Fibres - Handle with Care:
Silk: This natural fibre can bleed and lose its sheen. It always wise to test colourfastness if washing seems necessary. Use cold water briefly, with mild soap if you do venture forth, but I normally avoid washing silk entirely.
Wool: Another natural yarn, this is reknowned for felting if you get it wet and warm then start agitating it! Spot cleaning marks with a damp cloth is more sensible than immersing the work in water.
Metalics: These can be very fragile, so I find a gentle swishing in lukewarm water is enough.
How to Prevent Colour Bleeding in Cross Stitch
Ultimately you want to keep all those beautiful colours where they belong - in your stitches not spreading across the fabric.
I've said it above, but it bears repeating. Don't use hot water! Heat makes dyes run and you don't want that to happen.
Testing Colourfastness
There are various methods you can use to test if a thread is colourfast.
- Wet a scrap of thread and press it onto a white paper towel. If you see colour transfer, either skip washing or proceed very carefully.
- Alternatively, wet a piece of white cloth and dab it onto your thread a few times. Check the cloth for any hint of colour.
What do I do if the colour runs?
Don't panic!
Keep rinsing with fresh cold water, but don't let the fabric sit in it. Keep changing the water until it runs clear.
Or hold it under a gently flowing tap or faucet until you are sure no more colour is being released.
Avoid heat until the issue is completely resolved.
Consider using colour catcher sheets as insurance, especially with complex pieces of stitching.
Remember, once dye dries in the wrong place, it's usually there for good. Quick action is your friend here.
🧵 Want More Information?
My method of washing cross stitch
- Fill one bowl with cold water, the other with lukewarm. Not hot! (Sorry, I know I keep harping on about this.)
- Submerge your project in the cold water and let it soak. Meanwhile, add a small amount of soap to the second bowl and create a bubbly lather with your hand.
- Transfer the wet cloth to the bowl of soapy water. Avoid scrubbing, as this can damage your delicate work and unravel any unsecured thread ends. Instead, simply "sluice" the fabric up and down a few times, gently agitating it in the water to ensure a thorough clean.
- If the work is visibly dirty, you can leave it in the bowl to soak for up to an hour. Just give it a swirl every now and then.
- Remove stubborn marks with my secret weapon: an old badger hair shaving brush. Gently work the soap suds into the mark and sluice the work up and down for a spotless finish.
- Rinse your piece under a running tap (faucet) three to four times, until all the soapy suds have been washed away.
- Gently squeeze the work, then lay it face down on a thick, fluffy white towel. Roll it up like a jelly roll, and the fun begins!
Drying your cross stitched project
Lay the rolled-up towel on the floor and take off your shoes and socks. Then step on the towel until it becomes damp underfoot as the water in the fabric is absorbed into the towelling. I call this my happy dance as I am celebrating the completion of my project.
Place a clean, dry towel onto your ironing board or heatproof working surface.
Unwrap the stitched piece and lay it, face down, onto the dry towel. Gently ease into shape. Lay a thin, white pressing cloth on top (think tea towel or pillowcase).
Taking a warm iron, press the work from the back, to help it to dry. Do not use steam. Using the iron press down and lift to move to a new area, or slide it very lightly. Try to avoid dragging the iron across the fabric, as that could stretch it out of shape. A slow deliberate pressing motion works best. But don't keep it in one position for too long. You don't want to scorch your work!
When the piece is smooth, but still slightly damp, leave it laying flat to air dry thoroughly. If you are going to frame the piece it MUST be dry first.
This gentle method of cleaning cross stitch preserves your stitches and fabric while ensuring your work is clean. The whole process takes about an hour, mostly waiting time.
🧵 Before framing your piece...
Over to you
Now you know the method I use, you can try it yourself when you finish your next piece of embroidery.
I think you will agree that it's simple and it is definitely better than throwing you work into the back of a cupboard where it will never see the light of day again!
You might like these
Handmade Greeting Card Ideas: A Guide for Stitchers
Learn the easy way to mount your cross stitch or embroidery in an aperture card. Turn your small projects into beautiful handmade gifts.
Designing Cross Stitch on a Computer — Benefits & Tips
Discover the practical benefits of designing cross stitch on a computer — from instant undo to perfect borders. Plus tips for getting started and reader Q&A.
Top Needlework Finishing Techniques for Stunning Results
Discover essential needlework finishing techniques to preserve and display your projects beautifully, from framing to hemming.


Stay connected between projects
If you’d like occasional updates from my embroidery room, including new patterns, gentle tips, and little things I think you might enjoy, you’re warmly invited to join the Stitchin’ Times newsletter.
About Me - Contact Carol - Privacy Policy - Site Map - Testimonials
Please do not copy the content of this site. It is protected by Copyscape.
Copyright © 2006- www.needlework-tips-and-techniques.com All rights reserved