- Home
- Cross Stitch
- Using waste canvas
CROSS STITCH TECHNIQUE
How to Use Waste Canvas
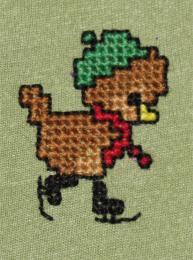
Transform everyday clothes into one-of-a-kind stitched pieces — it's easier than you think.
What Is Waste Canvas for Cross Stitch?
If you've ever dabbled in cross stitch, you might have come across the term waste canvas.
No, it's not some rejected piece of material that stitchers toss aside. Quite the contrary!
Cross stitch is a counted thread technique which appears to rule out using it directly on your clothes. Waste canvas offers an easy solution. It involves using a temporary layer that is then removed carefully, leaving your finished stitching exactly where you wanted it.
This one-use grid provides holes you can stitch just as if you were using Aida. This ensures your stitches are evenly placed and remain that way once the canvas is removed. One caveat is to make sure you don't pull your stitches too tight, otherwise the removal process becomes tricky.
Quick Pick: Which Option for Your Project?
Use waste canvas for sturdy fabrics and large areas; choose soluble canvas for delicate or highly-detailed work.
Key difference in removal:
Waste canvas = pull threads out one by one
Soluble canvas = dissolves in water
Testing tip: If unsure, test on a scrap of the same fabric.
Decorating clothes with needlework, like embroidery or cross stitch, is a trend that's gaining popularity, and the best part? It's incredibly easy to do!
Why not start with my free patterns and see where your creativity takes you?
The canvas comes in a number of different sizes, including 8.5, 11 and 14 threads per inch.
Before we dive into the fun part — stitching — let's take a few minutes to prepare our canvas.
What You'll Need
Your Garment & Pattern
The item you wish to stitch on, plus your chosen cross stitch design.
Embroidery Hoop
Keeps your fabric smooth and stable while stitching.
Waste Canvas
Available in 8.5, 11 or 14 holes per inch — choose to match your design.
Needle & Thread
Ballpoint for knits, sharp for woven fabrics. Plus embroidery floss in your chosen colours.
Tweezers & Spray Bottle
Essential for removing the waste canvas threads after stitching.
Prepare for Using Waste Canvas
Cut the Canvas
Cut the waste canvas according to the design size, allowing 2–3 inches (5–7.5 cm) allowance.
Find the Centre
Fold your canvas in half both ways to find the centre. Mark with a pencil.
Position on Garment
Align the centre of the canvas with where you want the design to sit on your garment.
Pin in Place
Use pins or fabric clips to hold the canvas in place, lining up the grid lines with the fabric weave if possible.
Baste Around the Edge
Baste using long stitches and a contrasting colour of sewing thread (not floss) around the edge of the waste canvas to ensure it doesn't move.
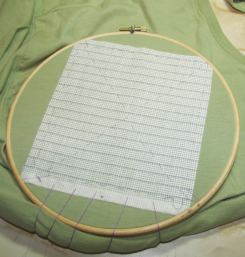
Hoop Up
Remove pins then hoop your garment and waste canvas "sandwich" to keep the fabric smooth without stretching it out of shape. Don't overtighten the screw on the hoop.
Managing Excess Fabric
If your garment has excess fabric beyond the stitching area, like the tee-shirt in my demonstration, don't worry!
Simply roll the extra fabric at the bottom and secure it with large tacking stitches to the canvas's selvedge.
Do the same for any fabric at the top.
This keeps everything tidy and out of the way while you do the stitching.
Cross Stitching on Waste Canvas
Stitching the design
Choose Your Needle
Use a blunt needle for knits, or a sharp needle for more firmly woven fabrics.
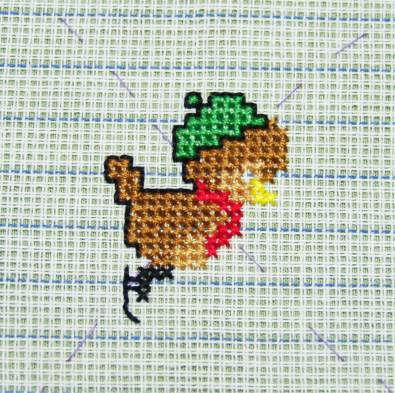
Start From the Centre
Start stitching from the centre of your waste canvas and pattern, to ensure the design will fit properly. This may not be the centre of your garment.
Use the Right Holes
Your waste canvas is formed with a double thread. Stitch through the larger holes formed by these double threads, not the tiny holes between them. This makes removal of the canvas later, easier.
Mind Your Tension
Keep your tension snug but not tight, make sure all top stitches lay in the same direction and don't carry the thread too far across the back. When fastening off, don't take the needle through the threads of the canvas, as this will make removal difficult.
How to Remove Waste Canvas
Remove Basting
Remove your basting stitches.
Dampen the Canvas
Spritz small pieces of work, or soak larger items for a few minutes using cold water. If you used soluble canvas, soaking will be the only step needed.
Pull Threads Gently
Once the canvas has softened slightly, use your tweezers to coax each thread out gently. Don't yank or pull suddenly.
Snip Stubborn Threads
If a thread doesn't pull out easily try snipping it in the middle, carefully avoiding your cross stitches. Then work from both ends.
Check Solidly Stitched Areas
Solidly stitched areas may need further care and use of a magnifying lens. Work slowly and remove any trapped canvas, snipping where necessary.
Rinse
Rinse the finished item to remove starchy residue and release any errant canvas that you may have missed.
Roll to Dry
Lay the garment on a towel and roll to remove any excess water.
Press Lightly
Air-dry then press lightly from the reverse over a soft towel to cushion your cross stitch.
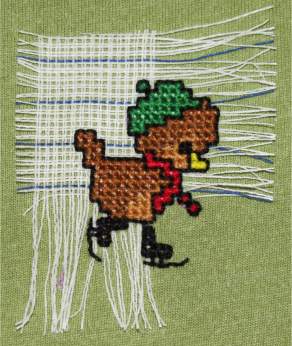
Removing waste canvas threads with tweezers
Frequently Asked Questions
In which direction should I place the Blue Line on the waste fabric? — from Phyllis in Georgia
Answer from Valerie Kalyani:
Phyllis, the blue line is only to help you to count. The direction you put it doesn't mean a thing — the waste canvas is 14 in both directions. It is just a matter of your choice in using this counting aid.
Also, did you know you can use waste canvas over one? As long as you consistently put your needle through the very centre of each square, you will get an even 28 count with your 14 waste canvas.
Ready to Try It?
Waste canvas really is one of those brilliant little tools that opens up a whole new world of possibilities. Once you've stitched your first design onto a tee-shirt or tote bag, you'll wonder why you didn't try it sooner.
Grab some waste canvas, pick a favourite motif, and give it a go. I'd love to see what you create!
You might like these
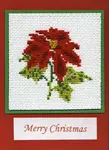
Cross Stitch Card Making Ideas: A Fun Finishing Technique
See inspiring card making ideas from fellow stitchers! This guide shows you how to mount your cross stitch on a card for a beautiful, finished look.
Blackwork for Beginners Book: Get a Neat, Reversible Back
Messy backs on your blackwork? This step-by-step book teaches the proven method for neat, reversible results. 8 guided projects. Instant download, £9.95.
Attaching beads to cross stitch and blackwork projects
A super simple way of attaching beads to your cross stitch and blackwork, with step by step instructions.
Stay connected between projects
If you’d like occasional updates from my embroidery room, including new patterns, gentle tips, and little things I think you might enjoy, you’re warmly invited to join the Stitchin’ Times newsletter.
About Me - Contact Carol - Privacy Policy - Site Map - Testimonials
Please do not copy the content of this site. It is protected by Copyscape.
Copyright © 2006- www.needlework-tips-and-techniques.com All rights reserved