- Home
- Four Sided Stitch
How to Work the Four-Sided Stitch Horizontally and Vertically
I often introduce the four-sided stitch in my Hardanger course as it's one of the most straightforward pulled thread techniques you'll encounter.
What I particularly like about this stitch is that it creates attractive, clearly visible holes without any need for cutting or removing threads - making it less daunting for those new to pulled work.
Whilst you'll need some basic embroidery experience before tackling this stitch, don't let that put you off. The main challenge is maintaining even tension throughout your work. Don't worry, I'll give you some tips for that shortly.
I always remind my students to count carefully as they stitch - unpicking pulled thread work isn't something you'll want to do if you can avoid it!
For traditional projects, I recommend using thread that matches your fabric colour. This creates that classic pulled work effect that's particularly striking when light catches the pattern of holes.
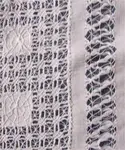
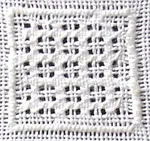
You'll find this stitch creates neat squares on the front of your work and crosses on the back, as shown in the photos below.
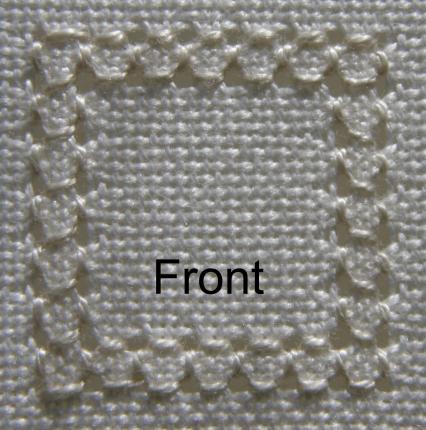
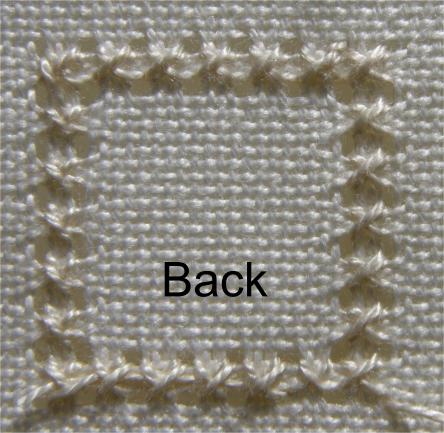
You can work it horizontally, vertically or diagonally depending on your design needs. Whichever direction you work in, I advise using an embroidery hoop as it will help you keep your tension even throughout.
Let me walk you through the process... but first a cautionary tale that may make you giggle.
Both sides of the work can look neat, a fact brought home to me while exhibiting at the Stitches exhibition in Birmingham one year.
I had a framed piece of hardanger on the wall of my stall for all three days of the show. It had been a mad dash as I had only managed to pick it up from the framers the day before the show.
It wasn't until the third day, when I went over to it to show a visitor what four-sided stitch looked like, that I realized that the framer had framed it back to front!
Four sided stitch worked horizontally
This embroidery stitch is used in my free hardanger coaster project, which part of my free learn hardanger course.
You can also see it in use in the downloadable hardanger design Wish Upon a Star.
Here is what you'll need
- Perle cotton 8, for 22 count hardanger fabric
- or Pearl cotton 12 for finer fabrics like 28 count evenweave or 32 count linen
- A tapestry needle suitable for your thread weight
Here's my method
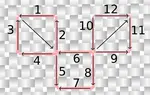
- Bring your needle up at your starting point (1 on the diagram)
- Count over 4 threads and take your needle down.
- Come back up 4 threads to the right of your starting point (3 on the diagram).
- Work a horizontal stitch by reusing your first hole (4 on the diagram).
- Come up at point 5 and then down again at point 6.
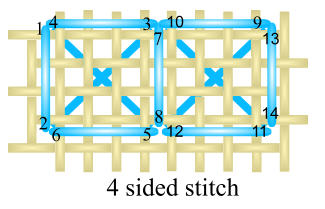
TIP: Here's a useful tip I've learned: when you complete the last stitch of your first "square", you're actually creating the first stitch of your next square. It's quite efficient once you get into the rythym.
Keep an eye on your pattern! It's surprisingly easy to get into a comfortable stitching rythym and suddenly realise you've worked beyond your intended stopping point.
Getting your tension right
Getting your tension right is crucial for this stitch, so let me share my approach:
NOTE: I find it helps to think of it as 'encouraging' the threads apart rather than forcing them. When I'm teaching this stitch, I often tell students to imagine they're using just enough force to separate the fabric threads, but not enough to distort them.
Here's my method for maintaining even tension:
- Complete each square fully before pulling.
- Hold your fabric slightly taut in an embroidery hoop or frame.
- Pull your thread slowly and deliberately, in the direction of the stitch.
- Check your work frequently from the front - the holes should look uniform.
- If you notice one hole is larger than the others, ease off your tension on the next few stitches.
A common mistake I see is pulling too hard on the first few squares and then struggling to match that tension throughout the rest of the work. It's better to start with moderate tension - you can always adjust slightly as you go along.
Four sided stitch worked in Vertical rows
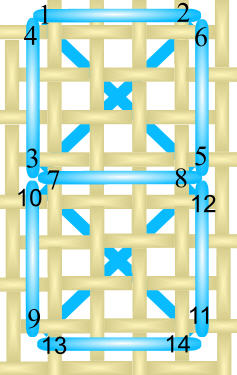
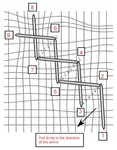
Stitching four sided stitch in vertical rows is a technique that is as straightforward as the horizontal method once you understand the sequence.
While you could turn your work 90 degrees and stick to working horizontally (especially if using a hoop) I found the vertical approach particularly useful when working in a rectangular frame.
I've included a separate diagram below, to guide you. You'll notice the numbering sequence varies slightly from the previous method.
Ready to try the four-sided stitch yourself?
I've included this stitch in Lesson 4 of my free Hardanger course. It's a perfect starting point if you're intrigued by pulled thread work or Hardanger but unsure where to begin.
The course breaks everything down into manageable steps, and this stitch is just one of the essential techniques you'll master. Why not join me?
You'll find the complete free course here.
More Pulled Work Stitches
|
|
You might like these
Pulled thread embroidery - all about this whitework technique
Learn about pulled thread embroidery, an exciting form of whitework embroidery where the threads are pulled to form a pretty lacy effect
Whitework embroidery an introduction to the different techniques
Whitework embroidery includes many different techniques - reticella, richelieu, cutwork, broderie anglaise, schwalm, hedebo, needlelace and hardanger
Pulled Work Embroidery Beginner's Guide: A Simple Free Project
Pulled thread embroidery guide for beginners. Learn two different stitches to create a lacy pattern. Step-by-step preparation, stitching and finishing.

Stay connected between projects
If you’d like occasional updates from my embroidery room, including new patterns, gentle tips, and little things I think you might enjoy, you’re warmly invited to join the Stitchin’ Times newsletter.
No pressure. Just a friendly note now and then to keep you inspired.
About Me - Contact Carol - Privacy Policy - Site Map - Testimonials
Please do not copy the content of this site. It is protected by Copyscape.
Copyright © 2006- www.needlework-tips-and-techniques.com All rights reserved