How do I follow a cross stitch chart

by Gordon Scoble
(West Sussex, England)

I’m starting cross stitch for the first time, as an 86 year old male! My design is not printed on the Aida.

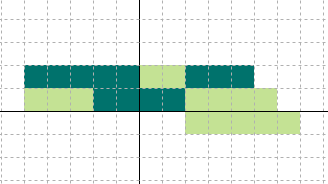
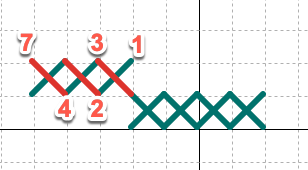
If you complete a line and when you transfer to the line above, and it is a midpoint for the same colour, if you go left and complete 3 stitches, must you “start again” to deal with the stitches to the right of that mid point?

Also, how do you finish? Simply by weaving under and over the reverse stitches?

Thanks

This is lock down therapy!

Comments for How do I follow a cross stitch chart

Average Rating starstarstarstarstar

Click here to add your own comments

Rating
starstarstarstarstar
This is how I would tackle it, Gordon
by: Carol

Thank you for your question, Gordon. I am pleased that your stitching is proving therapeutic during the lockdown period due to the pandemic. I find it a great stress reliever myself too.

You may find my page on learning cross stitch helpful, but here is a quick explanation also.


As you are aware, it is best to start a cross stitch chart from the centre of the design. You can then work up or down the picture as you wish. Let's use the following chart as an example to work from.

how to read a cross stitch chart

The darker stitches are closest to the centre so we start with those. I will walk through the way I would tackle this. First I would fold the fabric in half both ways to find the centre. Then I would count two squares to the left of that centre point and begin there.

I would stitch the four dark crosses, by doing the bottom of each stitch first, then crossing them on the way back to the beginning.

My needle will have gone down at the top left of the cross to complete that first set of four. Therefore, I can't bring it back up in the same hole or I will undo the last stitch. So I am going to work those three stitches in the row above "backwards".


reading a cross stitch chart

I will bring it up in the empty hole above (marked 1 on the diagram) and down at 2. I bring it back up at 3 and down at 4. Repeat once more to create the first leg of the third stitch.

In the diagram I have used red to show the next set of stitches, but of course you would not change your thread colour.

I bring the needle up at 7 down in the hole we used at point 4 and continue until we have completed those three stitches.

We now have a similar problem, in that to start the first leg of the next stitch we would naturally want to reuse the same hole we have just put out needle down in. So we do a little "dance" and come up at point 1 in the next diagram below.

learning cross stitch

Work backwards and go down at 2, then take a sidewards journey to point 3 and bring the needle back up there. From here on we are back to the normal way of stitching by going down in four to complete that first leg.

The chart shows that the next two stitches are paler in colour so we can miss those and bring the needle back up ready to do the next group of three stitches. Then we cross those three along with the two half done stitches on our return journey.

To finish off we slide the needle under our completed stitches, and weave back again to secure.

I hope this has helped, and not confused you further.

Carol

Click here to add your own comments

Join in and write your own page! It's easy to do. How? Simply click here to return to needlework questions.