- Home
- Intro to blackwork
- How to Do Blackwork
BLACKWORK TUTORIAL
How to Do Blackwork: Why You Start With Outlines (Not Fills)
The outline-first approach might feel backwards if you're a cross stitcher — but trust me, it makes everything easier.
All set to tackle your first project but need to know how to do blackwork? Let me help you untangle it.
✦ Where Do I Start?
✦ What Stitch?
✦ How Many Strands?
✦ Ready to Try?
Do I Need to Stitch an Outline?
Getting those outlines in place first is the best place to start. Although, if you are a keen cross stitcher, this will seem backwards.
The outlines give you an edge to work up to when you fill the area with patterns. You don't need to count the number of repeats and work out where each one finishes. You just stitch until an outline stops you. Easy!
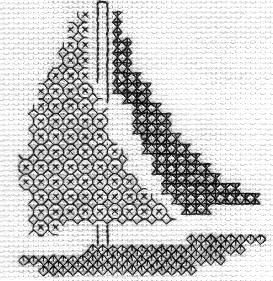
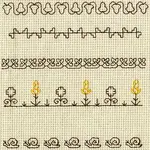
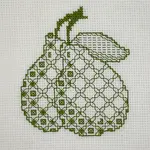
Not all blackwork designs use outlines. The fill pattern suggests the outline, as shown in the pictures below.

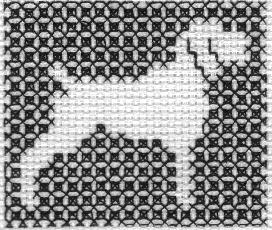
Let's swap things around. We are borrowing a technique called Assisi, here. We have stitched the background and left the picture area empty. Again, because the fill pattern is small, your eye sees the dog as if it has an outline.
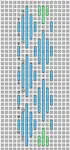
How Many Strands of Floss Should I Use?
Quick Reference
Most of my patterns call for two strands of embroidery floss for the outlines. You could substitute this for one strand of a thicker thread, instead. Cotton à broder or Pearl cotton number 8 would work well.
The outlines show up to separate the areas of a design. We then work the fill patterns with a single strand, or thinner thread.
What Stitch Should I Use for Blackwork Outlines?
Preference plays a part here.
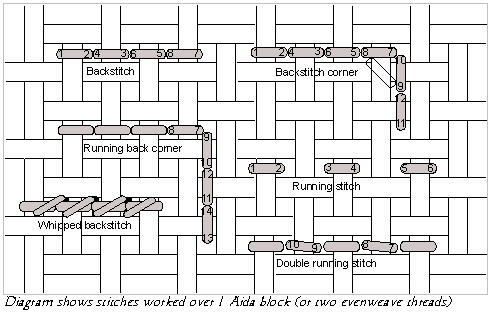
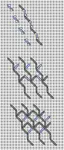
Double running stitch is the traditional stitch used for blackwork designs. For many patterns, this means the work is as neat on the back as it is on the front. Done this way, some patterns are, in fact, identical on both sides.
Another name for this stitch is Holbein. Named after an artist who painted portraits of people wearing clothes decorated with blackwork.
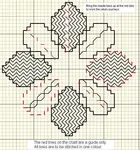
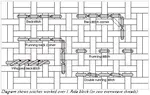
An alternative stitch to use is back stitch. You may find this easier to begin with. You don't have to work out a "route" to take around a pattern. This method is not reversible, but you may prefer it. It creates a thicker line on the reverse side than double running stitch.
If worked on a fine fabric, you may also see the thread from the front when you turn a corner. Running back stitch enables you to prevent this by cheating a little. The following diagram shows all three options.
Other Stitches for Outlines
You might also like to try these — though none will give a reversible finish:
Chain Stitch
See the tutorial →Stem Stitch
See the tutorial →Coral Knots
See the tutorial →Couching
See the tutorial →Try It Yourself
If you haven't tried double running stitch before, you might like to have a go. My first free blackwork pattern shows you how to do it.
Or if you prefer, you can move on to practising some filling stitches, or download my Blackwork for Beginners ebook for the full guided experience.
Free Blackwork Pattern
Learn double running stitch with a simple coaster project
Get the free pattern →Blackwork for Beginners
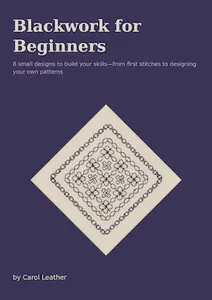
The full guided ebook with 8 patterns and step-by-step tips for neat, reversible blackwork.
Download the Ebook →You might like these
Enjoy this free blackwork pattern and learn double running stitch
Download this free blackwork embroidery pattern, perfect for beginners. Includes step-by-step instructions to create a beautiful Harvest Time coaster.
Make a bookmark with a Celtic embroidery pattern
A treat for lovers of Celtic embroidery. This little free blackwork bookmark is quick and easy to make as a gift, or for yourself
Blackwork Embroidery Patterns – Floral, Animals, Samplers and More
Discover blackwork embroidery patterns for every level—from simple animals to stunning florals. Download and start stitching in minutes


Stay connected between projects
If you’d like occasional updates from my embroidery room, including new patterns, gentle tips, and little things I think you might enjoy, you’re warmly invited to join the Stitchin’ Times newsletter.
About Me - Contact Carol - Privacy Policy - Site Map - Testimonials
Please do not copy the content of this site. It is protected by Copyscape.
Copyright © 2006- www.needlework-tips-and-techniques.com All rights reserved