- Home
- Intro to blackwork
- Pattern Darning
BLACKWORK TUTORIAL
Pattern Darning is Quick and Easy
If you can stitch a running stitch, you already know everything you need for this beautiful border technique
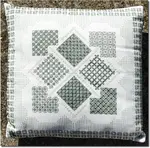
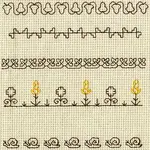
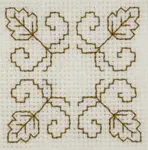
See that diamond-patterned border in the photo below? It looks intricate, but here’s the lovely secret — it’s nothing more than running stitch in different lengths. That’s it. If you’ve ever sewn a simple in-and-out stitch, you already have the skill you need.
Pattern darning (known as Smoyg in Norway, where it originated) uses these simple running stitches to build up repeating patterns. It’s an easy way to add a decorative border or personal flair to your stitching, without having to master anything complicated.
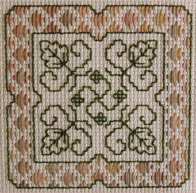
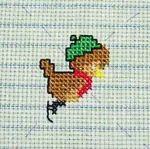
Harvest Time coaster with pattern darning border
By the end of this tutorial you’ll have a finished diamond border around the Harvest Time coaster — a real, complete piece you can use or give as a gift. I’ll walk you through it row by row, with a diagram beside each step so you always know exactly where you are.
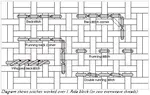
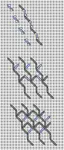
The project uses my free blackwork pattern for the central area. I’d recommend stitching that first — on that page I share my coloured arrow system for working the fill pattern reversibly, and it’ll give you confidence before you add the border.
If you’d rather stitch the whole design in one go, grab the full pattern below.
Once you’ve finished and feel the rhythm of the stitch, you might enjoy my Japanese lady blackwork pattern — pattern darning is used in both her clothing and hair, so you’ll already know the technique.
Harvest Time Pattern Darning Tutorial
What Will I Need?
A short supplies list — nothing specialist needed.
- Aida 14 or 28 count evenweave — 9.5″ square (about 3″ spare on each side)
- Your choice of thread (see note below)
- Size 24 or 26 tapestry needle
I worked the pattern darning in my sample with space-dyed thread. You may prefer to use 2 strands of embroidery floss.
How to Stitch Pattern Darning
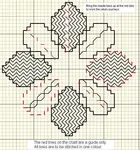
There are only five rows to learn, and rows 4 and 5 are repeats — so really it’s just three different instructions. On the chart and the diagram below, I’ve added arrows to show you which direction to stitch each row. Follow the arrows and you can’t go wrong.
The stitch used for pattern darning is a basic running stitch. The chart shows how many fabric threads to work over if you are using 28 count evenweave. If you are using Aida, two fabric threads equals one block.
Row One
Start at point 1 on the chart and work down a vertical row, going over two fabric threads and under 4.
Row Two
Starting at the bottom, work up the next row going over 6 threads and under 6.
Row Three
Working from the top down, make your stitches over 10 threads and under 2.
Row Four
Follow the instructions for row 2.
Row Five
Repeat row 1.
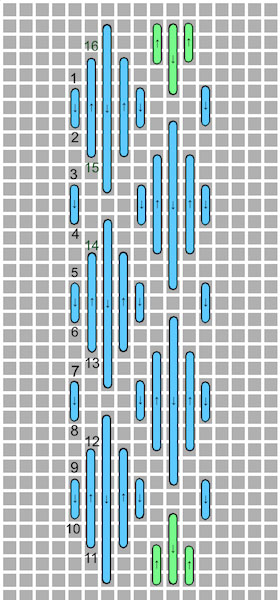
The green stitches on the diagram represent partial stitches — shorter stitches at the edges that fill out to the border line. Just make them as long as they need to be to reach the outer edge. They don’t have to be perfect; they’re there to tidy things up, not to be measured precisely.
That’s all there is to it — five rows, and you’ve got a beautiful diamond border. Once you’re comfortable with this arrangement, try changing the stitch lengths to create stripes, squares, or wavy lines. The same simple technique opens up dozens of patterns.
You’ve Got the Technique — Keep Going
Now that you know pattern darning, you’ve added a genuinely useful skill to your toolkit. It works as a border on almost any counted-thread project, and the same running-stitch principle underpins all sorts of blackwork.
Stitch Index
If running stitch felt this satisfying, wait until you see what a few more basic stitches can do. Clear diagrams and step-by-step instructions for each one.
Browse the Stitch IndexFree Blackwork Pattern
Haven’t stitched the centre yet? Download the Harvest Time coaster pattern and learn the coloured arrow system for neat, reversible blackwork.
Get the Free PatternYou might like these
Double Running Stitch Tutorial: Easy Guide for Beginners
Discover the secrets of the double running stitch for perfect blackwork embroidery. Learn step-by-step techniques for reversible designs with expert guidance
Blackwork Fill Patterns: 3 Easy Examples + How to Choose
Blackwork fillers look tricky but aren't! Learn 3 easy patterns step-by-step, handle compensating stitches at edges, and pick the right one for your design.
Blackwork Embroidery Patterns – Floral, Animals, Samplers and More
Discover blackwork embroidery patterns for every level—from simple animals to stunning florals. Download and start stitching in minutes


Stay connected between projects
If you’d like occasional updates from my embroidery room, including new patterns, gentle tips, and little things I think you might enjoy, you’re warmly invited to join the Stitchin’ Times newsletter.
About Me - Contact Carol - Privacy Policy - Site Map - Testimonials
Please do not copy the content of this site. It is protected by Copyscape.
Copyright © 2006- www.needlework-tips-and-techniques.com All rights reserved