- Home
- Redwork Embroidery
- Free redwork pattern
Free redwork embroidery patterns
and instructions
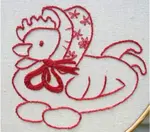
If you’re ready to try your first redwork project, this little Mother Hen design is a lovely place to start.
It is simple, quick to stitch, and uses just a few basic supplies. You don’t need lots of colours or complicated techniques, which makes it ideal if you are new to embroidery or coming back to it after a long break.
On this page you’ll find the free pattern, the materials you need, and the basic instructions to get started. Just take it one step at a time, and before long you’ll have your first redwork piece finished.

Step 1: Open and Print the Pattern
Start by opening the Mother Hen pattern PDF and printing it out.

What You’ll Need
To stitch this design, gather the following:
- White or cream fabric
- Red embroidery floss, such as DMC 321
- A crewel needle, size 8 to 10
- A small embroidery hoop, if you like to use one
- Small sharp scissors
For the outlines, use 2 strands of embroidery floss. This gives a neat line without making the stitching look too heavy.
Before You Begin
Transfer the design onto your fabric using your preferred method. If you are new to this, don’t worry about making it perfect. The main thing is to get a clear outline you can easily follow with your stitches. This page will help you if you haven't transferred a design before.
How to Stitch the Design
This pattern is made up of just a few simple stitches, so it is a nice project for practising the basics without feeling overwhelmed.
Use stem stitch for the main outlines of the hen. Work slowly and try to keep your stitches an even length so the lines look smooth and neat.
The comb and wattle can be filled with satin stitch. Take your stitches straight across the shape, placing them close together so the fabric does not show through.
If you would like to add the little flowers, they can be worked in lazy daisy stitch. These are optional, so if you are a complete beginner you can leave them out and still have a lovely finished design.
A Simple Way to Start
If you are unsure where to begin, start with the outline of the hen first. This helps anchor the design and gives you a clear shape to work with.
Once the outline is complete, add the filled areas such as the comb and wattle. Then finish with any extra details, such as the flowers.
Taking the design in this order makes it feel much more manageable, especially if this is your first redwork project.
A Few Helpful Tips
Try not to worry if your stitches are not perfectly even at first. Hand embroidery always has a little character, and neatness comes with practice.
If your thread starts to twist, let your needle dangle for a moment so the thread can untwist itself.
Keep your fabric reasonably taut if you are using a hoop, but not stretched so tightly that it distorts the weave.
Most of all, enjoy the process. Redwork is meant to be simple and relaxing, and this little project is a good way to build confidence.
Video: Stem stitch
You can follow along by clicking the transcript button, below.
How to do Stem Stitch
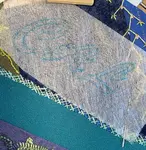
The following two photographs show how to work stem stitch in both the sewing and stab stitch methods for these free redwork embroidery patterns.
If you are working on a hoop it is difficult to push the needle into the fabric and out again in a single movement. When working on a hoop I like to loop the working thread around my thumb until I have inserted the needle back through the fabric where the last stitch finished, then pull the thread snug to the fabric. Don't pull too tightly or you may pucker the fabric and distort the stitches.

Stem stitch will produce a line that looks a bit like a rope and this effect can be heightened if you angle each stitch slightly.
I like to bring the needle up just to one side of the pattern line and then take it down just over the other side. As well as making a slightly wider line it helps to cover up any hint of the pattern drawn on the fabric, especially helpful if you have used a transfer that does not disappear.
Where there is a long sweeping line on the pattern you can use slightly larger stitches, reserving tiny stitches for tight curves or intricate detail.
On this design, for example, I used tiny stitches for the hens wattle (that red wobbly bit above her head), sometimes only picking up a few threads of the fabric for each stitch.

When Your Stitching Is Finished
When you have finished the design, remove any of your transferred marks, if needed, and give the piece a gentle press from the back.
You can then use your stitched hen in all sorts of ways. It could become part of a small quilt, a cushion, a hoop display, or simply a practice piece to keep as a reminder of your first redwork project.
If you enjoy stitching this pattern, you can always come back and try another design once you feel ready.
You might like these
How to Learn Hand Embroidery – Beginner’s Guide and Tips
How to learn hand embroidery for beginners: Discover essential stitches, helpful tips, and easy techniques to start your embroidery journey today
Cross Stitch vs Embroidery: Choosing the Right Needlework Technique
Choose from cross stitch or embroidery - let your creativity shine through & create beautiful items to last a lifetime! No matter which you choose, have fun
How to Thread Paint for Beginners: A Step-by-Step Guide to Get Started
Learn thread painting with this beginner's guide. Leaen the secrets to smooth shading and create a beautiful embroidered flower with our step-by-step tutorial.


Stay connected between projects
If you’d like occasional updates from my embroidery room, including new patterns, gentle tips, and little things I think you might enjoy, you’re warmly invited to join the Stitchin’ Times newsletter.
About Me - Contact Carol - Privacy Policy - Site Map - Testimonials
Please do not copy the content of this site. It is protected by Copyscape.
Copyright © 2006- www.needlework-tips-and-techniques.com All rights reserved