- Home
- Hand embroidery for beginners
- How Do You Embroider Letters
How to Embroider Letters by Hand: A Step-by-Step Tutorial
I am often asked "how do you embroider letters" so as I wanted to add my initials to the crazy quilt block I am working on, I thought I would bring you along with me.
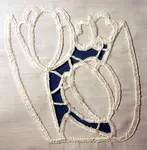
I picked a large dark blue patch to work on. My disappearing ink pen would not work directly on this colour, and I wanted to play with the letters to ensure they fitted in the space. Therefore...
 How do you embroider letters? Start by drawing them on washaway stabilizer
Preparing To Stitch
... I decided to use washaway embroidery stabilizer to first draw my letters out on. As it is translucent I could then lay it on the block to see if it was the right size. Both the stabilizer and the pen marks will wash away leaving no evidence.
I put the block in an embroidery hoop, and set it up in my clamp so it didn't move while I stitched and also videoed part of the process.
I advise pinning the stabilzer in place, so it doesn't move, but as you see from the photo, I only had a spare needle on hand so used that.
Materials Used
The patch I am working on is a blue velveteen fabric, and the crazy quilt block is backed with a thin cotton for support.
For more about suitable fabrics click here to go to the hand embroidery for beginners page.
I used DMC stranded embroidery floss, in colour numbers 827, 156 and 161 for the first letter. I threaded two strands in the embroidery needle at a time.
 Beginning the first round of split stitch
Choosing Embroidery Stitches
I decided to fill in the letter C with rows of split stitch. This versatile stitch can be used both for this purpose and for outlining. I also use it to outline shapes that I am going to fill in with satin stitch, as I did on the raised initial I stitched for my Mum's birthday.
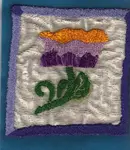
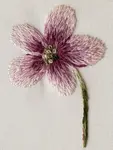
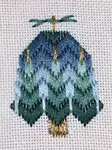
You can see a tulip picture worked in split stitch, stem stitch and french knots here.
 First round of split stitch completed
When working on a stand, I knot my threads and leave them on the front of the work while stitching, then snip them off and take the thread to the back when finished. I also bring the short ends to the front and leave them to fasten off later. This helps to avoid tangles on the back and saves me from turning the hoop over every time I use a new piece of thread.
To start the stitching I make a medium length stitch, beginning at the point of the C, then bring the needle back though the middle of the stitch, between the two strands. I move along the outline, putting the needle down through the fabric and back up through the stitch, hence the name split stitch.
 Working the second round of split stitch in another coloured thread
After working around the letter using the pale blue, I changed to the medium mauve thread and worked another round inside, keeping the rows close together. I then put my embroidery down for the night as the light was fading.
As I was up early the next morning, I decided to record a video showing how to embroider a letter in split stitch. The photo below shows how it looked Just before I finished it. I will soak the piece in water later to remove the stabilizer.

Embroidering a letter in backstitch
I decided to use backstitch to outline the letter A in my initials. I may whip the stitches but will leave that decision for later.
Backstitch is an ideal choice for outlining shapes or letters because it creates a clean, crisp line that's easy to control. Its simplicity also makes it a great stitch for beginners.
I started by using the middle toned thread and began stitching thinking the video was running. Ooops! I soon realized my mistake and switched it on for the rest of the outline.
Backstitch is a basic embroidery stitch that is ideal for outlining shapes or in this case letters.
You start with a small straight stitch then bring the needle back to the front a stitch length ahead. The next movement is backwards, taking the needle down in the same hole that you went down in for the previous stitch.
I changed to the darker thread for part of the letter, to keep the shaded effect going on.

Decision Making
I felt the L was a little too far away from the other two letters so cut it away from the stabilizer, so I could reposition it.
As you work on your design, don't be afraid to make adjustments as needed. In this case, repositioning the letter L ensured a better balance in my overall design.
I soaked the stabilizer behind the first two letters and rubbed it away with a soft cloth to reveal the work so far. As the sun was shining I left the work outside for a while to dry.

I made the decision to whip the backstitch with the same green floss that I had used nearby (166). To do this I just slipped the threaded needle under each stitch, without going through the fabric. This gives a rope like effect to the existing stitching by covering the areas where the stitches go through the fabric.

The Final Letter
I repositioned the stabilizer for the last letter and decided to simplify it somewhat from my original sketch. Easy to do when the sketch is on the stabilizer.
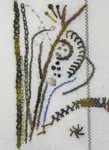
The stitch I used for this was coral knot, which added a bit of texture. I used a pale blue Perlé in DMC 800 for this.
I will likely add some flowers around the letters to fill in some of the blank space, but hadn't finalised the decision at the point where I took the photo below.

By incorporating these techniques and considerations into your embroidery project, you can create a unique and personalized piece that reflects your personality and style. Happy stitching!
You might like these
How to Do Colcha Embroidery: A Fun Guide to a Historic Stitch
Want to try a new craft? Colcha embroidery is a fun, historic technique with "no carved in stone rules." Learn to "paint with yarn" today!
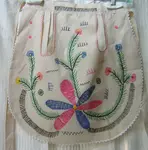
Vintage Embroidery: A Photo Gallery to Inspire Your Stitching
Love vintage charm? Explore this photo gallery of handmade vintage embroidery to inspire your own projects. See how simple stitches create timeless art.
Learn stem stitch and variations of this basic embroidery stitch
This stem stitch tutorial covers the basic stitch, raised stem and portuguese knotted stem. Videos explain how to work the stitches.

Stay connected between projects
If you’d like occasional updates from my embroidery room, including new patterns, gentle tips, and little things I think you might enjoy, you’re warmly invited to join the Stitchin’ Times newsletter.
About Me - Contact Carol - Privacy Policy - Site Map - Testimonials
Please do not copy the content of this site. It is protected by Copyscape.
Copyright © 2006- www.needlework-tips-and-techniques.com All rights reserved