Pulled Work Magic: Create Your First Embroidery Piece Effortlessly
Explore the world of pulled work embroidery with this beginner-friendly project, designed to introduce you to the unique techniques and stitches of this craft.
In this tutorial, you'll learn how to create a beautiful piece using just two stitches: satin stitch and a specific type of cross stitch.
Whether you plan to transform your work into a pincushion or a scissor keep, the skills you'll learn here will serve as a solid foundation.
So, let's get started with preparing the hoop and fabric, and move on to mastering the pulled satin stitch and diagonal raised band techniques.
You can read more about this technique on my pulled thread embroidery page.

You will need...
White evenweave fabric (28 threads to the inch)
white Pearl 8 cotton
a size 26 tapestry needle
a wooden embroidery hoop
How to prepare the hoop and Fabric
Find the centre of your fabric by folding it in half both ways and lightly creasing the fold at the centre. Lay the inner ring of your wooden hoop on a flat surface.
Thread your needle and lay the end of the thread across the hoop then place the fabric over the top.
Lastly place the outer ring of the hoop on top and push it down to secure both fabric and thread. This anchors the thread so it won't pull through the fabric when you start stitching and pulling!
Printing the chart
To access this chart on Windows, ensure Adobe Reader is installed on your computer. Download it here if needed. Click the link to open in your browser, or right-click and "Save Target As/File As" to download for later. Once saved, double-click to open. For printing, use the "Print" option from the menu.
On a Mac, Preview will automatically launch and load the chart if it's set as your default PDF viewer. To save it for later, press "Command + S" to save as, or "Command + Shift + S" for Save As, specifying a desired location and file name. For printing, go to the "File" menu, select "Print," and configure your printer settings as needed.
Pulled Satin Stitch
We will start in the centre with the pulled satin stitch. This is just one variation on a stitch that can be used in a multitude of ways in pulled work.
The trick is to pull firmly and keep the tension on the pulled thread with your finger at the back of the work while you place the next stitch. Try not to yank the thread as it may break! Keep the same tension throughout the work to keep the pattern looking the same.

The first row
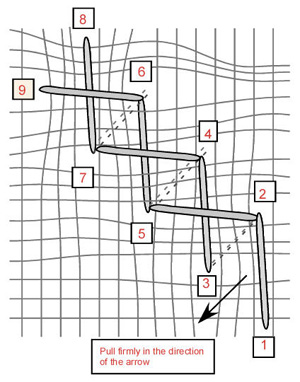
We will work in diagonal rows starting at the big blue dot on the chart.
Each stitch is worked over three fabric threads. Work the first three stitches as shown in the diagram above.
When you bring the thread up through the fabric for stitch 7-8 be careful to count one thread across and six up. You want to end the stitch in the same "channel" that you have created with the first block of three stitches.
At my workshops some students end the stitch in the row above which throws everything out. The faint dotted line shows where the thread is carried on the back of the work.
Row 2
When the first two blocks are in place we will travel in the opposite direction for the second diagonal row.
Count out to the side from stitch 11-12 to bring the needle up for this next row. (The blue line on the chart shows the position of the thread on the back of the work.) Work the blocks of three stitches in the same manner, starting at the bottom of the stitch and re-entering the fabric at the top of each stitch, as shown by the arrow beside the first block.
To start the second block in this row, drop 6 fabric threads and 1 across. Continue with the blocks coloured burgundy on the chart.

The third row
The third row is coloured pink on the chart.
Before we start this row we need to take a travelling stitch out to the side of our stitched area in order to keep the pull on the thread when moving to the next row.
This stitch is shown in blue on the chart and is just a little backstitch. It also serves to keep the thread from laying behind the decorative holes in the pattern and therefore showing in the finished piece.
Work the third row in a similar manner to before checking the direction of the arrow to make sure the stitches are worked from top to bottom.
Completing the pulled satin stitch area
Complete the rest of the centre square in the same way, using travelling stitches where necessary.
Fasten off your threads by taking them underneath the satin stitches on the back of the work.
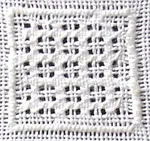
Diagonal raised band
For this stitch we will be working over 6 fabric threads.
It is best to start at the bottom centre, not the corner, or you will have difficulty getting the pull correct at the beginning and end of the pattern.
Follow the numbers on the diagram, above, to work the vertical stitch 1 to 2.
Begin stitch 3-4 by dropping 3 and moving across 3 fabric threads. Pull tightly so that the stitches form a raised band.
This won't be that obvious on the first trip but will give a good effect when you come back down the row to complete the horizontal stitches afterwards. This second journey is easy as the holes in which to put the needle are already in place.
Work the other three diagonal raised band areas to surround the centre square in the same way. You may find it easier to turn the fabric round so that you can follow the numbering on the diagram in the same way for each side.

I hope you have enjoyed your first try at pulled work.
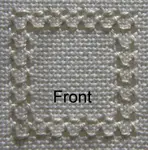
Why not mount a piece of coloured silk or satin underneath your project when finishing it to show up the lacy pattern?
You might like these
Four-Sided Stitch Instructions for Horizontal and Vertical Stitching
Discover four sided stitch, commonly used in Hardanger, pulled thread work, and counted embroidery. Easy steps for stunning openwork effects.
Pulled thread embroidery - all about this whitework technique
Learn about pulled thread embroidery, an exciting form of whitework embroidery where the threads are pulled to form a pretty lacy effect
Whitework Embroidery: 8 Techniques + Free Sampler Pattern
Explore 8 whitework techniques: drawn thread, Hardanger, cutwork, needlelace and more. Includes a free 7-band sampler pattern to try them all.


Stay connected between projects
If you’d like occasional updates from my embroidery room, including new patterns, gentle tips, and little things I think you might enjoy, you’re warmly invited to join the Stitchin’ Times newsletter.
About Me - Contact Carol - Privacy Policy - Site Map - Testimonials
Please do not copy the content of this site. It is protected by Copyscape.
Copyright © 2006- www.needlework-tips-and-techniques.com All rights reserved