- Home
- Whitework Sampler
- 4 Sided Stitch
A diagonal 4 sided stitch band
completes our whitework sampler
If you're looking to add a touch of elegance to your embroidery, the four-sided stitch is a technique worth exploring. This pulled thread stitch creates a delicate, lacy effect on the fabric and is sometimes referred to as the double backstitch or square filet stitch. It's particularly popular in whitework embroidery, where the goal is to create intricate designs using only white thread on a white or off-white fabric.
In this section of our whitework sampler, we will work this stitch diagonally. When it comes to the four-sided stitch, there are multiple ways to work the stitch. In addition to the diagonal method discussed here, you can also work it horizontally or vertically.
It's been a pleasure stitching this sampler with you so far. If you're joining us at this point, don't worry - you can easily catch up by using the links at the bottom of the page to access the first set of instructions. I hope you'll find this project as enjoyable and rewarding as I have, and I look forward to seeing your finished piece!

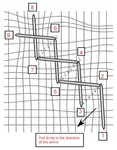
Let’s look at the chart
When looking at the sampler chart, you will notice a red row of triangles at the top. This row is actually part of the previous band and is included to help you understand where the current band begins.
If you're having trouble seeing the chart clearly, don't worry - you can download a PDF version by clicking on the picture. This will provide a more detailed and easy-to-read version of the chart, allowing you to focus on your stitching without any confusion or frustration.
See the zig-zag line on the chart? That is what we'll be focusing on this time.
By following the pattern and paying close attention to the details, we can create a beautiful and intricate design that will impress anyone who sees it. So let's get started and bring this chart to life!

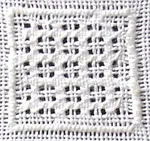
How to work diagonal 4-sided-stitch
To create this band, we'll be using perle 8 thread in either white or ecru, depending on the color of your fabric. As we stitch, we'll apply tension to form small holes at each corner of the stitch.
When working on your embroidery project, it's important to pay attention to the placement and direction of each stitch. You should work each stitch over three fabric threads, as illustrated in the diagram below.
Be sure to follow the arrows showing the direction of each stitch. - this will create a series of squares on the front of your work, and crosses on the back. By taking care with each stitch, you can achieve neat and professional-looking finished work.

Experience the beauty of Hardanger embroidery with my selection of patterns, including ones that feature the four-sided stitch! Click here to see my collection and start your next project today.
Links to the rest of the whitework sampler pages
Return to top of band 7 - 4 sided stitch
Go to part 1 of the whitework sampler
Go to band 2 - drawn thread work
Go to band 3 - satin stitch border and pulled double back stitch
Go to band 4 - diamond eyelet stitch
Go to band 5 - honeycomb stitch
Go to band 6 - three sided stitch
Return to Whitework embroidery
You might like these
Pulled Work Embroidery Beginner's Guide: A Simple Free Project
Pulled thread embroidery guide for beginners. Learn two different stitches to create a lacy pattern. Step-by-step preparation, stitching and finishing.
Four-Sided Stitch Instructions for Horizontal and Vertical Stitching
Discover four sided stitch, commonly used in Hardanger, pulled thread work, and counted embroidery. Easy steps for stunning openwork effects.
Whitework Embroidery Stitches: Step-by-Step Cobbler Stitch Guide
Discover the beauty of whitework embroidery stitches with a step-by-step guide to Cobbler Stitch, featuring a detailed diagram and photo of the finished sample


Stay connected between projects
If you’d like occasional updates from my embroidery room, including new patterns, gentle tips, and little things I think you might enjoy, you’re warmly invited to join the Stitchin’ Times newsletter.
About Me - Contact Carol - Privacy Policy - Site Map - Testimonials
Please do not copy the content of this site. It is protected by Copyscape.
Copyright © 2006- www.needlework-tips-and-techniques.com All rights reserved