Whitework embroidery stitches -
Cobbler Stitch
Pulled whitework embroidery stitches are wonderfully effective for creating intricate textures without the need for bright colours.
If you’ve read my introduction to pulled thread embroidery, you’ll know that the magic comes from pulling fabric threads together with your working thread. Typically, this thread is the same colour as the fabric (often white or ecru) because the beauty lies in the holes formed, not the stitches themselves.
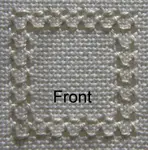
One such is Cobbler Stitch, shown in the photo below.

Why Try Cobbler Stitch?
Cobbler stitch is an absolute gem. Its windowpane-like pattern adds a delicate charm to your embroidery, and it’s surprisingly easy.
Sometimes called a composite stitch, it involves stitching one direction, turning your fabric, and stitching at a right angle to the first set.
What Do I Need?
As with all pulled thread work, use an evenweave fabric with the same number of threads in each direction. I'm all for letting the materials work with you and not against you, so choose a loosely woven cloth where the threads can move easily.
As a beginner, 18 threads per inch is a great starting point - small enough to look delicate but easy on the eyes while working.
If white feels a bit too bright for you, opt for a pastel fabric and matching thread. Just steer clear of anything with high contrast; otherwise, you'll end up noticing the stitches instead of the lovely little holes they create.
Embroidery floss isn't the ideal thread for this embroidery technique as it isn't strong enough to withstand the pulling. Instead you can use pearl cotton, cotton a broder or one of my favourites - tatting thread.
As you won't be piercing the fabric threads, a tapestry needle is well suited for pulled work.
How to Work Cobbler Stitch
This stitch involves creating rows of straight stitches, carefully spaced apart, and then crossing them with similar rows at a right angle.
All your stitches on the right side of the work will be the same length, going over four fabric threads.
Leave one empty hole before repeating this stitch to form a group of two.
Between each group of two you will leave four fabric threads, creating a diagonal stitch on the reverse.
Once you have filled your area with vertical stitches, turn your work ninety degrees to repeat the process, matching up the holes you have already used.
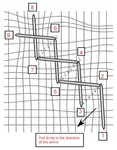
This is shown in the diagram below.

Just a quick note: the diagram illustrates how the stitches are placed (to make it easier to follow), but it doesn't capture the shifting of the fabric threads that occurs as you work.
Your stitching should resemble the photograph at the top of the page.
I also added a pulled satin stitch border around the cobbler stitch area in the photograph.
This stitch is one of the whitework embroidery techniques featured in my free pulled work lesson.
Tips for Perfecting Your Cobbler Stitch
Don't rush when working whitework embroidery stitches such as Cobbler.
Keep a firm but steady tension—no tug-of-war here! Pulling too hard can distort your fabric, while being too loose won’t create the pulled effect. It’s a balance, but you’ll find your rhythm with a bit of practice.
Look for the double cross. When done correctly, you will see the remaining un-pulled threads create a cross inside a square, with holes in the corners.
Taking it Further
Once you've got the hang of Cobbler Stitch, you might like to try Framed Cross Stitch. Both pulled stitches are similar in structure, but the latter has a single thread cross in the holes instead of a double one.
This is achieved by placing your groups of two stitches in adjacent holes, then leaving four threads in between each group.
Result: A lovely pattern that adds a bit of flair to your project!
You might like these
Whitework Embroidery: 8 Techniques + Free Sampler Pattern
Explore 8 whitework techniques: drawn thread, Hardanger, cutwork, needlelace and more. Includes a free 7-band sampler pattern to try them all.
Pulled thread embroidery - all about this whitework technique
Learn about pulled thread embroidery, an exciting form of whitework embroidery where the threads are pulled to form a pretty lacy effect
How to Hemstitch by Hand: Step-by-Step Embroidery Tutorial
Learn hemstitch embroidery with this easy tutorial. Master fabric scoring, hem folding, and Danish hemstitch technique with clear diagrams.

You might like these
How to Hemstitch by Hand: Step-by-Step Embroidery Tutorial
Learn hemstitch embroidery with this easy tutorial. Master fabric scoring, hem folding, and Danish hemstitch technique with clear diagrams.
Four-Sided Stitch Instructions for Horizontal and Vertical Stitching
Discover four sided stitch, commonly used in Hardanger, pulled thread work, and counted embroidery. Easy steps for stunning openwork effects.
Learn the Four-Sided Stitch: An Easy Pulled Thread Stitch
Learn the 4-sided stitch! This easy step-by-step guide with diagrams shows you how to create a neat, lacy border. Perfect for hems!

Stay connected between projects
If you’d like occasional updates from my embroidery room, including new patterns, gentle tips, and little things I think you might enjoy, you’re warmly invited to join the Stitchin’ Times newsletter.
About Me - Contact Carol - Privacy Policy - Site Map - Testimonials
Please do not copy the content of this site. It is protected by Copyscape.
Copyright © 2006- www.needlework-tips-and-techniques.com All rights reserved