- Home
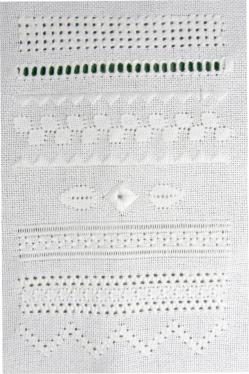
- Whitework Sampler
- Pulled Thread Work
Pulled thread work for band 3 of our sampler
Welcome back to our whitework stitchalong!
This time, we'll explore the art of pulled thread work, which involves manipulating the fabric to create a unique texture.
Specifically, we'll be using two stitches - satin stitch and pulled double back stitch - to create a wider band for our sampler. By combining these techniques, you can achieve a stunning effect that will add contrast to your piece.
So let's get started and see what kind of beautiful designs we can create with this exciting stitching method!
Satin stitch border
To continue your embroidery project, place your fabric in an embroidery hoop with the previous row easily visible.
Next, thread your needle with white Perle no. 5 - a length of around 24 inches will work well. Before you start stitching, tie an away waste knot and then take your needle down near the top of the hoop. You can learn more about waste knots on the embroidery floss page.
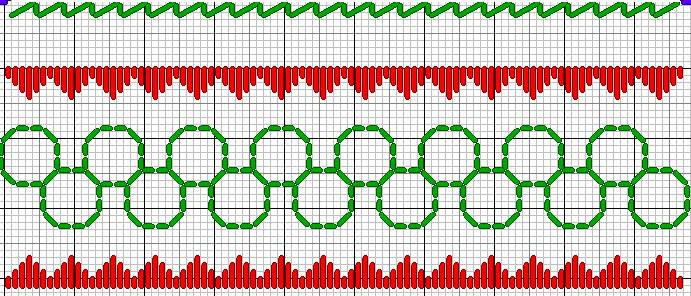
Please note: The green line located at the top of the chart above represents the bottom of row 2. It's important to remember that you don't need to stitch this line again - it's simply there to assist you in positioning this particular row.
To begin the first row of the satin stitch, count seven fabric threads from the above row. This should be directly underneath the left-hand edge of the previous row. Once you've found the right spot, bring your needle up through this hole and take it down over two threads to create your first vertical stitch.
These stitches are meant to lay on the surface, so resist the urge to tug or tighten - we will use tension in the next stage.
To create a polished satin stitch, it's important to follow the chart provided and adjust the length of your stitches accordingly. Take care to lengthen and shorten the stitches as indicated in each row. Additionally, be sure to always bring your needle up on the straight edge of the design - taking shortcuts can result in uneven, bumpy stitches that detract from the overall look of your work.
Pulled double back stitch
Please take note that to achieve the desired effect, it is important to pull your stitches tightly this time.
Don't be afraid to experiment with different levels of tension until you find the perfect balance for your project.
About the chart
If you've done pulled thread work before, you may have noticed that the charts and diagrams don't always accurately reflect the final result.
This is also true for the double back stitch, which may appear to create octagon shapes based on the diagram below, but will actually result in distorted rectangles once completed.
So while it's helpful to refer to charts and diagrams as a guide, it's important to keep in mind that the final outcome may differ slightly from what you initially expect.
Working the double back stitch

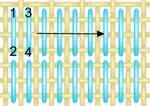
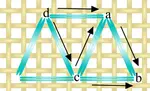
To create the stitches for this project, refer to the diagram above and follow the numbered sequence. Using the chart provided above for placement, bring your needle up at the straight end of each arrow and then down at the pointed end.
When you're working on a pulled thread work project, it's important to be aware of the threads on the back of your work. These threads will criss-cross and create a pattern, as shown by the lines behind the grid.
To help you keep track of the direction of your stitches, I've added arrows to the first few reverse side stitches. It's also worth noting that these stitches should be worked in a specific color order - blue, green, pink, and purple - to achieve the desired effect.
Stitch 12 will complete each shape. Then, move on to the next shape by working another stitch on top of the previous one. As you continue across the row, follow the chart and alternate between octagons to create a visually appealing pattern.
To finish off your band, simply repeat the satin stitch triangles with the straight edge at the bottom this time. Again follow the first chart for placement.
Take your time, follow the instructions closely, and enjoy the satisfaction of completing your beautiful band!
This sampler was initially released row by row in my newsletter, Stitchin' Time.
By signing up for this newsletter using the form at the bottom of this page, you'll gain access to even more helpful resources and tips for improving your stitching skills. So don't hesitate - sign up today and start exploring all that Stitchin' Time has to offer!
Links to the rest of the whitework sampler pages
Go to part 1 of the whitework sampler
Go to band 2 - drawn thread work
Go to band 3 - satin stitch border and pulled double back stitch.
Go to band 4 - diamond eyelet stitch
Go to band 5 - honeycomb stitch
Go to band 6 - three sided stitch
Return to Whitework embroidery
You might like these
Creating Your First White Work Sampler - From Thread to Treasure
Explore the intricate art of whitework embroidery through our step-by-step tutorial. Ideal for beginners, this guide will take your skills to the next level!
Diamond eyelet stitch and double backstitch leaves
Time for diamond eyelet stitch and double backstitch leaves in our free whitework embroidery sampler. Learn pulled thread and drawn thread work!
Band 5 of the white work embroidery sampler
Are you stitching along with my white work embroidery sampler? Come on, join in, and learn new needlework techniques with us. Its free!

You might like these
Use pulled three sided stitch in your whitework sampler
In our penultimate band on the whitework sampler we are using three sided stitch and ringed back stitch
Drawn thread work - Whitework sampler band 2
We will learn drawn thread work in band 2 of our stitchalong whitework sampler. Find out the difference between pulled work and drawn thread needlework
Creating Your First White Work Sampler - From Thread to Treasure
Explore the intricate art of whitework embroidery through our step-by-step tutorial. Ideal for beginners, this guide will take your skills to the next level!
Stay connected between projects
If you’d like occasional updates from my embroidery room, including new patterns, gentle tips, and little things I think you might enjoy, you’re warmly invited to join the Stitchin’ Times newsletter.
About Me - Contact Carol - Privacy Policy - Site Map - Testimonials
Please do not copy the content of this site. It is protected by Copyscape.
Copyright © 2006- www.needlework-tips-and-techniques.com All rights reserved