LESSON 6 OF 6
Free Hardanger Course — Lesson Six
A Christmas card design with satin stitch, eyelets, and cable stitch — no cutting required!
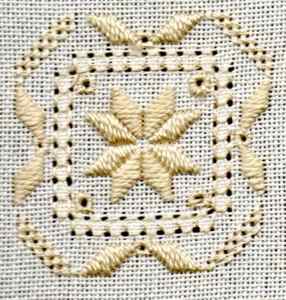
Welcome to Lesson 6 — the final lesson in the course! This time you'll stitch a pretty Christmas card design that makes a wonderful handmade gift.
The central motif looks like a star at first glance, but it's actually an eight-petalled rose. Surrounding it are satin stitch holly leaves, pulled-thread eyelets, and cable stitch corners — all techniques you've met (or nearly met) before.
Best of all? There's no cutting in this design! Even complete beginners can tackle it with confidence.
What You'll Need
The Christmas Card Pattern
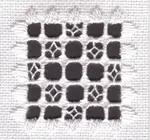
Download and print the chart for this lesson before you begin. It shows the satin stitch rose motif, holly leaf placement, eyelet positions, and cable stitch corners.
Central Satin Stitch Motif
Start by finding the centre of your fabric and marking it with a glass-headed pin. Pop your fabric into an embroidery hoop to make the stitching easier.
Thread up with a generous length of pearl cotton No. 5 (the thicker thread) in either green or white.
Following the chart, work the satin stitch motif by counting up two threads from the centre and stitching the top right diamond shape first.
When you complete this shape, run the thread through the back of the stitches so that you're in the right position to stitch the adjoining shape. Work your way around the motif in this manner.
Join Between Shapes
If you run short of thread, always finish a shape before re-threading. If you join a new piece of thread in the middle of a shape it will show — the old thread looks dull while the new one is still shiny.
Four-Sided Stitch Border & Eyelets
Switch to the finer pearl cotton No. 8 and work the four-sided stitch border around the central motif. You can pull this tightly to produce a lacy effect, or leave the stitches at a normal tension — the choice is yours.
Count Carefully
I love working four-sided stitch and have on many an occasion got carried away and stitched too many! Check the chart often to make sure this doesn't happen to you.
While you still have the fine thread in your needle, work the square eyelets in the centre of the motif and in the corners. Pull these tightly to form a central hole.
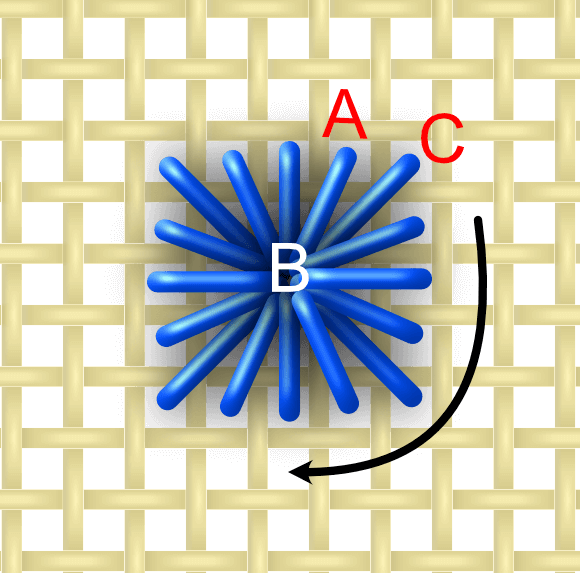
If you wanted to get fancy, you could stitch the eyelets in a gold metallic thread — but it isn't the easiest fibre to work with!
Satin Stitch Holly Leaves & Berries
Back to the thicker pearl cotton No. 5 now for the satin stitch holly leaves around the outside. Follow the chart for placement.
Then pop another eyelet in the centre of each group to represent a berry — a lovely festive touch!
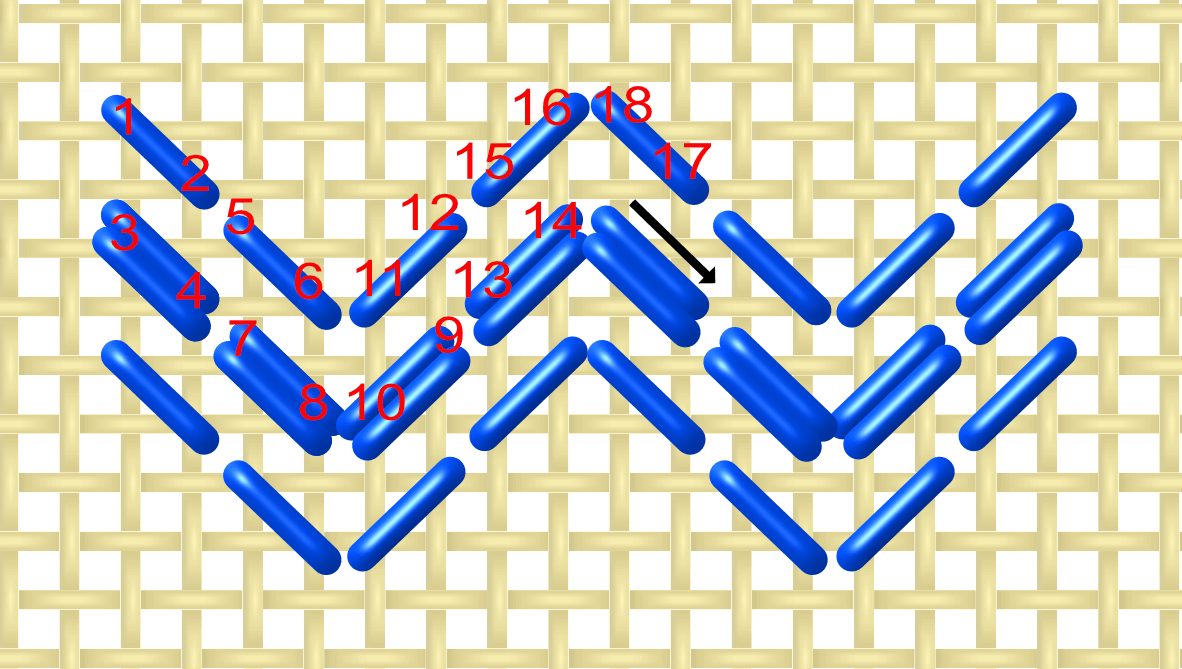
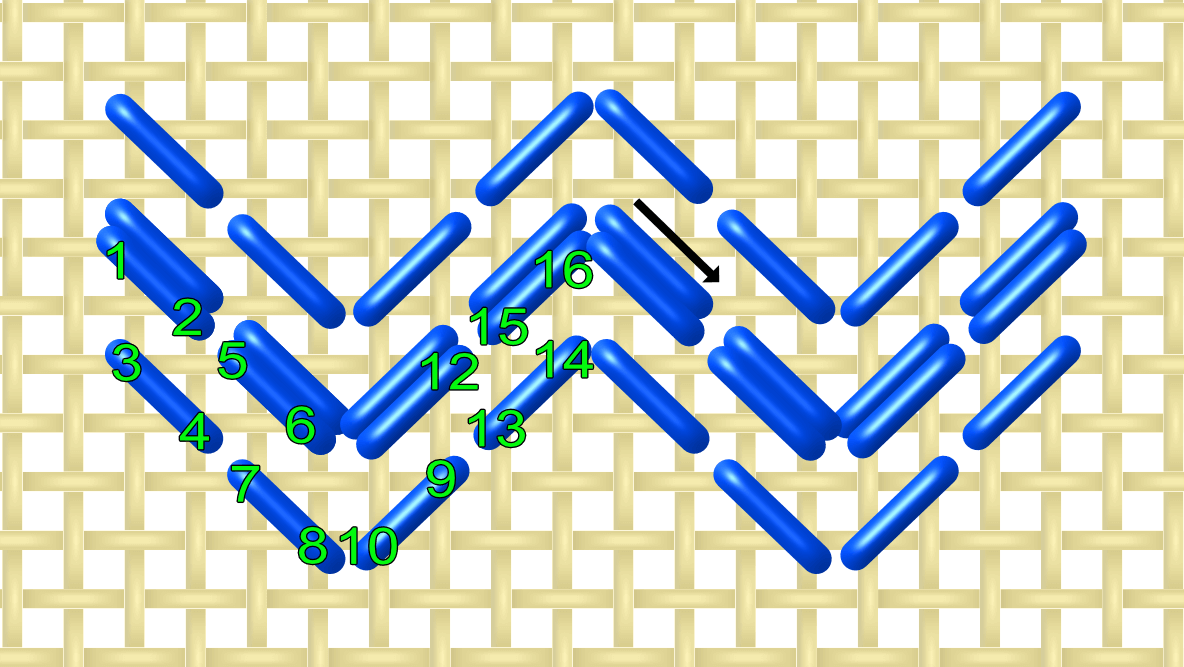
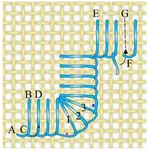
Cable Stitch
All we have left is the cable stitches in each corner. Use the finer pearl cotton No. 8 and pull firmly.
Follow the two diagrams below, noting that the centre row of holes will end up being used twice.
Mounting Your Card
With all the stitching complete, the only thing left is to mount your finished piece in a blank card using double-sided tape. Trim the fabric to fit, centre your design carefully, and press it into place. If you'd like more detail on neat card mounting, my handmade greetings cards page walks you through it step by step.
And there you have it — a beautiful handmade Hardanger Christmas card, ready to send to someone special!
You've Completed the Course!
In this final lesson you learned:
Look how far you've come! Over six lessons you've mastered Kloster blocks, needleweaving, dove's eyes, buttonhole edging, eyelets, four-sided stitch, spider's web filling, hemstitch, cable stitch, and so much more. You should be really proud of yourself.
If you've enjoyed learning Hardanger and want to carry on stitching, take a look at my beginner-friendly patterns below. And if you ever get stuck on a future project, I'm always happy to help.
Ready for more Hardanger?
You might like these
How to Hemstitch by Hand: Step-by-Step Embroidery Tutorial
Learn hemstitch embroidery with this easy tutorial. Master fabric scoring, hem folding, and Danish hemstitch technique with clear diagrams.
Free Hardanger Bookmark Pattern: Buttonhole Edging Tutorial
Download this free Hardanger bookmark pattern with step-by-step instructions. Learn buttonhole stitch edging, square eyelets, and neat finishing.
Hardanger Embroidery for Beginners: Free Step-by-Step Guide
New to Hardanger? Learn wrapped bars, dove's eyes, and fancy Kloster blocks with clear step-by-step instructions and a free downloadable chart.

Stay connected between projects
If you’d like occasional updates from my embroidery room, including new patterns, gentle tips, and little things I think you might enjoy, you’re warmly invited to join the Stitchin’ Times newsletter.
About Me - Contact Carol - Privacy Policy - Site Map - Testimonials
Please do not copy the content of this site. It is protected by Copyscape.
Copyright © 2006- www.needlework-tips-and-techniques.com All rights reserved