- Home
- Whitework Sampler
- Drawn Thread Work
Whitework band sampler -
drawn thread work
In drawn thread needlework, the process involves removing certain threads from the fabric and then gathering the remaining ones together to create decorative bands. On the other hand, pulled work doesn't involve removing any threads - instead, they are simply rearranged to produce a delicate, lacy effect. With practice and patience, you can master both techniques and create stunning pieces of needlework.
If you're interested in learning both whitework techniques, you might be pleased to know that this lesson was originally part of a stitchalong sampler that was released monthly for subscribers to my newsletter. These are now available to you here on the site.
To access the other parts of the sampler, simply follow the links at the bottom of this page.
Ready to try drawn thread work for the first time?
If you're hesitant about cutting and pulling out fabric threads, don't be! It won't cause your project to unravel.
To start, we'll use buttonhole stitches to secure the ends of our band. This will ensure that everything stays in place and allows you to move forward confidently with your project without fear of it falling apart.
Securing the fabric threads
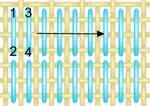
To begin this embroidery project, locate the bottom left corner of your first band (shown in red in the chart below) and count down eight fabric threads. Once you've found the correct spot, mark it with a pin.
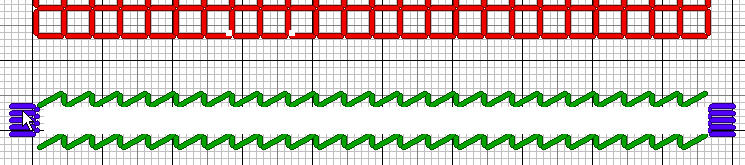
Keep in mind that you'll eventually need to remove the ninth to twelfth threads, but for now, thread up with perle 8 and start working on the buttonhole stitches.
Create five vertical stitches with the corded edge facing towards the center of your work, directly below the left-hand edge of the first band, as indicated on the chart. Repeat this process on the right-hand side of your sampler to complete this section.
To make it easier for you to follow along, I have marked the stitches in blue on the chart.
However, when you begin stitching your sampler, you will use the same color thread you used for the rest of the project.
Removing the threads
Before you start cutting, make sure to secure the fabric threads at both ends.
Once that's done, it's time to begin snipping.
Take each of the four threads and cut them once in the center of the row. Then, using your needle, carefully pull them out of the fabric, working your way back towards each side of your sampler. This technique will help you create a clean and precise cut, ensuring that your finished piece looks professional.
When you come to the buttonholed edges of your project, there are two ways to finish them off.
The first option is to simply cut the fabric threads as close to the stitches as possible. However, if you want to ensure extra security and a neater finish, you can thread the loose threads onto a needle and weave them under the buttonhole stitches. Take care to weave them into the fabric itself, going over and under the remaining threads all the way to the edge of your fabric before cutting them. By taking this extra step, you can prevent any loose threads from unraveling over time.
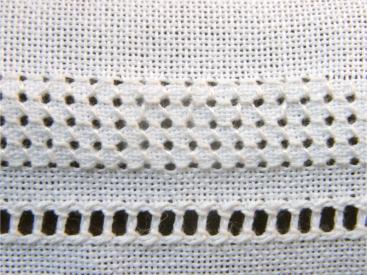
After withdrawing the threads from the open area, you should be left with only the vertical fabric threads. You'll gather these threads into groups of four by using a technique called hemstitching.
Hemstitching your drawn thread work band
Secure your stitching thread behind the buttonhole stitches.
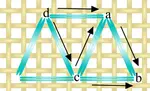
To begin hemstitching, refer to the numbered diagram below and locate the open space on the right-hand side along the bottom edge of the withdrawn area.
Then, bring your needle up two fabric threads below this space and prepare to start your first stitch.
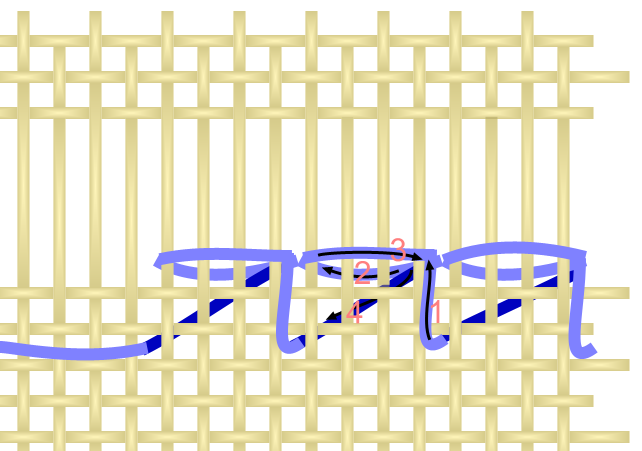
Plunge your needle into the gap between the remaining threads, directly above the hole the thread is currently coming out of. Then with the needle pointing to the left slip it behind the first four vertical threads. Pull firmly to move the threads into a clump and take the needle to the back of the work in the same gap you previously used.
Bring it back to the surface four holes to the left in line with your first entry point and repeat the process explained above.
To ensure that the top edge of your drawn thread work band is secure, simply repeat the sequence you used for the bottom edge. This involves collecting the same four threads together to create a ladder effect, as demonstrated at the top of the page. You may find it easier to turn your work by 180 degrees so that you are working in the same direction as before.
These instructions are for right handed people. Reverse the direction of stitching if you are left handed.
Links to the other bands in the sampler
Return to top of white work embroidery sampler
Go to band 2 - drawn thread work
Go to band 3 - satin stitch border and pulled double back stitch
Go to band 4 - diamond eyelet stitch
Go to band 5 - honeycomb stitch
Go to band 6 - three sided stitch
Move on to band 7 - diagonal 4 sided stitch
Learn more about whitework embroidery
You might like these
Diamond eyelet stitch and double backstitch leaves
Time for diamond eyelet stitch and double backstitch leaves in our free whitework embroidery sampler. Learn pulled thread and drawn thread work!
Band 5 of the white work embroidery sampler
Are you stitching along with my white work embroidery sampler? Come on, join in, and learn new needlework techniques with us. Its free!
Use pulled three sided stitch in your whitework sampler
In our penultimate band on the whitework sampler we are using three sided stitch and ringed back stitch
You might like these
Band 5 of the white work embroidery sampler
Are you stitching along with my white work embroidery sampler? Come on, join in, and learn new needlework techniques with us. Its free!
Use pulled three sided stitch in your whitework sampler
In our penultimate band on the whitework sampler we are using three sided stitch and ringed back stitch
Diamond eyelet stitch and double backstitch leaves
Time for diamond eyelet stitch and double backstitch leaves in our free whitework embroidery sampler. Learn pulled thread and drawn thread work!

Stay connected between projects
If you’d like occasional updates from my embroidery room, including new patterns, gentle tips, and little things I think you might enjoy, you’re warmly invited to join the Stitchin’ Times newsletter.
About Me - Contact Carol - Privacy Policy - Site Map - Testimonials
Please do not copy the content of this site. It is protected by Copyscape.
Copyright © 2006- www.needlework-tips-and-techniques.com All rights reserved