- Home
- Whitework
- Whitework Sampler
- Diamond Eyelet Stitch
WHITEWORK SAMPLER · BAND 4 OF 7
Diamond eyelet stitch and double backstitch leaves
Individual pulled work motifs: a diamond eyelet in the centre with a leaf on each side.
Welcome to the fourth band in my complimentary whitework embroidery sampler. If you have just discovered the site, and this Stitchalong, then don't worry. You can access the previous bands using the sampler navigation below.
This page is Band 4 of the free whitework sampler: seven bands, each teaching a new whitework technique.
As you can see from the photograph below, we make this band from individual pulled work motifs. We have a diamond eyelet in the centre with the leaves on each side worked in a double back stitch variation.

Band 4: diamond eyelets with their leaves
I often use the diamond eyelet in Hardanger designs along with other forms of whitework.
Download the Band 4 Chart
I have included the bottom row of Satin stitch from the previous row to help you with placement.
Download the Band 4 Chart (PDF) →Instructions for diamond eyelet stitch
We are going to leave 6 clear fabric threads below the third band. Work the eyelet in the center of the row, covering 16 fabric threads. Each stitch will start on the outside of the shape by taking the needle down in the centre, pulling towards the outside to enlarge the hole in the middle.
It is always best to start an eyelet 1 stitch away from a vertical or horizontal stitch. Follow the diagram below, coming up at the number and going down in the centre. Pull firmly. To fasten off, pull the last stitch towards the centre and slip the needle behind the stitches at the bottom right of the stitch a few times to secure.
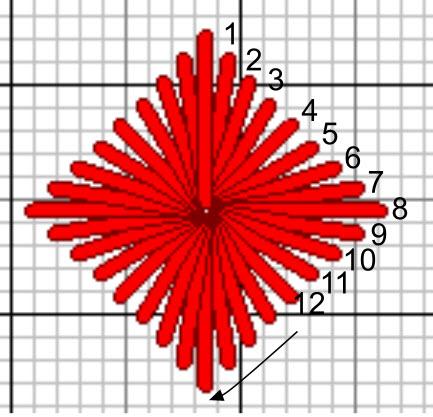
The diamond eyelet diagram. Click it to open full size.
Double back stitch leaves
We will start off at the point of the leaf and by alternating our stitches on either side. Then we will change to working from one side to the center, to create the vein. After working up the other side of the vein, we will then complete the leaf.
Follow the numbering on the diagram below carefully.
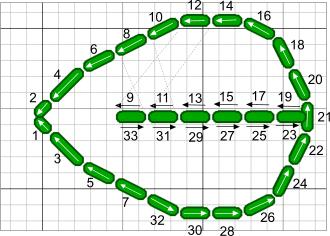
The leaf diagram. Click it to open full size.
To work the leaf on the other side of the diamond eyelet stitch, turn either your work or the diagram upside down (of course you will need to print this page in order to do the latter).
Ready For Band 5 of Your Whitework Sampler?
Your motif band is done, and the centre of the sampler is taking shape.
In the next part of this sampler we will work a band using two more new pulled thread embroidery stitches.
Stitchin' Times Newsletter
Stay connected between projects
If you'd like occasional updates from my embroidery room, including new patterns, gentle tips, and little things I think you might enjoy, you're warmly invited to join the Stitchin' Times newsletter.
About Me - Contact Carol - Privacy Policy - Site Map - Testimonials
Please do not copy the content of this site. It is protected by Copyscape.
Copyright © 2006- www.needlework-tips-and-techniques.com All rights reserved