- Home
- Whitework Sampler
- White Work Embroidery
Band 5 of the
white work embroidery sampler
We have reached band 5 of our white work embroidery sampler.
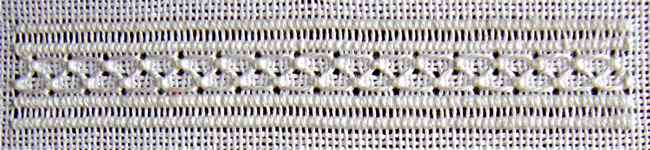
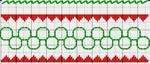
The photograph below shows the band we are going to stitch this time around. It consists of four rows of pulled satin stitch and a section of honeycomb stitch
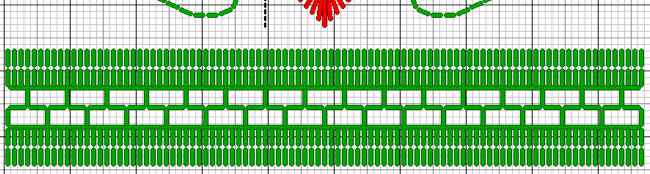
The chart below shows this band with a tiny piece of band 4 so that you can line things up.
Now I know that the chart does not look like the photograph above! I assure you it is correct, the honeycomb stitch is worked as shown and with the right tension on the stitches will resemble the photo above.
Pulled Satin Stitch
OK, let us start with the pulled satin stitch rows.
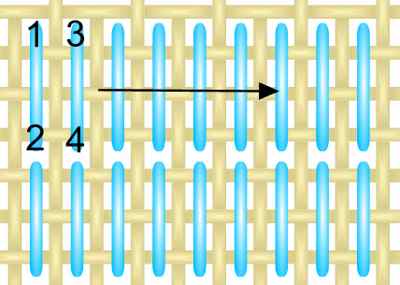
These stitches are worked over 3 fabric threads and are pulled tightly, each row in the alternate direction, to create a ladder effect in between the rows.
So for the top row pull up when you complete each stitch, and for the 2nd row pull down towards the honeycomb stitch section. The direction of pull can be important in white work embroidery.
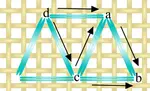
Please use the diagram below to work the top two rows of pulled satin stitch,continuing in the direction of the arrow.
Honeycomb Stitch
After the top two rows we will work the honeycomb stitch area. this stitch can be worked in vertical rows but as we are only working a narrow band we will work it horizontally this time.
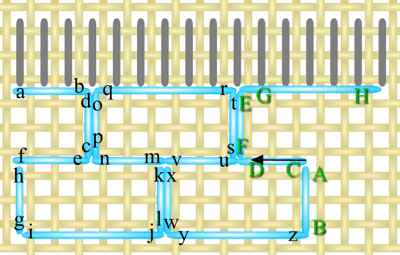
The grey stitches in the diagram above relate to the 2nd row of pulled satin stitch that we worked. They are there so that you can see where to position your honeycomb stitch row.
Follow the letters in the diagram. Although this stitch may seem a little complicated from the diagram, you will soon get into a rhythm with it. Pull firmly to draw the fabric threads into the right positions.
Complete the band by stitching a further two rows of pulled satin stitch as above.
Go to part 1 of the whitework sampler
Go to band 2 - drawn thread work
Go to band 3 - satin stitch border and pulled double back stitch
Go to band 4 - diamond eyelet stitch
Go to band 5 - honeycomb stitch
Go to band 6 - three sided stitch
Complete your sampler - 4 sided stitch
Return to Whitework embroidery
You might like these
Creating Your First White Work Sampler - From Thread to Treasure
Explore the intricate art of whitework embroidery through our step-by-step tutorial. Ideal for beginners, this guide will take your skills to the next level!
Diamond eyelet stitch and double backstitch leaves
Time for diamond eyelet stitch and double backstitch leaves in our free whitework embroidery sampler. Learn pulled thread and drawn thread work!
Use pulled three sided stitch in your whitework sampler
In our penultimate band on the whitework sampler we are using three sided stitch and ringed back stitch

You might like these
Pulled thread work - sampler band 3
Combining stitches is common in pulled thread work. For this third band in our free whitework sampler we will use satin stitch with pulled double back stitch
Use pulled three sided stitch in your whitework sampler
In our penultimate band on the whitework sampler we are using three sided stitch and ringed back stitch
Creating Your First White Work Sampler - From Thread to Treasure
Explore the intricate art of whitework embroidery through our step-by-step tutorial. Ideal for beginners, this guide will take your skills to the next level!
Stay connected between projects
If you’d like occasional updates from my embroidery room, including new patterns, gentle tips, and little things I think you might enjoy, you’re warmly invited to join the Stitchin’ Times newsletter.
About Me - Contact Carol - Privacy Policy - Site Map - Testimonials
Please do not copy the content of this site. It is protected by Copyscape.
Copyright © 2006- www.needlework-tips-and-techniques.com All rights reserved