- Home
- Cross Stitch
- Laying Tool
EMBROIDERY TOOLS
What Is a Laying Tool and Why Do You Need One?
The simple tool that transforms twisted threads into smooth, light-catching stitches.
What Is a Laying Tool?
Looking for the answer to what a laying tool is and why it is needed for embroidery?
This tool is used to ensure smooth, even stitches on fabric. It is invaluable for embroiderers, giving a neater appearance to your needlework by helping multiple strands of embroidery floss, rayon or other fibres lay side by side without being twisted. This smoothness allows the light to reflect evenly off the fibres giving a beautiful sheen to your work.
You will find laying tools made from many materials — wood, metal, bone, glass or even plastic. The most important requirement is that they are smooth and free from burs or rough areas. Basically, they are a long, thin or tapered instrument, sometimes with a handle, that resembles an awl.
My favourite is an old mother of pearl handled version with a metal end that I found in an antiques shop. It is beautiful to look at and comfortable to hold.
There is also a version that you can slip onto your finger, which is known as a trolley needle. The danger here is forgetting you are wearing it and poking yourself in the eye!
How to Use a Laying Tool for Smooth Stitches
Spread the Strands
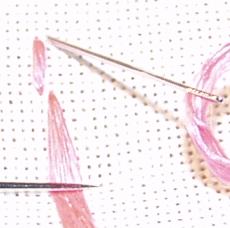
Bring the needle through the fabric and then, holding the tool in your left hand, press it against the floss close to the fabric.
Gently slide the tool towards you a little, spreading the strands flat against the fabric.
Guide the Thread Into Place

Still holding the tool against the thread, push the needle back into the fabric and slowly pull it through until the thread forms a loop around the tool.
Then allow the tool to guide the strands into place before removing it carefully.
See the Results for Yourself
Eterna Silk Comparison
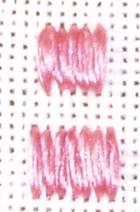
In the photograph I worked the top row using the laying tool. The stitches look smoother and fuller than the unlaid row below.
The fibre used in this sample was Eterna silk and laying the threads enables it to shine evenly. You can see that in the bottom row the light catches the stitches at different angles depending on how they lay.
Embroidery Cotton Comparison
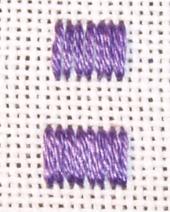
Although not as glossy, stranded embroidery cotton or floss can also benefit from using a laying tool. In this photograph I used the tool for the bottom row.
You can see how the stitches look fuller and give the appearance of a solid area of stitching, where those in the top row look like separate stitches.
One small tool — a world of difference in every stitch.
Why Use a Laying Tool?
Beautiful Sheen
Threads lay flat so light reflects evenly — especially stunning with silk.
Fuller Stitches
Strands sit side by side instead of twisting, giving a solid, polished finish.
Any Technique
Works for satin stitch, cross stitch, needlepoint — anywhere flat stitches matter.
Ready to Build Your Toolkit?
A laying tool is just one of the essentials that makes your stitching smoother and more enjoyable. Discover everything you need to get set up for beautiful embroidery.
You might like these
Choosing embroidery fabric for counted thread embroidery techniques
A Guide to choosing fabric for counted thread embroidery. Including cross stitch fabric, evenweave fabrics and linen embroidery fabric
Counted Cross Stitch - using linen and evenweave fabrics
Time to try counted cross stitch on linen or evenweave fabrics? Learn about the advantages over Aida and how to determine the finished project size.
How to Wash Cross Stitch Before Framing – Safe & Easy Guide
Should you wash cross stitch before framing? Yes! Learn how to safely wash, dry and press your embroidery. Step-by-step instructions to remove oils and marks.


Stay connected between projects
If you’d like occasional updates from my embroidery room, including new patterns, gentle tips, and little things I think you might enjoy, you’re warmly invited to join the Stitchin’ Times newsletter.
About Me - Contact Carol - Privacy Policy - Site Map - Testimonials
Please do not copy the content of this site. It is protected by Copyscape.
Copyright © 2006- www.needlework-tips-and-techniques.com All rights reserved