Stumpwork tutorial - Easter bunny in basket
Ready to try stumpwork for yourself? I designed this little Easter bunny in a basket to guide you through some of the basic techniques. He is the ideal size to mount in an aperture card or you could frame him when he is finished.
During this tutorial you will learn about padding with felt, creating slips, wiring the edges of freestanding sections and a little needleweaving.

What will you need for the stumpwork bunny?
- 8 inch square (20 cm) background fabric
- 6 inch square (15cm) unbleached calico or muslin
- Firm sew-in interfacing (used to stiffen collars and cuffs)
- White and fawn felt
- Size 32 paper covered florist's wire
- Stranded embroidery floss in white, peach, black, brown, green and a flower colour
- Crewel needle
- Paper cutting scissors
- Pencil
- 5 inch embroidery hoop
- A stiletto (or sharp pointed object)
Download the stumpwork pattern sheet here. and print it out.
Step 1 - Embroider the handle
Trace the outline from the pattern sheet onto your background fabric, having the ends of the handle at the centre mark. Place the fabric into a hoop (optional but it helps keep your tension right).
Using two strands of brown floss, embroider the handle in three close rows of chain stitch..
 Fig 2 - Chain stitch handle
Step 2 - Padding the basket and bunny's head
Cut out the two smallest basket shapes from fawn felt.
Place the smallest in the center of the basket and hold in place with a few tiny stitches around the edge. Lay the other piece over the top and attach that in the same manner. You want the top of the felt to just cover your handle stitching.
In the same way attach the two smallest felt head shapes, just above the top of the basket.
Tack the piece of interfacing to the back of your work.
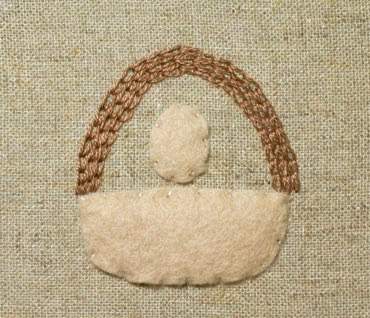 Fig 3 - Padding the basket and bunny's head with felt
Step 3 - Stitching bunny's ears
Trace the ears and largest basket shape onto your muslin or calico.
Stitch a row of backstitch around the outside edge of the ears. Starting in the centre, with 1 strand of peach floss, fill the center of the ear with long and short stitch, as shown in
Then work out towards the edges with white long and short stitch. Don't worry about keeping the stitches too straight and even, they are supposed to be representing the rabbit's fur and look better if they are slightly untidy.
 Fig 4 - The center of bunny's ear worked in long and short stitch
Lay a length of wire around the outside of the ear shape and work over it with buttonhole stitches (keeping the looped edge to the outside) using two strands of white floss.
Cut around the ears closely but leave the ends of the wires sticking out from the bottom of the ears, to use when attaching them.
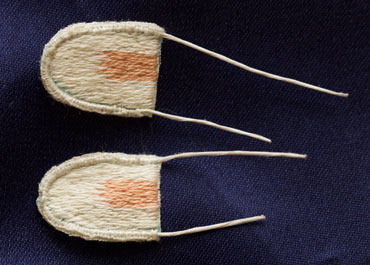 Fig 5 - The bunny's ears wired and cut out
Step 4 - Attaching bunny's ears
Attach the ears to the top of the head, with the right side facing outwards.
Start by poking two holes at the top of the head on each side. Then pass the wires at the bottom of the ears through the fabric and interfacing. Hold in place on the back with overcasting stitches.
Bend the wires at different angles to help to secure them.
The interfacing is used in stumpwork embroidery to help prevent the wires being visible from the front.
Attach the largest felt head shape (white) over the previous padding and covering the raw edge of the ears.
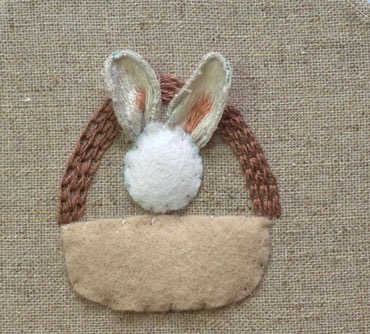 Fig 6 - Attaching the ears
Step 5 - Embroider the head and grass
Embroider the head with long and short stitch in one strand of white floss. In order not to flatten the padding, try to scoop the needle through the felt only, rather than going through all layers.
Take the stitches around the outside over onto the backing fabric so as to cover any hint of the felt.
At the top of the head, take your stitches through the ears to further secure them and hide any remaining raw edges.
Using 1 strand each of two different greens, work two rows of velvet stitch to represent grass poking out of the top of the basket.
Do not work this in front of the rabbit's head, just to each side of him.
Fig 8 shows the left side loops cut, while they are still in loop form on the right.
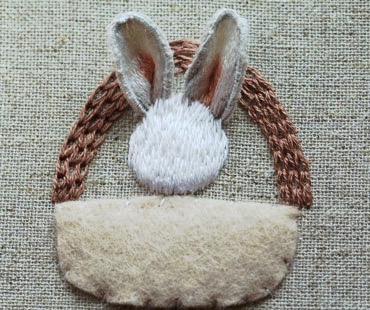 Fig 7 - Embroider the head
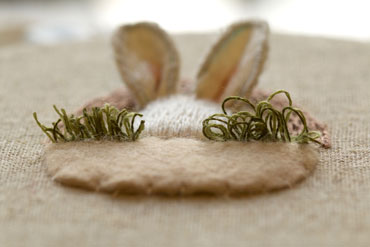 Fig 8 - The velvet stitch grass
Step 6 - Embroider the basket
Stitch the third basket shape, using 2 strands of brown thread, in Bokhara couching. Try to stagger the couching stitches to create a basketweave effect.
Cut around the basket about a quarter of an inch away from the edge of the stitching. Turn the unstitched edge over to the wrong side and gathering slightly, tack it to the back of the basket.
 Fig 9 - Couching the basket
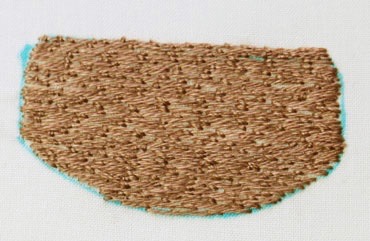 Fig 10 - The basket slip completed
Step 7 - Attaching the basket and paws
Attach the loose basket shape to the background around the sides and bottom leaving the top free.
If desired you can pop in a little toy filling to pad the basket even more.
The paws are worked in a similar manner to the ears (omitting the peach areas).
To attach them, poke the wire through just below the top level of the padded basket and stitch in place. Fold the paws down over the basket making sure the front of the work is visible.
I also added my bunny's features at this point as he looked odd with no eyes, nose and mouth.
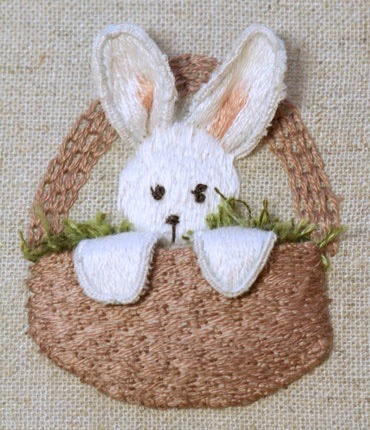 Fig 11 - Bunny in basket
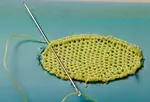
Step 8 - Needlewoven leaves
If you wish you can now work some needlewoven picots below your basket to represent leaves.
I find an ideal thread to use for these is actually a tatting thread - Fil a dentelles size 80. It enables me to get plenty of weaving in a small space.
You may wish to anchor the tips of some of the leaves in place, so they lay where you desire. They do tend to have a will of their own if you don't!
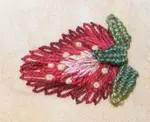
You can also add some flowers if desired. I made my with cast on stitch.
I hope you have enjoyed stitching this little stumpwork bunny with me. Wouldn't he look nice as a stitched Easter card?
You might like these
A Detailed Tutorial for Making a Pretty Needle Lace Heart
Learn to create a beautiful needle lace heart with this step-by-step tutorial for beginners. Master corded single Brussels stitch and double Brussels stitch
Stumpwork Embroidery: A Brief History of this Intricate Craft
Learn Stumpwork Embroidery techniques including padding with felt, raised embroidery stitches, adding slips and creating wired needlework petals
Easy Elegance - Craft a Needlelace Daffodil with These Simple Steps
Embroider your way to spring with this detailed needlelace daffodil tutorial - perfect for beginners and beyond!
Stay connected between projects
If you’d like occasional updates from my embroidery room, including new patterns, gentle tips, and little things I think you might enjoy, you’re warmly invited to join the Stitchin’ Times newsletter.
No pressure. Just a friendly note now and then to keep you inspired.
About Me - Contact Carol - Privacy Policy - Site Map - Testimonials
Please do not copy the content of this site. It is protected by Copyscape.
Copyright © 2006- www.needlework-tips-and-techniques.com All rights reserved