- Home
- What do I need?
- How-to-use-embroidery Hoops
ESSENTIAL EQUIPMENT GUIDE
How to Use & Tighten Embroidery Hoops for Perfect Tension
Choose the right hoop, get drum-tight tension every time, and stop puckers for good
Puckers? Let's Fix That
Is there anything more frustrating than watching your stitches pull the fabric into puckers? It can ruin a great piece of work, but the good news is, it's fixable.
I'll walk you through how to choose the right embroidery hoops, get that perfectly drum-tight tension, and even share a simple binding trick I use to stop puckers on delicate fabrics for good.
Quick Takeaways
- Pick the right size: Use a hoop about 1–2 inches larger than your design area — it gives better tension and fewer edge puckers.
- Set tension like a drum: Tighten the screw, then gently pull fabric toward the inner hoop while tightening to keep the cloth flat.
- The binding trick: Wrap a thin strip of calico or bias tape around the inner hoop for extra grip on slippery fabrics.
What Can Happen if You Don't Use a Hoop
I rediscovered an embroidery I stitched in my twenties and noticed the problem right away.
The fabric had puckered where I'd pulled stitches too tight, most noticeably around the panda's white body and the narrow leaves on the left.
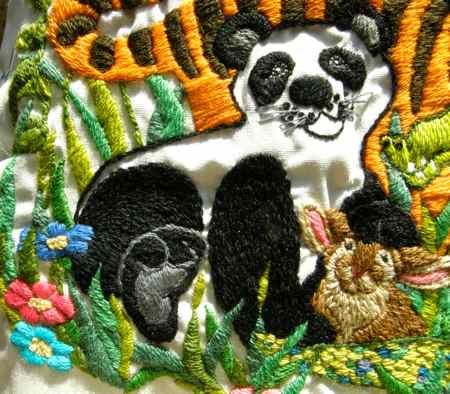
The result of not using an embroidery hoop
How to Choose the Right Embroidery Hoop
Quick answer: for most hand embroidery choose a 6-inch hoop. It's the easiest size to control and fits most projects.
5–6 Inches
Best for small motifs and fine detail. Easy to hold and rotate with one hand.
6–8 Inches
The sweet spot for most home projects. Great balance of comfort and control.
8 Inches & Up
Use for large pieces, wall hangings, or when you need a flat, stable surface. Consider a frame or stretcher bars.
Why Size Matters (Three Factors)
Personal comfort
How well you can hold and rotate the hoop matters more than the number on the label. If you work standing or like to move the fabric a lot, a smaller hoop (5–6") gives better control. If you prefer to sit and rest your hands on the table, a larger hoop can feel more stable.
Stitching style
Dense satin stitches and heavy thread need more careful tension and sometimes more room; delicate surface embroidery or tiny backstitch work better in a smaller hoop so you can see and control the detail.
If you do lots of beading or metallic threads, avoid hooping directly over them. Use a big enough hoop so it doesn't crush or snag the embellishments.
Project type
For small decorations, smaller hoops mean less wasted fabric. For garments, a smaller hoop may fit better in between ready stitched seams.
Quilters should look for extra-deep hoops: the extra depth grips all three layers (top, batting, backing) securely and prevents slipping while you quilt.
For very large pieces, use a frame or stretcher bars instead of trying to hoop the whole thing.
Workarounds for a Big Hoop
Use this method when your fabric is too small for your smallest hoop.
- Cut a piece of scrap fabric (muslin or cotton) large enough to fit in your hoop.
- Lay the scrap fabric right side down. Place your embroidery fabric centered on top, right side up.
- Using a long running or basting stitch, sew through both layers around the edges of the embroidery fabric (about ¼–½" from the edge). Keep stitches large enough to remove easily later.
- Put the fabric sandwich in your hoop, center the design area, and tighten to the desired tension (not too tight).
- Turn the hoop over. Using small sharp scissors, carefully cut away the scrap fabric from behind the embroidery area, trimming close to the basting stitches. This leaves just your embroidery fabric in the stitching area, with the scrap fabric only around the edges where it is held by the hoop.
- Work your embroidery through the single layer of fabric as normal.
- When finished, remove from the hoop, snip the basting stitches, and separate the scrap fabric from your embroidery piece.
How to Tighten an Embroidery Hoop
Quick answer: use a good wooden hoop with an adjustable brass screw and tighten the fabric until it's nicely taut (not stretched) with a drum-like sound when you flick it. That gives even, smooth stitches without puckering.
Why this matters: consistent tension keeps stitches flat and predictable, so your satin stitches won't pull and your backstitch lines stay crisp.
How to Get There (Short, Practical Steps)
- Choose a quality wooden hoop with an adjustable brass screw. The screw is how you control tension.
- Hoop your fabric so it sits flat and centered.
- Tighten the screw a little, then gently pull the fabric at the edges to remove slack.
- Flick the fabric — you want a short, drum-like "snap," not a floppy thud.
- Check the fabric visually: it should be taut but not distorted or stretched thin. If stitches pull the fabric inward as you work, loosen slightly.
Keep a small flat-head screwdriver (or a coin) nearby so you can fine-tune tension without interrupting your flow.
Screw Placement (Keep It Out of Your Way)
Positioning the screw properly prevents tangles and makes stitching more comfortable:
Left-Handed
Place the screw at 2 o'clock — same idea, mirrored for comfort.
Right-Handed
Place the screw at 10 o'clock — behind your working hand, out of the way.
How to Stop Your Hoop Slipping
Wrap the inside ring of your hoop with a thin, flexible strip (fine cotton, bias binding, or narrow ribbon) then tack it in place with a few small stitches.
The added friction keeps the fabric from sliding, so your tension stays steady and your stitches stay even. Don't use anything bulky (it can distort tension); a narrow, tightly wrapped strip does the job best.
Binding the Hoop — Step-by-Step
- Cut a ½"–¾" (13–19mm) strip of fine cotton, bias tape, or narrow ribbon long enough to wrap the inner ring.
- Start at one point and wrap the strip tightly and evenly around the inner hoop, overlapping slightly as you go so there are no gaps. Keep the wrapping flat; avoid bunching.
- Secure the end with 3–4 small, discreet running stitches through the strip and hoop (on the inside/back so they're out of sight).
- Hoop your fabric and tighten as usual. Check tension — the fabric should sit taut, not pinched.
- If the strip shifts, add one more tiny stitch opposite the starting point to lock it in.
Add a wrapped inner hoop to your toolkit and try it on a test square before you start your next project — you'll notice fewer re-hooping interruptions.
Loosen the Hoop Between Sessions
Always release the tension (or remove the hoop) when you stop stitching. Leaving a hoop tightened for long periods can leave permanent marks, distort fabric, and make finishing harder.
Why this helps:
- Prevents hoop marks and fabric creasing.
- Keeps fibers from stretching or becoming permanently distorted.
- Saves you time fixing problems later.
Simple Steps
- At the end of your session, loosen the brass screw until the fabric relaxes (or remove the hoop entirely).
- If you leave work in the hoop for short breaks, back the screw off slightly so the fabric isn't held taut.
- Store projects flat or in a breathable bag to avoid pressure points.
Alternatives to Traditional Hoops
Wooden hoops are classic, but several modern options can make your life easier or change how your finished work looks.
Below are the most useful alternatives, what they're good for, and one quick tip for deciding which to try first.
Flexi-Hoops
Best for: neat display and framing
A rigid inner ring plus a flexible outer ring that snaps over the fabric. Lightweight, gives a clean professional edge for finished pieces.
Tip: if you struggle with assembly, try a Q-Snap or ask a friend to help with the first fit.
Q-Snap Frames
Best for: portable, on-the-go stitching
Plastic frames that click together to form a square or rectangle. Easy to store, quick to set up, and excellent when you want something light.
Tip: use smaller frame sizes for detailed work; larger frames need more attention to keep tension even.
Spring Hoops
Best for: machine embroidery
Almost-flat rings with a spring action that lets them slip under a machine foot. Very flat profile, but the spring and handles can catch thread.
Tip: practice once or twice with scrap fabric to learn how the spring behaves under your machine.
Frequently Asked Questions
What size embroidery hoop should I start with?
What size embroidery hoop should I start with?
Start with a 4–6 inch hoop for most beginner projects — small hoops are easier to handle and keep fabric taut.
How tight should an embroidery hoop be?
How tight should an embroidery hoop be?
Tight enough that the fabric sounds and feels like a drum when tapped — not so tight the fabric distorts stitches.
What's the best way to stop fabric from slipping?
What's the best way to stop fabric from slipping?
Use a binding strip (twill tape or masking tape) around the inner ring or place a small rubber washer under the screw for extra grip.
Should I hoop my fabric before or after washing?
Should I hoop my fabric before or after washing?
Pre-wash if the fabric will shrink or bleed. Hoop it after it's fully dry and pressed to maintain accurate tension and design placement.
Is there a difference between wooden and plastic hoops?
Is there a difference between wooden and plastic hoops?
Wooden hoops give a traditional feel and slightly more grip; plastic hoops are lightweight and often cheaper; choose by comfort and the project's needs.
Can left-handed stitchers use a hoop easily?
Can left-handed stitchers use a hoop easily?
Yes, orient the hoop screw to the top or right/left depending on comfort (showing both orientations in your images helps left-handers).
Hoop With Confidence
A good hoop and the right tension are the foundation of smooth, pucker-free stitching.
Choose a hoop that fits your hand, tighten until the fabric sounds like a drum, and remember the binding trick for tricky fabrics. These small habits make a big difference to every project you stitch.
Do you have other questions about embroidery hoops?
Which type do you prefer? When do you use them, and when don't you? Feel free to ask questions, or answer other people's queries.
This is your section of the page, so feel free to add anything that you think will help other embroiderers find out which are the right hoops for them.
What Other Visitors Have Said
Click below to see contributions from other visitors to this page...
Removing the backing muslin 
You suggest that the backing fabric can be removed by snipping the basting, but hasn't it been incorporated into the embroidery? Surely all the stitches …
Fabric size vs design size vs hoop size
I am doing a project on 8 inch fabric. The design is a 6 inch and I want to use a 4 inch hoop. Is that OK?
Sprung hoops
I'm searching for sprung hoops. I hadn't realised how rare and unusual they were, until after I lost my grandmother's beautiful 8" Princess hoop.
After …
When were embroidery hoops invented?
I'm watching a show on Edwardians and the ladies were stitching without hoops. I was wondering when hoops were invented. I would have assumed a long time …
Do spring hoops leave marks?
My granddaughter and husband are having trouble with hoops marks on their work. It seems to be coming from the metal part of the spring hoop. I remind …
Spring hoops, I like them
I like spring hoops because of the tension.
I always put the hoop on a flat surface place the front of the fabric facing me because after I place the …
Making the fabric taut
I am starting on my second cross stitch project. The first one I never finished because it was looking so bad.
What I am having a problem with is getting …
needlework frames that keep the fabric taut 
Is there any scroll frame that holds the sides of the fabric?
I find that with a scroll frame, while the fabric can be tight, it always sags on the …
Will putting a hoop over my work damage it Not rated yet
I have returned to doing cross stitching from years ago and never used a hoop or frame. But now I am, and like it feel my work is neater.
However, …
Wood embroidery hoops Not rated yet
What kind of wood are embroidery hoops made from? I am embroidering a large tablecloth as a keepsake. What size hoop is optimal? Help please!
Carol …
You might like these
Embroidery Floss Guide: Strands, Threads & How to Use Them
Your complete guide to embroidery floss: how to separate strands, how many to use for each fabric, plus DMC, Anchor and alternative thread options.
How to Thread a Needle (Plus Threaders That Do It for You)
Struggling to thread a needle? The method that works every time, plus fixes for fraying thread, tiny eyes and metallics. Includes a guide to needle threaders.
Your Beginners Guide to Essential Hand Embroidery Supplies
Embroidery supplies you need to get started - embroidery scissors, embroidery hoops, frames, stands, lights and magnifiers.


Stay connected between projects
If you’d like occasional updates from my embroidery room, including new patterns, gentle tips, and little things I think you might enjoy, you’re warmly invited to join the Stitchin’ Times newsletter.
About Me - Contact Carol - Privacy Policy - Site Map - Testimonials
Please do not copy the content of this site. It is protected by Copyscape.
Copyright © 2006- www.needlework-tips-and-techniques.com All rights reserved