LESSON 4 OF 6
Free Hardanger Course — Lesson Four
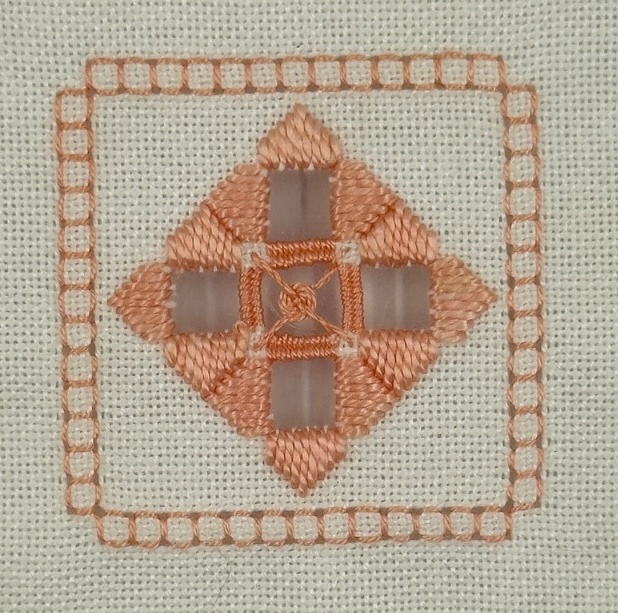
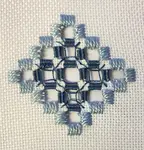
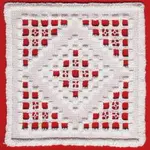
A coaster pattern with fancy Kloster blocks, four-sided stitch, and spider's web filling
Welcome to Lesson 4! You've covered a lot of ground already — Kloster blocks, cutting, needleweaving, and dove's eyes across the earlier lessons. Now it's time to add two more techniques to your toolkit: four-sided stitch and spider's web filling.
This lesson's project is a pretty coaster that brings everything together. The shaped Kloster blocks give it character, the four-sided stitch creates a lovely pulled-thread border, and the spider's web at the centre is a real showpiece.
What You'll Need
The Coaster Pattern
Download and print the chart for this lesson before you begin. It shows the Kloster block layout, cutting lines, and the placement of the four-sided stitch border and spider's web filling.
Fancy Kloster Blocks
Start by finding the centre of your fabric — fold it in half both ways to mark the spot. From that centre point, count up 16 threads and left 4 threads. This is point 1 on your chart (above the big letter C) and where you'll begin stitching.
Thread a generous length of the thicker pearl cotton No. 5 into your needle. You can use an away waste knot to secure the end.
Bring the needle up at point 1 and take it back down over 4 fabric threads at point 2 above. Come back up at point 3 (next to 1) and this time make the stitch slightly longer — over 5 fabric threads.
Continue in the same way, gradually increasing the stitch length to form the shaped top edge. Then start reducing again to complete the fancy Kloster block.
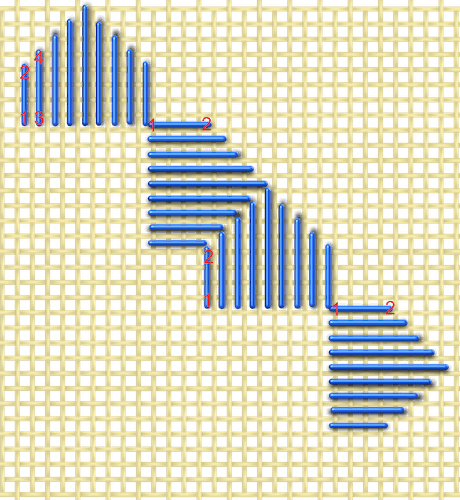
To begin the second block, bring the needle back up in the same hole you used at the bottom of the last stitch (numbered 1 again on the diagram, above the big letter A). This avoids creating a diagonal stitch across the back of the work.
Stitch the second block the same way, making sure you carry the thread behind the block on the back. If you only take a tiny stitch from one top point to the next, your work won't hold together once you cut.
Continue working the Kloster blocks, re-using the corner holes as before. Avoid diagonal stitches when you start a new block — if they fall across an area you'll later cut, they'll become visible in the finished work.
These Are Shaped Blocks
Unlike the straight-sided Kloster blocks in Lessons 1 and 3, this design uses graduated stitch lengths to create a shaped top edge — similar to the fancy blocks you stitched in Lesson 2.
Four-Sided Stitch Border
Next, work the four-sided stitch border around your design. This pulled-thread stitch creates a delicate, lacy frame that complements the Kloster blocks beautifully.
I've written full instructions for this stitch on a separate page — head over to the four-sided stitch tutorial and then come back here when you're done.
Pull Firmly
Four-sided stitch needs firm, even tension to open up the holes properly. Don't be shy — pull each stitch snugly so the decorative holes appear clearly.
Cutting the Fabric Threads
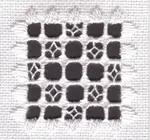
Once the four-sided stitch border is complete, it's time to cut and withdraw the threads for the openwork area. Only cut where marked with red lines on your chart.
Each red line on the chart marks 8 threads to be cut — but I recommend doing this in two cuts of four threads each. It's much easier to count accurately that way.
Needle Channel Technique
Use your needle to create a channel for the scissors. Insert the needle tip into the hole used by the first stitch in the Kloster block and bring it out at the last. Pull gently toward the centre to open a small gap — just enough to slip the scissor blades in.
Keep the scissors close to the Kloster blocks, but be careful not to cut the stitches themselves. Carefully withdraw the cut threads using a pair of tweezers if it helps.

Needleweaving the Bars
Switch to the finer pearl cotton No. 8 and needleweave the three bars shown in the diagram, following the direction of the arrows.
Weave the four exposed threads of each bar in a figure-of-eight motion — over two threads, under two. Pull the stitches firmly and work enough wraps to fill the bar comfortably, without packing in so many that it bends out of shape. If you need a refresher on needleweaving, pop back to Lesson 1.
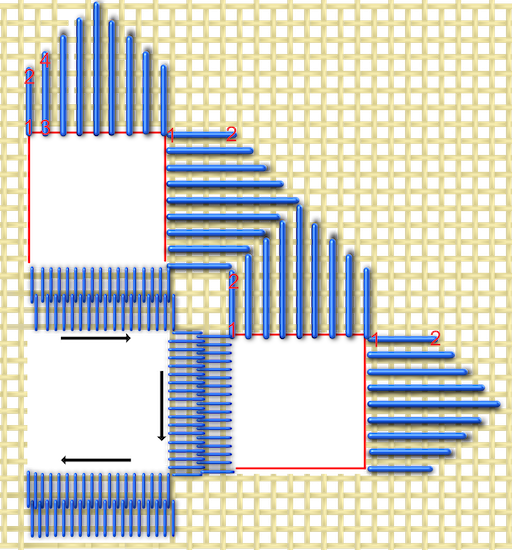
Don't worry if the threads don't sit in neat rows like the diagram — in reality, the weaving pulls them close together. The photo further down shows the finished effect much better.
Spider's Web Filling
This is the exciting part — spider's web is a beautiful filling stitch that creates a real focal point at the centre of your coaster. Let me walk you through it step by step.
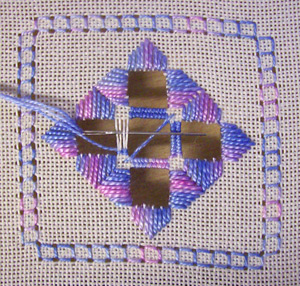
Laying the Framework
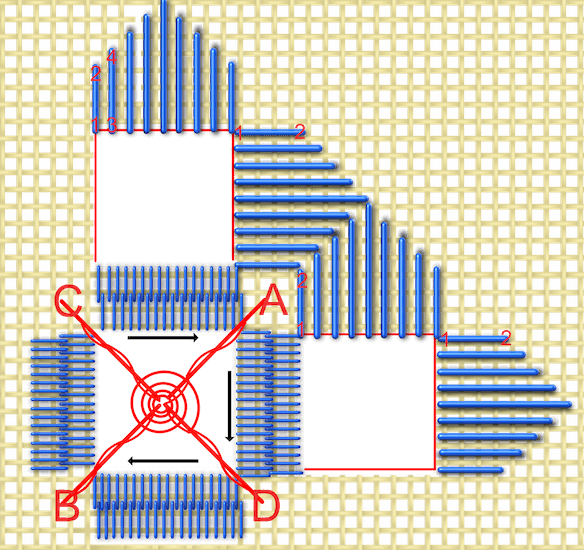
Thread your needle with pearl cotton No. 8. Secure the thread behind the Kloster blocks, then bring it up at point A on the diagram — the centre hole in that little square of bare fabric.
Take the thread across the centre hole and go down at B. Bring it through inside the hole in the fabric, then wrap around this thrown thread four times. Re-insert the needle at point A from the front of the work and wrap again down to B.
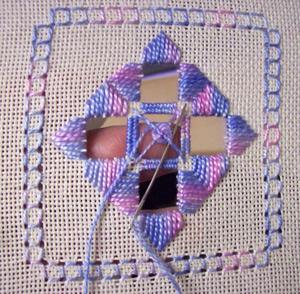
Building the Web
Continue by needleweaving the fourth bar, from point B to point C on the diagram, to bring your thread to the opposite corner from the thrown thread.
Carry a second diagonal thread across from C to D — take this over the top of the existing thread.
Bring the needle up from behind the work at D. Twist around this bar twice, then pass the needle under both threads at the intersection in the middle.
Now weave under-then-over alternate bars to form a spiral spider's web at the centre. Try to keep this flat and smooth — it takes a light touch.
Finishing Off
When your web is the size you want, finish your stitching next to the thrown thread leading to C. Wrap this thread twice, then re-insert the needle at point C. Fasten off through the back of the Kloster blocks.
Keep It Flat
The trick with spider's web is keeping even tension so the web sits flat against the fabric. If it starts to pucker or dome, you're pulling a touch too tightly.
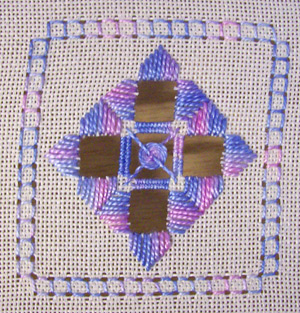
You Did It!
Look at everything you've learned in this lesson:
Four lessons down — you're well past the halfway mark now! If there's any point where you get stuck, just let me know.
Ready for more Hardanger?
You might like these
Learn Hardanger Needlework: Kloster Blocks & Your First Project
Start Hardanger needlework with this free beginner lesson. Learn to stitch Kloster blocks, cut threads safely, and needleweave on 22-count fabric.
How to Hemstitch by Hand: Step-by-Step Embroidery Tutorial
Learn hemstitch embroidery with this easy tutorial. Master fabric scoring, hem folding, and Danish hemstitch technique with clear diagrams.
Hardanger Embroidery for Beginners: Free Step-by-Step Guide
New to Hardanger? Learn wrapped bars, dove's eyes, and fancy Kloster blocks with clear step-by-step instructions and a free downloadable chart.

Stay connected between projects
If you’d like occasional updates from my embroidery room, including new patterns, gentle tips, and little things I think you might enjoy, you’re warmly invited to join the Stitchin’ Times newsletter.
About Me - Contact Carol - Privacy Policy - Site Map - Testimonials
Please do not copy the content of this site. It is protected by Copyscape.
Copyright © 2006- www.needlework-tips-and-techniques.com All rights reserved