Learn hardanger embroidery step-by-step
Learn hardanger embroidery the easy way, with my free online course. From the basic beginner stitches to more advanced techniques, I will walk you through the steps required.
You will learn; how to stitch Kloster blocks (the satin stitch blocks that surround the lacy areas of a hardanger pattern), how to cut the fabric threads for the openwork areas, how to needleweave the remaining fabric threads into a grid, and various filling stitches.
I have taught this course, at live workshops across the UK, to many other needleworkers wishing to learn hardanger and we have all had great fun. The instructions were continuously updated, to answer any questions that arose during the live classes. But if you are unsure of anything you can use my contact page to ask me your questions directly.
If you work through the course in sequence you will pick up many tips as you go along.
Click on the pictures below to get started straight away!
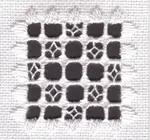
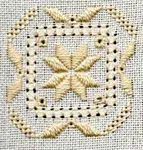
Lesson 1

Our first lesson teaches you the basic kloster blocks, cutting, needleweaving and square filet filling stitch.
During the lesson we will make a sweet little piece that you could insert into a greetings card, use in a drinks coaster or put into a box lid just to give you a few ideas. Although traditionally worked white on white I advise using colour for this piece as you begin to learn hardanger embroidery.
Click the picture or here to go to lesson one.
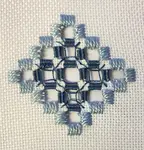
Lesson 2

Adding fancy kloster blocks (on a straight line rather than diagonal), wrapped or overcast bars and doves eyes to your repertoire this small design can be used in a similar manner to the first pattern.
Why not try working with white thread this time around?
Lesson 2 in our beginner guide to hardanger
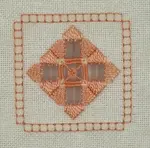
Lesson 3

Putting what you have learnt to use in a hardanger bookmark we also cover buttonhole stitch edging in this lesson.
Learn how to add in a new thread and how to turn inside and outside corners when finishing the edge of your bookmark. I have also added a few eyelets to this design for you.
This pattern can be adapted to have more openwork or easily made longer.
Your free hardanger pattern for lesson 3
Lesson 4

As you continue to learn hardanger techniques this class takes kloster blocks to a new level, introduces four sided stitch and a pretty spiders web filling stitch.
Hardanger instructions for lesson 4
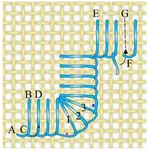
Lesson 5

This lesson covers another finishing technique for hardanger patterns, hemstitch. This is more dainty than the buttonhole edging we covered in lesson 3.
Hemstitch your hardanger piece
Bonus free hardanger pattern

An addition to my free hardanger patterns. No cutting involved here! This makes a lovely Christmas card.
You might like these
Beginner-Friendly Hardanger Patterns by Carol Leather
Discover Hardanger embroidery. Shop beautiful, modern patterns by Carol Leather with clear, step-by-step instructions. Instant PDF downloads available!
Learn Hardanger Needlework | Step-by-Step Beginner Lesson 1
Start your Hardanger needlework course today. Free patterns and detailed instructions in this beginner-friendly lesson. Part 1 of a series of 6 lessons.
Hardanger Instructions lesson 4 - spiders web and 4-sided stitch
Part 4 of my hardanger instructions series. Learn four sided stitch and spiders web filling in addition to fancy kloster blocks and needleweaving

You might like these
A beginner guide to hardanger embroidery - overcast bars & doves eyes
Part 2 of the free beginner guide to hardanger embroidery. Learn to stitch Kloster blocks, wrapped bars, and dove’s eyes with step-by-step instructions
Hemstitch: Enhance Your Needlework with Fine Handcrafted Touches
Learn how to hemstitch your embroidered pieces with our easy-to-follow instructions and detailed step-by-step photographs.
Free hardanger pattern | A bookmark edged with buttonhole stitch
Create a bookmark with this free hardanger pattern, covering buttonhole stitch, Kloster blocks, and doves eyes. Part 3 of our free course.
Stay connected between projects
If you’d like occasional updates from my embroidery room, including new patterns, gentle tips, and little things I think you might enjoy, you’re warmly invited to join the Stitchin’ Times newsletter.
About Me - Contact Carol - Privacy Policy - Site Map - Testimonials
Please do not copy the content of this site. It is protected by Copyscape.
Copyright © 2006- www.needlework-tips-and-techniques.com All rights reserved