LESSON 2 OF 6
Free Hardanger Course — Lesson Two
Fancy Kloster blocks, wrapped bars, and dove's eyes — building on what you learned in Lesson 1
Welcome back! If you've finished Lesson 1, you've already mastered Kloster blocks, cutting, needleweaving, and square filets. That's a fantastic foundation.
In this lesson, we'll build on those skills with a charming new design that introduces three things: fancy (side-by-side) Kloster blocks, wrapped bars, and dove's eyes. Each one builds naturally on what you already know.
Let's get started!
What You'll Need
The Pattern for This Lesson
Before you begin, download and print the chart for this lesson. It shows the Kloster block layout, cutting lines, and which bars to work with dove's eyes.
Stitching the Fancy Kloster Blocks
Find the Centre of Your Fabric
Fold your fabric in half both ways and lightly crease the centre. From there, count up 19 threads and two threads to the left to find Point A on your chart.
Start Stitching
Thread your needle with pearl cotton No. 5 and tie a temporary knot at the end. Push the needle through from the front, leaving the knot on the surface of the fabric outside your stitching area. You'll snip it off later.
Work the first five satin stitches as numbered on your chart, stitching over this pattern of fabric threads: 4, 5, 6, 5, and 4. This creates a gently shaped block — slightly different from the straight blocks in Lesson 1.
Skip four threads and start the next block, repeating the stitch sequence. Carry the thread diagonally across the back between blocks as you work along each side of the motif.
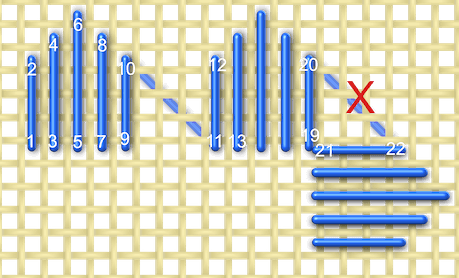
When you reach a corner, reuse hole 19 and take the next stitch out to the side as shown. This avoids having a messy diagonal thread across the corner.
Running Out of Thread?
Try to finish the current block before joining a new length. Starting mid-block can show, because worn thread appears less shiny than fresh thread.
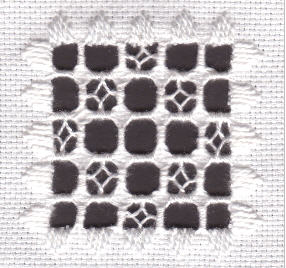
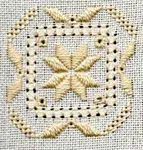
Once all the Kloster blocks are complete, your project should look like the example below.
Cutting the Fabric Threads
Take a deep breath — this is the step that makes everyone nervous! But you've done this before in Lesson 1, so you know the drill.
With sharp, pointed scissors:
- Locate the fabric threads to cut using the red lines on your chart.
- Slide the scissor blade under four adjacent threads, double-check your count, and cut in one movement.
- Cut close to the satin stitches, but don't worry about small tufts — they'll settle in after washing.
Remember: only cut threads at the end of the satin stitches, never alongside them!
Safety First
It's safest to slide the scissor blade underneath all four adjacent threads at once, then double-check that you only have four, before cutting them in one movement.
Working the Wrapped (Overcast) Bars
Now we'll wrap the remaining fabric threads to create a neat grid for the openwork. This is similar to needleweaving from Lesson 1, but simpler — you just wrap the thread around the bar rather than weaving over and under.
Re-thread your needle with pearl cotton No. 8 for this step.
Pull the four fabric threads together firmly, wrapping the thread over and under them. Make sure the wraps lie flat beside each other, not overlapping. Count your wraps on the first bar and keep that number consistent across all the bars.
At the end of each row, pass the needle through the back of the nearest Kloster block to reach the starting point for the next diagonal row.
Watch for the Green Bars
On your chart, the bars marked in green indicate where you'll stitch a dove's eye. When you reach one of these, wrap only half the bar, then stop — you'll complete it after working the dove's eye.
Stitching Dove's Eyes
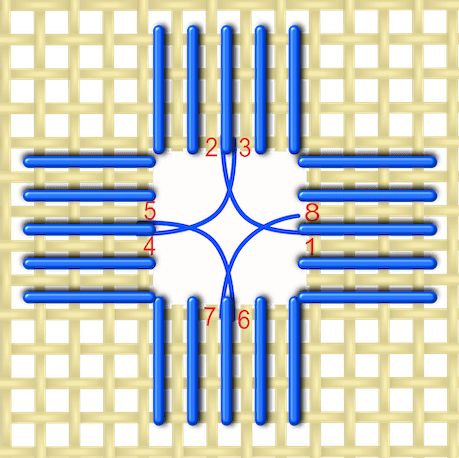
The dove's eye is a beautiful filling stitch formed by four buttonhole stitches inside the hole left after cutting the fabric threads. The edges of the hole may be Kloster blocks, wrapped bars, or a combination of both. If buttonhole stitch is new to you, a quick look at the blanket stitch page will help — it's the same basic movement.
Begin by wrapping half of a green bar on your chart, then bring the needle up in the centre of the hole.
Take the needle under the adjacent bar or Kloster block (you can work clockwise or anti-clockwise). Bring the needle back up inside the loop you've just made, and pull it into shape until it sits comfortably — not loose, but not stretched too tight either.
Repeat this process for all four sides until you reach the bar you were halfway through working.
To complete the stitch, take the thread under the first loop you made and back down into the middle. Then finish wrapping the remaining half of the bar.
Keep Them Consistent
Make sure all four loops in each dove's eye cross in the same direction — this keeps things neat. Try to give every dove's eye the same amount of tension so they all match.
Ideas for Your Finished Piece
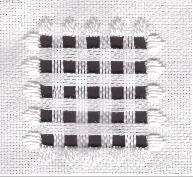
Your Lesson 2 piece is complete — congratulations! Here are a few ways to use it:
- Turn it into a coaster
- Mount it in an aperture card
- Make a pincushion with a satin lining
- Create a Christmas tree ornament
We'd love to see your finished work — feel free to share a photo!
You Did It!
Look at what you've learned in this lesson:
Two lessons down — you're building a lovely set of Hardanger skills!
Ready for more Hardanger?
You might like these
Hardanger Embroidery: 6 Free Lessons + Patterns to Download
Learn Hardanger embroidery with 6 free beginner lessons. Each includes a pattern and project — coasters, cards, bookmarks and more. Start stitching today!
Free Hardanger Christmas Card Pattern — Cable Stitch Tutorial
Stitch a beautiful Hardanger Christmas card with this free pattern. Learn cable stitch, satin stitch rose motifs, and how to mount your finished piece.
How to Hemstitch by Hand: Step-by-Step Embroidery Tutorial
Learn hemstitch embroidery with this easy tutorial. Master fabric scoring, hem folding, and Danish hemstitch technique with clear diagrams.

Stay connected between projects
If you’d like occasional updates from my embroidery room, including new patterns, gentle tips, and little things I think you might enjoy, you’re warmly invited to join the Stitchin’ Times newsletter.
About Me - Contact Carol - Privacy Policy - Site Map - Testimonials
Please do not copy the content of this site. It is protected by Copyscape.
Copyright © 2006- www.needlework-tips-and-techniques.com All rights reserved