Lesson 3: Free hardanger pattern
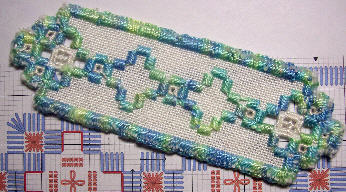
This free Hardanger pattern introduces buttonhole stitch, a simple way to finish the edges of your Hardanger embroidery. This stitch helps secure the fabric threads while also adding a decorative touch.
This is part 3 of my beginner Hardanger course and you can check out the other lessons here.
What will I need?
- 6 x 10.5" piece hardanger 22 count fabric
- Pearl cotton no. 5, 1 skein *
- Pearl cotton no 8, 1 ball *
- tapestry needles sizes 22 and 26
- small embroidery hoop
* Traditional hardanger is worked in white thread on white fabric, but you don't need to stick to that if you prefer colour!
Print the chart
The chart, or pattern, for this design is in pdf format and can be dowloaded by clicking on this link.
Start Stitching
Start stitching your free Hardanger pattern by using the Pearl 5 (the thicker of the two threads) to work the Kloster blocks following the chart. Each satin stitch in the Kloster block covers 4 fabric threads.
Note, on the pattern I have added arrows on top of the first few blocks to guide you of which "route" to take. When you reach a block that you have already stitched, just pass your needle through the back of the block in order to stitch the next one.
Ignore the outer row of stitches for now, as these denote the buttonhole stitch edging to be worked later.
Buttonhole stitch edging
Before we do any cutting we will stitch the buttonhole stitch edge, again with the pearl number 5 thread. Follow the downloaded chart for placement.
Secure the thread with a waste knot and work from left to right.
Take the needle up through the fabric at A, on the diagram below, and down again at B one thread to the right and four threads up.
Leaving the thread loose bring the needle up at C within the loop. Pull the thread to enable the stitch to lie comfortably against the fabric. Continue in the same manner, taking the needle back down at D.
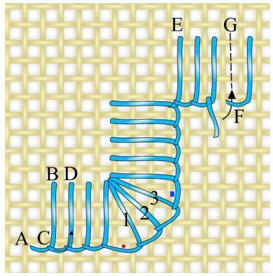
Turning an outside corner
To turn an outside corner, leave one hole free (marked with a red square on the diagram (above), before working the three numbered stitches on the diagonal. Then miss another hole (marked with a blue square) before carrying on until you reach the next turning point.
You will use the corner hole five times so be careful not to pull this too tightly to avoid making the hole large and unsightly.
Turning an inside corner
To work buttonhole stitch around an inside corner, take the needle down at E (diagram above). Bring it back up over the thread to form the loop at the corner point.
Joining a new length of thread
Whilst stitching the buttonhole stitch edging around your free Hardanger pattern, you may come to the end of your current piece of thread.
There is a method of adding a new length without the join showing.
Do NOT end at a corner!
Leave the old thread to one side and secure the new one through the back of the existing stitches. Bring the new thread through one hole to the right of the last stitch (at point F on the diagram above). Continue stitching as before.
To complete the join, slip the old thread through the first loop made after the join and take the needle down through the fabric at G to fill in the missing upright stitch. Fasten off at the back of the work.
Stitching the Eyelets
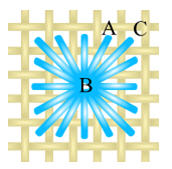
When you have completed the buttonhole edge of your free hardanger pattern, work the square eyelets where marked on the chart using the finer no. 8 thread.
Pulling firmly will enlarge the centre hole.
To achieve a neat eyelet start at point A (on the diagram below), one hole away from the corner. Take the needle down into the centre hole B and up at C to continue the eyelet.
Cutting the fabric threads
Next, take a sharp, pointed pair of scissors and begin cutting. The chart shows red lines inside the Kloster blocks, which denote the fabric threads to cut.
I like to use a needle to make a channel for the scissors to fit into.
Take your needle and insert the tip before the first fabric thread that you need to remove, bring the needle back up again after the last thread. Here, you will end up with four fabric threads on the needle.
Pull the needle firmly towards what will be the hole in the fabric to open the threads a little. This gap will be big enough to slip the point of the scissors into. Keeping the scissor blades open gather the four threads and double check before closing the blades and snipping the threads in one movement.
Using tweezers gently pull on the cut threads to remove them from the work. Have a tub handy in which to put the discarded threads.
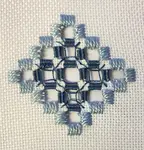
Needleweaving and doves eyes
Once the cutting is finished you will be left with open areas surrounded by four empty fabric threads.
Using the finer no. 8 pearl cotton, you will needleweave these together to form neat bars.
Attach the thread to the back of the Kloster blocks and then take your needle under two threads, over two, backwards and forwards until the once naked bar is comfortably filled with stitches. Don't squeeze too many stitches in otherwise your bars will bend and not look as tidy in the finished piece.
After needleweaving three sides of the "square" left by the withdrawn threads, you need to just work half of the fourth bar, at which point we will work a doves eye filling stitch.
I have given directions for these in lesson 2.
Finishing your free hardanger pattern
Once all stitching is complete, it is time to cut away the excess fabric around your Hardanger bookmark. Turn your work over so that you are cutting from the wrong side. You will get the scissors closer this way. Gently push the looped edge of the buttonhole stitches aside whilst you cut beneath them. Take it slow, don't rush!
I hope you have enjoyed stitching this free Hardanger pattern. If you are not an avid reader, you could give your bookmark to a friend who will marvel over your skills!
Check out the other lessons in the course here.

You might like these
Hemstitch: Enhance Your Needlework with Fine Handcrafted Touches
Learn how to hemstitch your embroidered pieces with our easy-to-follow instructions and detailed step-by-step photographs.
Beginner-Friendly Hardanger Patterns by Carol Leather
Discover Hardanger embroidery. Shop beautiful, modern patterns by Carol Leather with clear, step-by-step instructions. Instant PDF downloads available!
Learn Hardanger Needlework | Step-by-Step Beginner Lesson 1
Start your Hardanger needlework course today. Free patterns and detailed instructions in this beginner-friendly lesson. Part 1 of a series of 6 lessons.

You might like these
Learn hardanger embroidery in easy step-by-step stages
Learn hardanger embroidery step by step. Stitch our free hardanger patterns with full instructions with this series of lessons
Free Hardanger Patterns: Festive Christmas Card Design
Make your own beautiful Christmas cards with our free hardanger patterns. Download and stitch this festive design for a unique and personalized touch
Learn Hardanger Needlework | Step-by-Step Beginner Lesson 1
Start your Hardanger needlework course today. Free patterns and detailed instructions in this beginner-friendly lesson. Part 1 of a series of 6 lessons.
Stay connected between projects
If you’d like occasional updates from my embroidery room, including new patterns, gentle tips, and little things I think you might enjoy, you’re warmly invited to join the Stitchin’ Times newsletter.
About Me - Contact Carol - Privacy Policy - Site Map - Testimonials
Please do not copy the content of this site. It is protected by Copyscape.
Copyright © 2006- www.needlework-tips-and-techniques.com All rights reserved