- Home
- What do I need?
- Magnification for Embroidery
EMBROIDERY EQUIPMENT
Magnification for Embroidery: How to Choose the Right Lamp and Lens
Better light, better magnification, better stitching, and far less eye strain
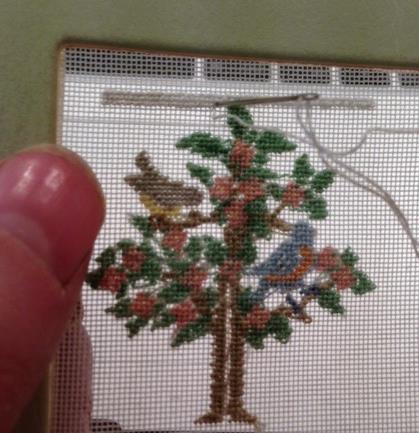
Magnifying lamps are not just for older adults. Anyone who does detailed needlework, crafts, or even reads fine print can benefit from using one.
If you do embroidery in the evening and rely on an ordinary desk lamp, you may find the lighting rather harsh. It doesn't provide the best colour balance either, which matters when you're trying to match threads accurately.
Natural light is always ideal. Try choosing a table next to a sunny window when you can. But in winter, or during evening stitching sessions, that's not always an option.
A magnifying lamp solves this by spreading bright, even light across your work with no shadows or glare.
The Benefits of Using a Magnifying Lamp
When you can see your work clearly, everything gets easier. You stitch for longer without tired eyes, your colour choices are more accurate, and you spot mistakes before they become unpicking sessions.
But the benefit I think matters most is colour matching. Poor lighting plays tricks on your colour perception, so you can end up choosing the wrong shade without realising. A quality magnifying lamp cuts through that problem.
Reduced Eye Strain
Even illumination without harsh glare means your eyes can work comfortably for longer sessions
Accurate Colour Matching
Quality light helps you see true thread colours, so you can match shades with confidence
See Fine Detail
Magnification lets you see individual fabric threads and stitch placement clearly
Gone are the days when lacemakers used a lighted candle behind a glass of water, which magnified the light enough for them to keep working after the sun went down. We have it rather easier now!
What Are the Symptoms of Eye Strain?
How do you know if poor lighting is straining your eyes? These are the telltale signs:
✗ Your eyes feel itchy, watering, and sore
✗ You suffer from blurred or double vision
✗ You have severe headaches after stitching
✗ You notice an increased sensitivity to light
✗ You find it difficult to concentrate on your needlework
There is now such a wide choice of magnification lamps available, suitable for wherever you do your needlework, that you can wave eye fatigue goodbye. Even better, they don't need to break the bank!
How Do You Choose a Magnifying Lamp?
So what should you look for? Here are the things that actually matter.
LED lighting: the modern standard
Virtually all quality magnifying lamps now use LED lighting, and for good reason. LEDs last up to 50,000 hours (roughly 20 years of typical use), compared to just 3,000 hours for old halogen bulbs. They also run cool, so there's no heat building up near your work, and they give you steady, flicker-free light.
If you come across a lamp that still uses halogen or fluorescent bulbs, I'd steer clear. The technology has moved on, and you'll get a much better stitching experience with LED.
Many modern LED lamps also offer adjustable brightness levels, which is a lovely feature. You can dial the light up for fine detail work, then soften it for more relaxed stitching.
Size, weight, and portability
Will you be using your lamp at home only, or do you need it to be portable enough to take to classes or stitching groups?
Some magnifying lamps are nearly three feet tall, while others extend about half that height, making them more suitable for cramped work areas.
Larger bases can easily take up an entire table. If you'll be using your lamp frequently, look for one with a smaller footprint that clamps to the edge of your work table instead.
Stability and adjustability
Make sure the base is solid enough that it won't tip over when you adjust the arm. It should hold its position firmly but still be easy to move around.
Lamp and lens configurations
You'll find two main styles. One has a separate lamp and magnifying lens on their own flexible goosenecks. The other has a circular LED ring around a central magnifying lens. The ring-light style is popular because it casts even light directly onto your work without shadows.
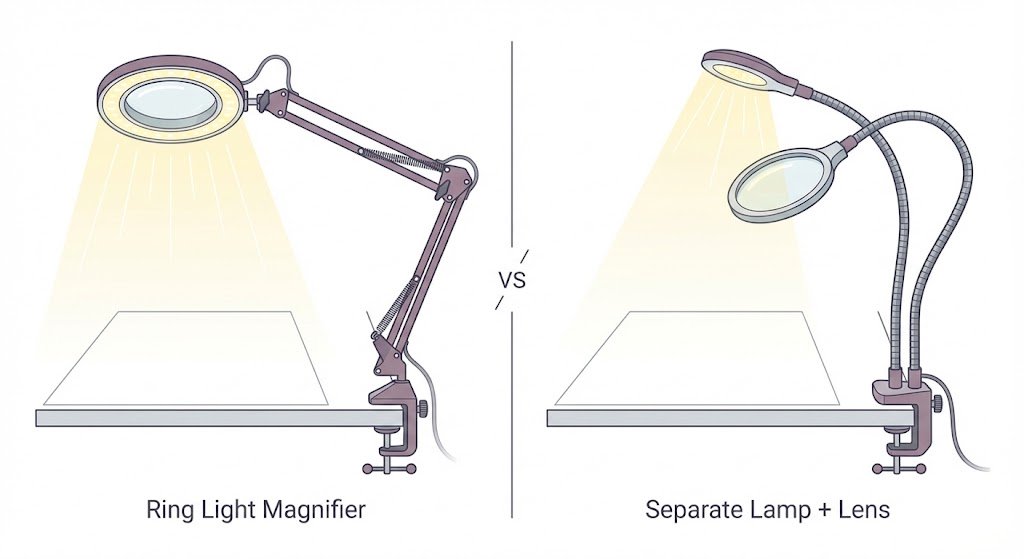
Some lamps come without a magnifying glass, which is useful if you already have a separate magnifier or just need better light.
Modern Features Worth Having
Today's magnifying lamps come with features that would have seemed like science fiction to those candlelit lacemakers. Here are the ones that genuinely make a difference for needlework:
Dimmable Brightness
Nearly universal on quality lamps now. Lets you dial the light up for fine detail or soften it for relaxed stitching
Adjustable Colour Temperature
Switch between warm, neutral, and cool daylight modes. Invaluable for colour matching
Lens Cover
A surprisingly important safety feature. An uncovered lens can focus sunlight like a burning glass
Glass Lens
More scratch-resistant and clearer than acrylic. Worth the small extra cost if you stitch frequently
USB Connectivity
Plug into a power bank or laptop. Perfect for stitching groups and classes where plug sockets are scarce
Types of Magnification
Magnifying lamps come with different lens sizes and strengths. Understanding the basics will help you pick the right one for your stitching.
Lens size
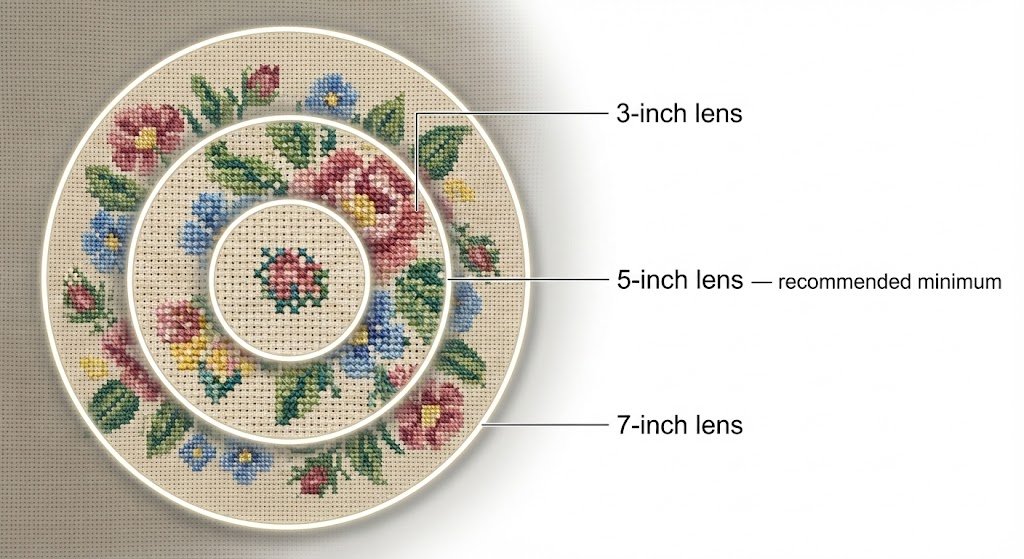
Modern magnifying lamps typically come with lenses ranging from about 3 inches to 7 inches in diameter. For embroidery, I'd recommend a 5-inch lens as the minimum. Anything smaller and you'll find yourself constantly repositioning your work to keep it in the magnified area.
If you do a lot of detailed needlework or work on larger projects, a 7-inch lens is well worth the investment. The broader viewing area means less shuffling and more uninterrupted stitching time. You'll notice the difference straight away.
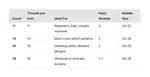
Magnification power
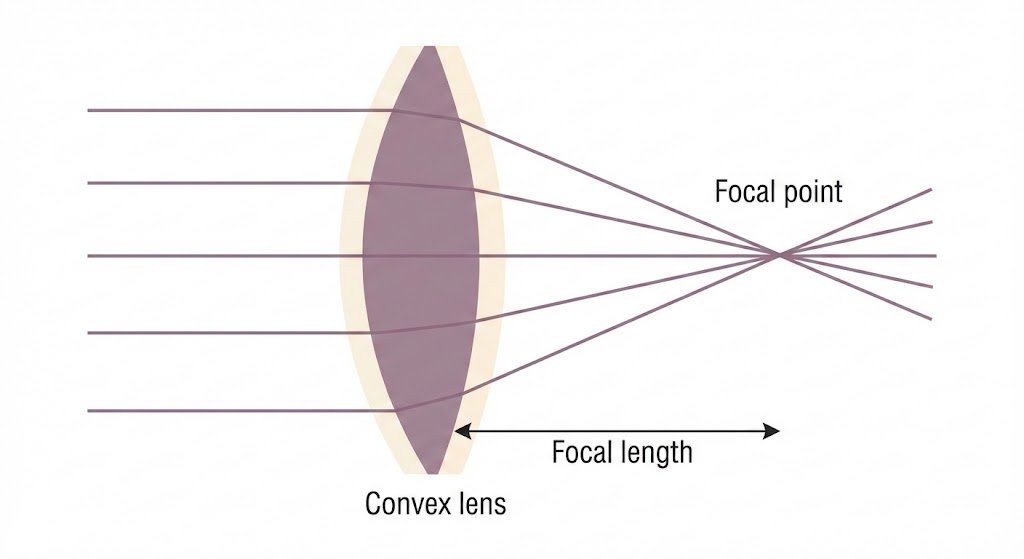
You'll find magnification expressed either in dioptres or as 2x, 3x, and so on. I'll keep this simple.
A dioptre measures how curved the lens is. The more curved (thicker in the middle), the stronger the magnification. You don't need to remember the formula. This table does the maths for you:
Dioptre to magnification
3 dioptres = 1.75x magnification
5 dioptres = 2.25x magnification
8 dioptres = 3x magnification
What Strength Do You Need?
Here's the trade-off: stronger magnification means the lens sits closer to your work and shows you a smaller area.
So buying a really strong magnifying lamp won't necessarily be your best option. You need room to pull the thread through the fabric without hitting the lens and scratching it with your needle!
For most embroidery work, the sweet spot is 1.75x to 2.25x magnification (that's +3 to +5 dioptres if you refer back to the table above). If you're just starting to feel the need for magnification, 1.75x may be all you need. Jumping straight to 2.25x can feel like overkill, and the reduced working distance takes getting used to.
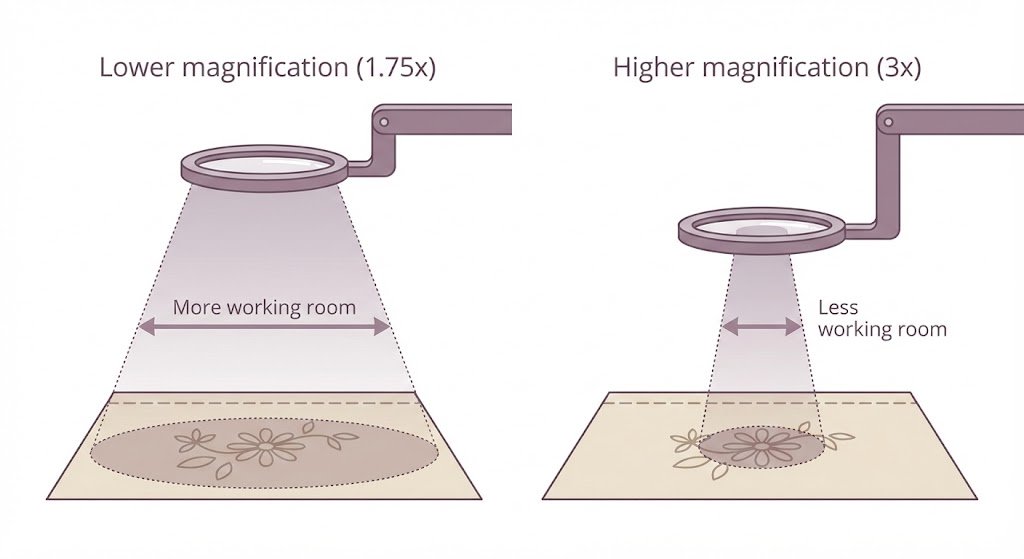
Personally, I opted for 2x, which sits right in the middle of that range. It gives me a nice balance between seeing fine detail and having enough working room to stitch comfortably.
Colour Rendering Index (CRI)
Here's something that most magnifying lamp reviews don't mention, but it makes a real difference for needlework: the Colour Rendering Index, or CRI.
CRI is a score from 0 to 100 that tells you how accurately a light shows true colours. A score of 100 means it's identical to natural sunlight.
Why does this matter? Think about the last time you chose a thread colour under your desk lamp, only to discover it looked completely different in daylight. That's low CRI at work. The light was changing how you saw the colour.
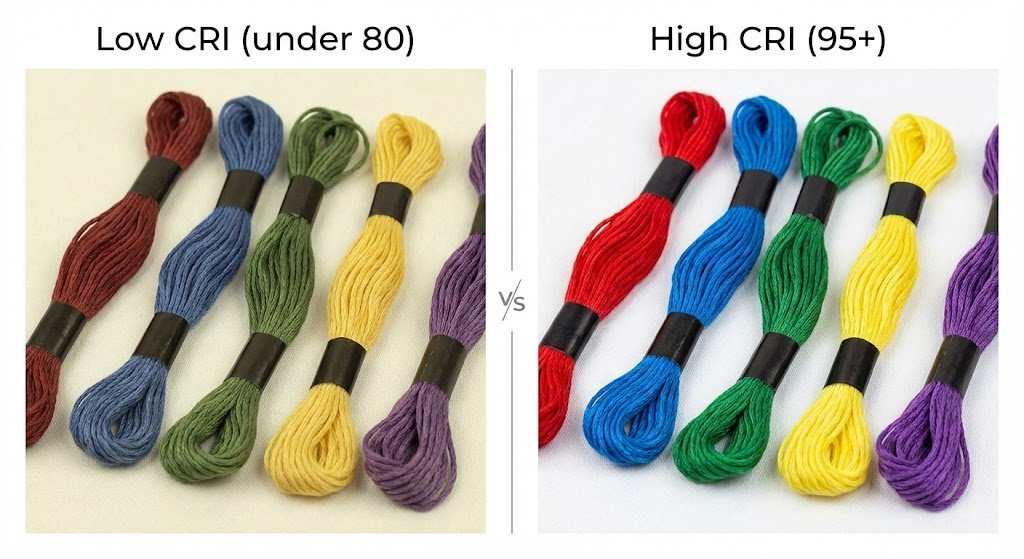
For matching thread colours accurately, look for a CRI of 90 or above. A CRI of 95 or higher is ideal. At that level, your threads and fabrics will look essentially the same as they would in natural daylight.
CRI quick guide
CRI 80-89 = Acceptable for general use
CRI 90-94 = Good for needlework
CRI 95-100 = Excellent, true-to-life colours
When shopping, look for CRI in the product specifications. It's not always prominently displayed, but quality craft lamps will list it. If a lamp doesn't mention CRI at all, that's usually a sign it's not very high.
Colour Temperature
Normal household bulbs give out warm, yellowish light at around 2700 kelvin. That's fine for creating a cosy atmosphere, but it's not ideal when you need to match colours accurately.
For embroidery, look for a lamp that offers daylight-equivalent lighting in the 5000K to 6000K range. This is closest to natural daylight and gives you the truest colours for your threads and fabric.
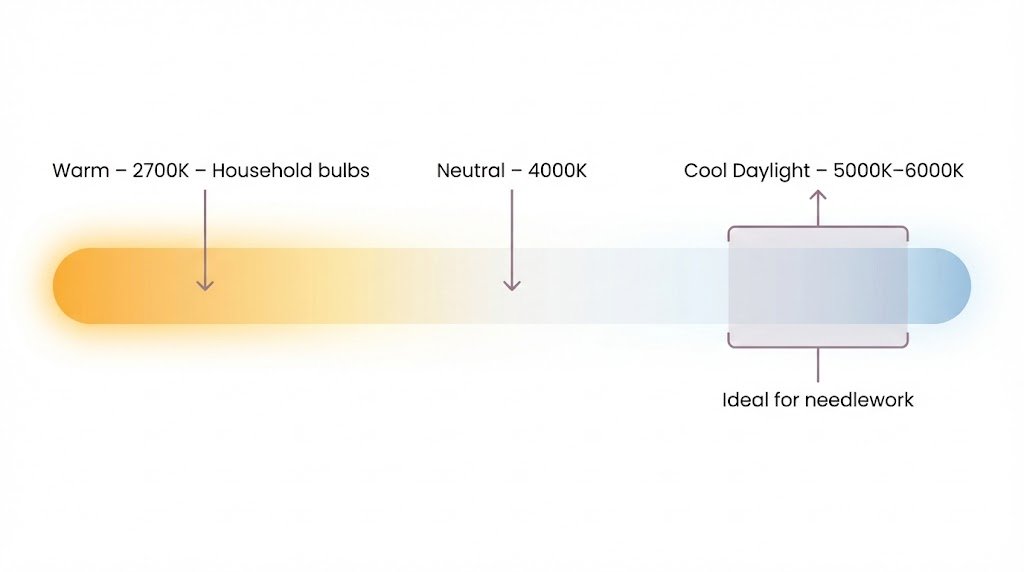
Here's the good news: many modern LED magnifying lamps now offer adjustable colour temperature. This means you can switch between warm light (around 3000K for relaxed evening stitching), neutral light (4000K), and cool daylight (5000K-6000K for colour matching). It's a wonderful feature that gives you the best of both worlds.
If your budget only stretches to a single fixed colour temperature, go for one in the 5000K-5500K range. That'll serve you well for most needlework tasks.
Popular Brands to Consider
Several brands have built strong reputations in the embroidery community. I'm not affiliated with any of them. These are simply the names that come up again and again when stitchers share what works for them:
Brightech
Known for their LightView Pro series with quality glass lenses and sturdy construction. A solid all-rounder that many stitchers swear by.
Daylight Company
Highly regarded for colour-accurate daylight LEDs. Their StitchSmart and MAGnificent models are popular choices among needleworkers.
Neatfi
Offers the XL series with large 7-inch lenses and high lumen output. Great if you want a generous viewing area.
Purelite
Another trusted name among needleworkers, with a range of craft-focused lamps designed with stitchers in mind.
Carson
The DeskBrite 200 is a budget-friendly option that punches above its price point. Worth a look if you're just starting out.
Prices and models change frequently, so it's always worth checking recent reviews before you buy. What matters most is finding a lamp that ticks the boxes we've covered: good CRI, daylight colour temperature, and a lens size that suits your work.
What I Actually Use
I love good illumination. I have three lamps for sewing, and each one earns its place because they solve different problems.
Desk lamp with a daylight bulb
This is my main lamp. It sits on my desk and floods my work area with bright, even light. It's perfect for long sessions where I need accurate colour matching, and it's where I do most of my stitching.
Clip-on lamp for my hoop
When I don't want to disturb my husband while he's watching TV, or when I'm stitching away from home, this little lamp clips right onto my hoop. It's lightweight and portable, and gives me enough light to stitch anywhere.
LED ring light magnifier
My favourite. The ring of LEDs surrounds the magnifying lens, so the light falls directly onto my work with no shadows. It's perfect if you always stitch in one room. But it's heavy, so I don't carry it around.
Between the three of them, I can stitch anytime, anywhere, without picking up the wrong coloured thread. If we ever meet, ask me about the foxes!
Browse craft lamps on Amazon (affiliate link)
Standalone Magnifiers
A magnifying lamp combines light and magnification in one unit. But sometimes you already have good lighting and just need a magnifier on its own. Here are the main options.
Neck magnifiers
Many of my students use a magnifying glass that hangs around the neck (affiliate link) with little "feet" that stand on their chest. Some also have a built-in light. They're economical and popular.
I tried them, but they didn't work for me. I kept losing focus on the fabric when I moved, and the magnifier kept slipping, so I had to keep adjusting it. They might suit you though, especially if you stitch fairly still and want something lightweight and affordable to start with.
Clip-on magnifiers
If you wear glasses, clip-on magnifiers attach to your frames and flip up when you don't need them. They keep the magnification close to your eyes, which some people prefer. The downside is they only work with glasses, and the clip can feel heavy on lighter frames.
Headband magnifiers (my pick)
I like my magnifier close. After trying neck magnifiers and clip-ons, I settled on MagEyes.
This headband magnifier sits comfortably on your forehead, keeping the lenses at an ideal distance from your eyes. Hinged arms let you push the lenses up out of the way when you don't need them. You can wear them with or without glasses.
Different lens strengths are available, so you can start with a mild magnification and swap to a stronger one later without buying a whole new unit.
In Summary
A good magnifying lamp will reduce eye strain, improve your colour matching, and let you stitch comfortably for longer. When choosing, the key things to look for are: LED lighting, a CRI of 90+, daylight colour temperature (5000K-6000K), a lens of at least 5 inches, and a magnification strength that gives you room to work (1.75x to 2.25x for most embroidery). And don't forget that lens cover!
The technology has come a long way. Today's lamps are lightweight, adjustable, energy-efficient, and won't break the bank. Your eyes (and your stitching) will thank you.
See our full guide to getting started with the right equipment
You might like these
Small Sewing Space Tips for Embroidery Lovers
Make a small sewing space work in a busy home with clever storage, compact surfaces and details that let stitchers and makers create without clearing tables.
Rayon Embroidery Thread - From Tangles to Triumphs
Love-hate relationship with rayon embroidery thread? Go from frustration to flawless stitching - discover the secrets and techniques that work
Organizing Embroidery Floss: Storage Ideas That Actually Work
Stop hunting through tangled skeins. Bobbin boxes, project cards, floss bags, and other storage ideas to keep your thread collection tidy and findable.

Stay connected between projects
If you’d like occasional updates from my embroidery room, including new patterns, gentle tips, and little things I think you might enjoy, you’re warmly invited to join the Stitchin’ Times newsletter.
About Me - Contact Carol - Privacy Policy - Site Map - Testimonials
Please do not copy the content of this site. It is protected by Copyscape.
Copyright © 2006- www.needlework-tips-and-techniques.com All rights reserved