- Home
- Basic embroidery stitches
- Blanket Stitch
- Turning corners
BLANKET STITCH
How to Turn a Corner with Blanket Stitch
A simple, step-by-step method for sharp outside and inside corners that stay neat every time.
You're stitching along happily, your blanket stitch border is looking lovely, and then you reach the corner. Suddenly you're staring at the fabric, wondering how to get around it without creating a bulky, uneven mess.
If that sounds familiar, you're in exactly the right place. Corners feel tricky until someone shows you the method, and then they become one of those satisfying little moments where everything clicks into place.
What follows is a clear, counted approach to both outside and inside corners. No guesswork, no fiddling. Just a reliable technique you can repeat every time.
How to Stitch a Perfect Outside Corner
The whole secret to a crisp outside corner is surprisingly simple: you let a few key stitches share the very same hole. This creates a neat little fan that guides your thread smoothly around the bend.
It works especially well on evenweave fabric, where counting threads keeps everything precise.
Step 1: Stitch up to the edge
Work your blanket stitch border as normal. Stop when you are one space away from the corner hole.
Step 2: Make the turn with three sharing stitches
Now for the satisfying part. To create the turn, you'll work three diagonal stitches, and all three come up through that same corner hole. This fan of stitches is what gives you a clean, sharp angle.
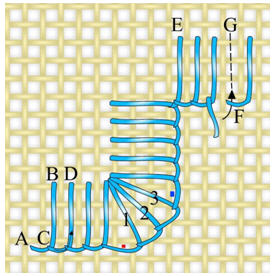
Step 3: Carry on stitching
Once your three turning stitches are complete, skip over the next empty hole on the new side and continue your blanket stitch as normal along the new edge.
And just like that, you've turned the corner.
Tackling the Inside Corner
If you managed the outside corner, you'll find this even simpler. There's no fan of stitches needed here. Instead, one single, tidy loop anchors the turn perfectly.
Step 1: Stitch into the corner point
When you reach the inside corner, take your needle down directly into the corner point.
Step 2: Secure the loop
Bring your needle back up just over the working thread and pull gently. You'll see a neat little loop form that secures the corner in place.
That's genuinely all there is to it. Now you can carry on stitching along the next side, confident that everything is tidy and secure.
Running Out of Thread at a Corner?
Stitching a long border often means starting a new length of thread partway through. If you notice your thread running short as you approach a corner, don't panic.
There's a wonderfully neat method for joining a new thread so the join is practically invisible. You can find the full step-by-step in our guide to changing thread in blanket stitch.
Now Go Add a Beautiful Border
With these two techniques, you can stitch a continuous blanket stitch border around anything you like. A handmade felt book, a cosy fleece blanket, a sweet little appliqué. Those once-tricky corners are now just another part of the rhythm.
Once you're comfortable with neat corners, why not add more personality to your borders? Our guide to blanket stitch variations covers whipped lines, scallops, and other decorative effects.
Blanket Stitch: The Complete Guide
New to this stitch? Our step-by-step guide covers everything from your first loop to neat, even edges.
Go to the guide →How to Change Thread in Blanket Stitch
Running out of thread mid-row? This quick tutorial shows you a neat, invisible way to join a new thread without breaking your rhythm.
Learn the method →You might like these
Learn Feather Stitch Embroidery: Step-by-Step Tutorials & Variations
Feather stitch embroidery made easy! Step-by-step guide with videos, creative variations, and pro tips for embroidery enthusiasts of all levels
Couching Stitch Embroidery: Types, Techniques & Designs
Explore couching stitch embroidery with easy step-by-step photos. Discover different types, creative designs, and add stunning texture to your projects.
A Beginner's Guide to Split Stitch for Lines and Fillings
Learn how to embroider with split stitch! This step-by-step guide shows you how to create smooth outlines and filled shapes for your embroidery projects
Stay connected between projects
If you’d like occasional updates from my embroidery room, including new patterns, gentle tips, and little things I think you might enjoy, you’re warmly invited to join the Stitchin’ Times newsletter.
About Me - Contact Carol - Privacy Policy - Site Map - Testimonials
Please do not copy the content of this site. It is protected by Copyscape.
Copyright © 2006- www.needlework-tips-and-techniques.com All rights reserved