- Home
- What do I need?
- Embroidery Hoops and Frames
EMBROIDERY EQUIPMENT
Embroidery Hoops and Frames: Which Do You Need?
Hoops, scroll frames, slate frames, lap frames, and floor stands explained
Every type of hoop, frame, and stand does the same basic job: it holds your fabric taut while you stitch. That tension is what keeps your stitches even and your finished work smooth.
But the options can be confusing, especially when you're starting out. Do you need a hoop or a frame? What about a stand? This page explains the differences so you can choose the right one for the way you stitch.
Hoops vs Frames
A hoop is circular. Your fabric sits between two rings, and a screw tightens the outer ring to hold everything in place. You can slide a hoop around your fabric to work on different areas.
A frame is rectangular. Your fabric attaches to bars along the top and bottom (and sometimes the sides). Frames hold larger pieces of fabric under steady, even tension without needing constant adjustment.
When a hoop works best
- Small to medium projects
- Surface embroidery and cross stitch
- When you want portability
- Quick projects you can move around
When a frame works better
- Larger or longer projects
- Counted thread and Hardanger work
- When you need even tension across the whole piece
- When you want both hands free (with a stand)
If you're a beginner, start with a hoop. It's the simplest way to get stitching. Most embroiderers add a frame later when their projects grow bigger or their techniques demand more consistent tension.
Scroll Frames
If you're not into hoops, scroll frames are the classic alternative. They're traditionally used for needlepoint, but they work brilliantly for embroidery too.
A scroll frame has wooden rollers on the top and bottom with webbing strips attached to each one. Side bars slot through the rollers and stretch the fabric between them. You can get them in different sizes.
Setting up a scroll frame
You need bars wider than your fabric. The length of the side pieces doesn't matter because you'll wind any excess fabric around the top and bottom rollers.
Use strong thread to tack your fabric to each webbing strip. Then wind the extra fabric around one or both bars until you can comfortably reach the area you're stitching.
For counted thread work, which usually starts in the centre of the fabric, wind an equal amount onto both bars so the middle is exposed. You can also lace the fabric edges to the side bars to keep everything under tension.
Slate frames
A slate frame is a variation where you pin the fabric down rather than rolling it around the bars. This keeps the fabric very tight, which is ideal for techniques that need firm, even tension.
The trade-off is that your entire design needs to fit inside the frame. You can't wind and unwind the fabric the way you can with a scroll frame, so these work best for smaller pieces.
Modern Frames
Modern frames eliminate the fiddly business of tacking your fabric to webbing strips. There are two main types:
Slotted bar frames
These have grooves in the top and bottom bars. Your fabric goes over the slots and a wooden dowel presses it into the groove to hold it tight. Quick to set up and easy to adjust.
Snap-together frames
Four plastic or PVC tubes snap together at the corners. The fabric goes over the tubes and clip-on covers keep it in place. Lightweight, portable, and available in a range of sizes.
Lap Frames and Floor Stands
Holding a hoop or frame for any length of time can tire your non-stitching hand. A lap frame or floor stand supports the frame for you, freeing up both hands for stitching. This makes the work faster and more comfortable, and it's particularly helpful for techniques that need two hands, like the "stab" method.
Lap frames
Lap frames sit across your lap or rest on a table. They come in two types:
- Fixed hoop or frame: The hoop is built into the stand. Simple and stable, but you're limited to one size.
- Universal clamp: A clamp that fits any size hoop or frame. More versatile, and you can swap between projects easily.
If you stitch in different spots around the house, a lap frame is easy to pick up and move with you.
Floor stands
I often use a sturdy wooden or metal floor stand for stitching. They're heavier than lap frames, but that weight keeps them solid and steady.
Some stands have attachment points for accessories like lamps, magnifiers, chart holders, and magnets. The magnet is wonderful for keeping your threaded needles in place for later use, especially when you're working with multiple colours.
A good floor stand will last for years. And if it looks nice, you can leave it out as a piece of furniture between stitching sessions rather than packing it away.
Which Should You Choose?
There's no single right answer. It depends on what you stitch, where you stitch, and how long your sessions are. Here's a quick guide:
Just starting out?
Begin with a good quality wooden embroidery hoop (6 inches is ideal). It's all you need to get stitching.
Projects getting bigger?
Try a scroll frame or modern frame. You'll appreciate the even tension and the ability to work on larger pieces.
Hands getting tired?
Add a lap frame or floor stand. Once you've stitched with both hands free, you'll wonder how you managed without one.
Building Your Setup
You don't need to buy a hoop, a frame, and a stand all at once. Start with whichever suits your current project, and add to your setup as your stitching evolves. The right combination will come naturally as you discover what feels comfortable.
Everything you need for your stitching toolbox
You might like these
Rayon Embroidery Thread - From Tangles to Triumphs
Love-hate relationship with rayon embroidery thread? Go from frustration to flawless stitching - discover the secrets and techniques that work
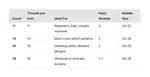
Aida Cloth Guide: Compare 11, 14, 16 & 18 Count (With Chart)
Which Aida count is right for you? Compare 11, 14, 16 and 18 count with a video guide, stitch chart, and needle and floss recommendations for each.
Small Sewing Space Tips for Embroidery Lovers
Make a small sewing space work in a busy home with clever storage, compact surfaces and details that let stitchers and makers create without clearing tables.

Stay connected between projects
If you’d like occasional updates from my embroidery room, including new patterns, gentle tips, and little things I think you might enjoy, you’re warmly invited to join the Stitchin’ Times newsletter.
About Me - Contact Carol - Privacy Policy - Site Map - Testimonials
Please do not copy the content of this site. It is protected by Copyscape.
Copyright © 2006- www.needlework-tips-and-techniques.com All rights reserved