- Home
- Basic embroidery stitches
- Blanket Stitch
- Blanket Stitch Variations
BLANKET STITCH
3 Fun Decorative Blanket Stitch Variations
Simple twists on a classic stitch that look far more impressive than they are to work.
You know that lovely, rhythmic feeling of working a row of blanket stitch? The gentle loop, the satisfying pull. Once you've settled into that rhythm, it's only natural to wonder, "What else can I do with this?"
Quite a lot, as it turns out. With small changes to how you place, space, or layer your stitches, you can create effects that look beautifully intricate, yet feel just as relaxed to work.
Each of the three variations below builds directly on the basic blanket stitch you already know. No new skills required, just a fresh angle on a familiar friend.
The Charming Whipped Blanket Stitch
This is a wonderful place to start if you've never tried embellishing a stitch before. You work a standard row of blanket stitch first, then weave a second thread through the loops to create a twisted rope effect along the bottom edge.
The result looks bold and textured, perfect for outlines or adding a pop of a second colour.
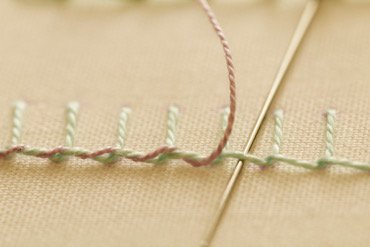
How to do it
- Stitch a standard row of blanket stitch along your line.
- Thread a second needle with a contrasting colour (I used the same Perle no. 8 in a different shade). Pass your needle under each loop along the corded bottom edge, always working in the same direction.
The Leafy Barb Stitch
Also known as back-to-back blanket stitch, this variation creates something that looks wonderfully like a tiny fern or branch. It's one of those stitches that makes people say, "You did that by hand?" and it's genuinely simpler than it looks.

How to do it
- Work two rows of blanket stitch so they mirror each other, back-to-back.
- Using a third thread, whip the looped edges of both rows together down the centre. This creates the "stem" of the fern.
The effect is remarkably realistic, especially when stitched with a hand-dyed thread. Imagine these in autumnal golds and browns for a fall-themed sampler or cushion.
Playful Scallops & Buttonhole Wheels
This is where one simple idea, changing the height of your stitches, opens up a whole family of shapes. Circles, scallops, wavy lines. All from the same basic blanket stitch you already know.
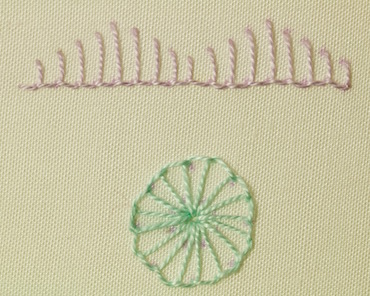
To create scalloped edges
Simply vary the length of your blanket stitches as you work along a line. Gradually increase the stitch height to form a "hill," then decrease it again to create a "valley." Repeat the pattern for gentle, rhythmic scallops.
To form a buttonhole wheel
Work your stitches in a circle, always taking the needle down into the same central point to form the spokes of a wheel.
If you'd like to take that idea further into texture, the raised buttonhole stitch flower creates a more dimensional result using a variation of the basic stitch. It's a lovely next step when you're ready.
Time to Play
And just like that, you have three new ways to get creative with a classic stitch. The real fun begins when you start experimenting with different thread types, thicknesses, and colour combinations to see what effects you can create.
If you're using these variations on an edge, you may also want to read my guide to turning corners with blanket stitch.
Grab your hoop, pick a variation, and enjoy the process.
Blanket Stitch: The Complete Guide
Need to brush up on the basics? This step-by-step guide covers everything from your first loop to neat, even edges.
Go to the guide →How to Change Thread in Blanket Stitch
Running out of thread mid-row? This quick tutorial shows you a neat, invisible way to join a new thread without breaking your rhythm.
Learn the method →STAY IN TOUCH
Stay Connected Between Projects
If you'd like occasional updates from my embroidery room, including new patterns, gentle tips, and little things I think you might enjoy, you're warmly invited to join the Stitchin' Times newsletter.
You might like these
How to Change Thread in Blanket Stitch: A Simple Guide
Running out of thread in your blanket stitch project? Learn a simple, neat method for joining a new thread seamlessly with this quick step-by-step tutorial.
Blanket Stitch Embroidery: Step-by-Step Tutorial and video
How to do blanket stitch in embroidery, step by step with photos and video. Includes variations, plus tips for neat, evenly-spaced stitches.
Stay connected between projects
If you’d like occasional updates from my embroidery room, including new patterns, gentle tips, and little things I think you might enjoy, you’re warmly invited to join the Stitchin’ Times newsletter.
About Me - Contact Carol - Privacy Policy - Site Map - Testimonials
Please do not copy the content of this site. It is protected by Copyscape.
Copyright © 2006- www.needlework-tips-and-techniques.com All rights reserved